background image

MicronNav 200 Hardware Manual 

0734-SOM-00002-01 

Page 21 of 27


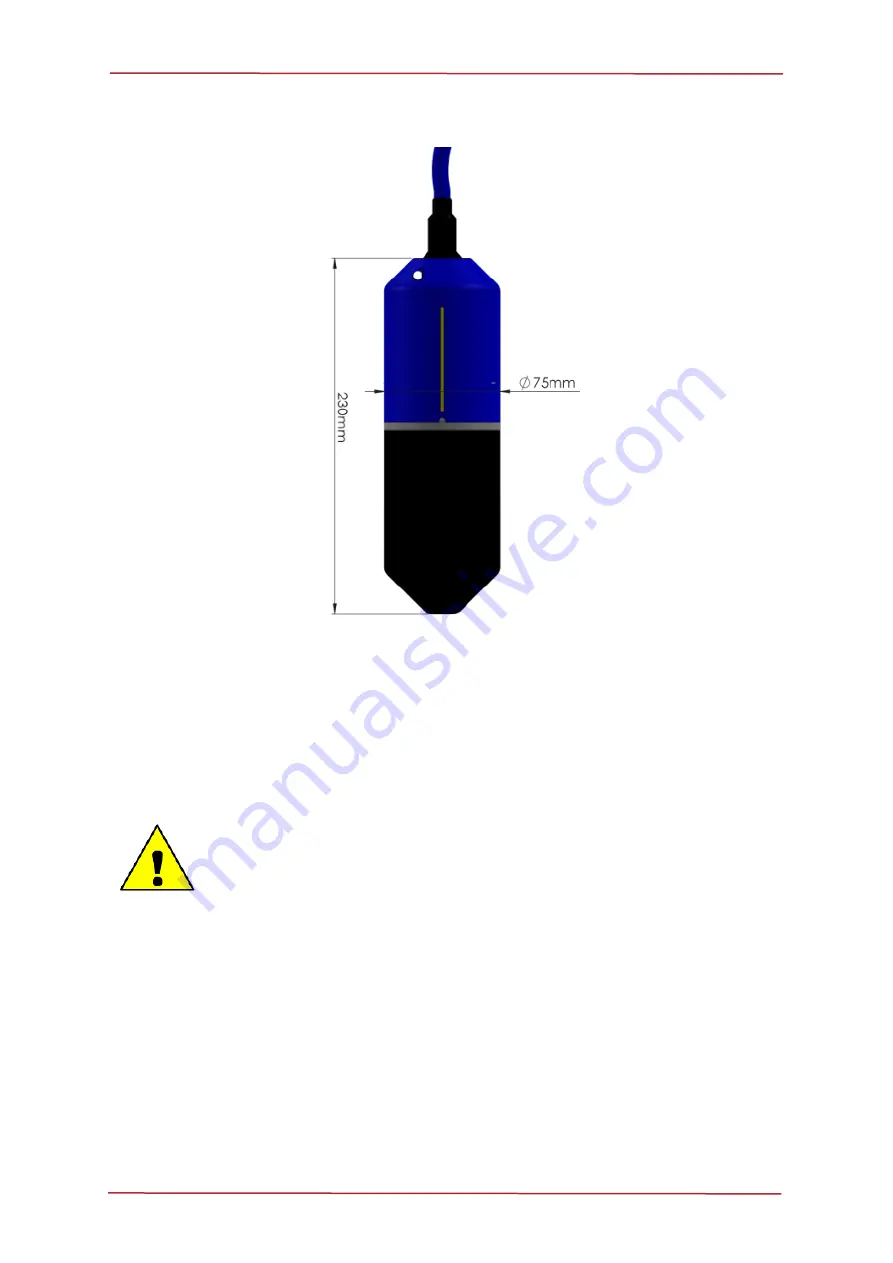
The yellow line indicating the front of the USBL Dunking Transducer. 


Mounting Depth  
 

Mount the USBL Dunking Transducer head at least 1m to 2m below the surface of the water.  


Caution 

The USBL Dunking Transducer head is rated to a depth of 30m and must 
not exceed this depth.  


Содержание 0734-SOM-00002-01

Страница 1: ...MicronNav 200 Hardware Manual 0734 SOM 00002 01 Page 1 of 27 MicronNav 200 System Hardware Manual 0734 SOM 00002 01 ...

Страница 2: ...ied by Tritech International Ltd on the understanding that it may not be copied used or disclosed to others except as authorised in writing by Tritech International Ltd Tritech International Ltd reserves the right to change modify and update designs and specifications as part of their ongoing product development programme All product names are trademarks of their respective companies ...

Страница 3: ...ce Hub 11 USBL Dunking Transducer 12 Battery Modem 13 Micron Modem 14 Electrical Connections and Pin Outs 15 MicronNav 200 Hub 15 Tritech Micron Connector 17 Using the MicronNav Hub 18 System Installation 19 Using the MicronNav System with Tritech Sonars 19 Reducing Magnetic Interference 19 Mounting the USBL Dunking Transducer 20 Mounting the USBL Dunking Transducer to a Vessel 22 System Mobilisat...

Страница 4: ...are revision numbers 3 A clear fault description 4 Details of any remedial action implemented Contamination If the product has been used in a contaminated or hazardous environment you must de contaminate the product and report any hazards prior to returning the unit for repair Under no circumstances should a product be returned that is contaminated with radioactive material The name of the organis...

Страница 5: ...topic Important When this is shown there is potential to cause harm to the device due to static discharge The components should not be handled without appropriate protection to prevent such a discharge occurring Caution This highlights areas where extra care is needed to ensure that certain delicate components are not damaged Warning DANGER OF INJURY TO SELF OR OTHERS Where this symbol is present ...

Страница 6: ...ronNav 200 uses spread spectrum acoustic technology This provides a robust method for communication between the dunking transducers and the vehicle Micron Modem Micron Battery Modem The USBL Dunking Transducer can provide 180degree hemispherical coverage below the transducer which allows vehicle tracking in very shallow water Omni directional coverage is provided by the Micron Modem and Micron Bat...

Страница 7: ...tween 20 kHz and 28 kHz known as a CHIRP waveform By correlating the received signals with the CHIRP waveform it is possible to achieve superior performance in challenging multi path environments In addition identification of a unique transmission signature allows signals to be detected in extremely noisy conditions to the extent that communication is successful even when the signal to noise ratio...

Страница 8: ...ector other connector options and lengths are available USBL Dunking Transducer This is the subsea interface for the system responsible for communicating acoustically with the modems and contains an AHRS Attitude and heading reference system sensor 1 S11960 Micron Modem A standard system includes a single modem More can be purchased as necessary 1 S08155 MicronNav Connector Kit This includes solde...

Страница 9: ...modem can be configured to work as a Legacy modem operating as either a USBL or Data modem OR combining the two to provide both USBL positioning and Data transmission 1 S11992 6 pin Din Connector to Micron Connector 2 metre This cable is wired for both power and communications and allows for configuration of micron devices such as modem and sonar This is not standard equipment and may be purchased...

Страница 10: ... or 100bits s spread spectrum Tracking range 500m Horizontal 150m Vertical Range accuracy 0 2m Bearing accuracy 1 RMS determined by USBL integrated heading sensor Pitch Roll accuracy 0 2 Static 0 5 Dynamic typical Targets tracked 1 Responder or up to 254 Transponders Doppler tolerance 5m s Range is dependent on operating conditions 2 of 10m slant 0 2 of 100m slant 0 04 of 500m slant assumes correc...

Страница 11: ...5 36 VDC Power consumption 8 5W from either source with no external load Output voltage 33V when on AC Supply 31 5V when on DC supply Dimensions 232 x 185 x 52mm width depth height Weight 1 4kg Material Stainless Steel housing with Anodised Aluminium front fascia Temperature rating 5 to 35 C operational 20 to 50 C storage T T All dimension shown in mm ot to scale ...

Страница 12: ...g Transducer USBL Transducer Transmit source level 173dB re 1µPa at 1m Deck cable length 10m standard 20m 50m options Depth rating 30m Dimensions 75 x 250mm diameter length Weight in air 1 0kg Weight in water 0 1kg Temperature rating 10 to 35 C operational 20 to 50 C storage ...

Страница 13: ...MicronNav 200 Hardware Manual 0734 SOM 00002 01 Page 13 of 27 Battery Modem ...

Страница 14: ... 3 5W transmitting 0 28W receiving 3 5W transmitting 0 05W receiving Dimensions 56 x 77mm depth height 56 x 206mm depth height Weight in air 0 24kg 0 89kg Weight in water 0 08kg 0 45kg AC Charger N A 90 264VAC 47 63Hz 18W charging Temperature rating 10 to 35 C operational 20 to 50 C storage Battery Modem operational temperature limited to no less than 10 C during charging or while on external powe...

Страница 15: ...MicronNav 200 Hardware Manual 0734 SOM 00002 01 Page 15 of 27 Electrical Connections and Pin Outs MicronNav 200 Hub Ports A C Electrical Connection DE 9 Connector Face View ...

Страница 16: ...uld be used with a DIN 45322 6 pin plug and should be wired as follows Connector Face View AIF ARCNET Port Electrical Connection DA 15 AIF ARCNET connector and should be wired as follows ARCNET Connector Face View Note The voltage on pin 9 is selectable via an internal jumper the factory default is 33V 31 5V ...

Страница 17: ...cron Connector whip to the vehicle as applying power to the Communication lines could damage the electronic equipment Micron Connector Installation Precautions The connector sockets are not usable open face and should always be sealed with the blanking plug provided when not in use Care should be taken when mating the connector with either a plug or a blanking plug to ensure both mating ends are c...

Страница 18: ...ommunication activity that is currently taking place on each port A RED flash indicates communication from a device has been detected A GREEN flash indicates communication from the NavHub has been detected This can provide a visual aid in determining the status of equipment prior to any service work The next four rows of LEDs are used to indicate the communications protocol setup of each port All ...

Страница 19: ...nder and Responder modes of the Micron Modem Super SeaPrince Sonar Super SeaKing Sonar The Super SeaPrince DST and the Super SeaKing DST Sonars require the same Micron Standard to Tritech Connector Right Angle R A cable Part Number S09819 0 5M This type of sonar supports both Transponder and Responder modes of the Micron Modem Gemini Multibeam Sonars Transponder Mode is the only mode supported wit...

Страница 20: ...ng Transducer The yellow line on the top of the USBL Dunking Transducer indicates the front of the transducer head as can be seen in the illustration below This should be positioned facing in the required forward position to the fixed platform to ensure correct representation on the PPI display When mounting on a vessel this should be pointed towards the bow The USBL Dunking Transducer should be m...

Страница 21: ... yellow line indicating the front of the USBL Dunking Transducer Mounting Depth Mount the USBL Dunking Transducer head at least 1m to 2m below the surface of the water Caution The USBL Dunking Transducer head is rated to a depth of 30m and must not exceed this depth ...

Страница 22: ... is worth noting that the depths reported by the Transponder Responder will be below this depth The yellow line on the outside of the Dunking Transducer should be orientated with the bow of the vessel USBL Dunking Transducer Deployment Speed When operating the USBL Dunking Transducer from a vessel consideration should be given to the speed the vessel is likely to be travelling at As the resultant ...

Страница 23: ... reference line at 90 degrees Pre Dive System Checklist Apply power to the ROV or Modem Diver and Micron Nav System Run the Genesis software and setup the application Place the USBL Dunking Transducer next to the subsea Modem 10 cm in a bucket of water to check the acoustic communications link is operating correctly Warning To avoid internal damage to the transmit transducer it should not be opera...

Страница 24: ...OV Name S N MicronNav 200 Hub S N Dunk Trans S N Software Version Genesis Transponder S N Ground Tests Check cable connections Check Project Settings Check position updates by mating Dunking Transducer and Transponder Check position updates by move Dunking Transducer 10 cm away and above Transponder in a slow circular motion Fix Dunking Transducer rigidly at least 1 m away from ship and below wate...

Страница 25: ...nto any intermediate hubs between the unit and the PC Use the Microsoft Windows hardware Device Manager to check that all the USB drivers are correctly installed and setup on the PC The USB peripherals plugged into the front of the MicronNav Hub unit don t work Check that the MicronNav Hub is powered up correctly Check that the MicronNav Hub modules onboard peripherals and hub controller have corr...

Страница 26: ...a PC Check that ground connections are correct and made to the COMMS GROUND Check that baud rates and serial setup on both the device and the PC are correct Check the cable length used does not exceed the stated RS232 specification for the baud rate being used 10m or less for 115 2KBaud Check that if handshaking is required Port A is being used as it is the only port that supports RTS and CTS sign...

Страница 27: ...ification for the baud rate being used Check that there are no short circuit faults on the RS485 signals and voltage levels are 5V Check the port is correctly configured as RS485 mode through the Genesis Setup configuration interface Check that the correct termination has been fitted to the cable nominally 120Ω Check that the half duplex turnaround time is less than a half baud period on the RS485...

Отзывы: