background image

2

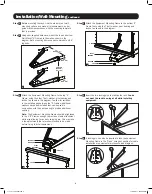
Installation/Wall-Mounting

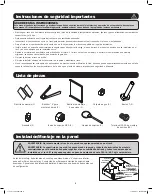
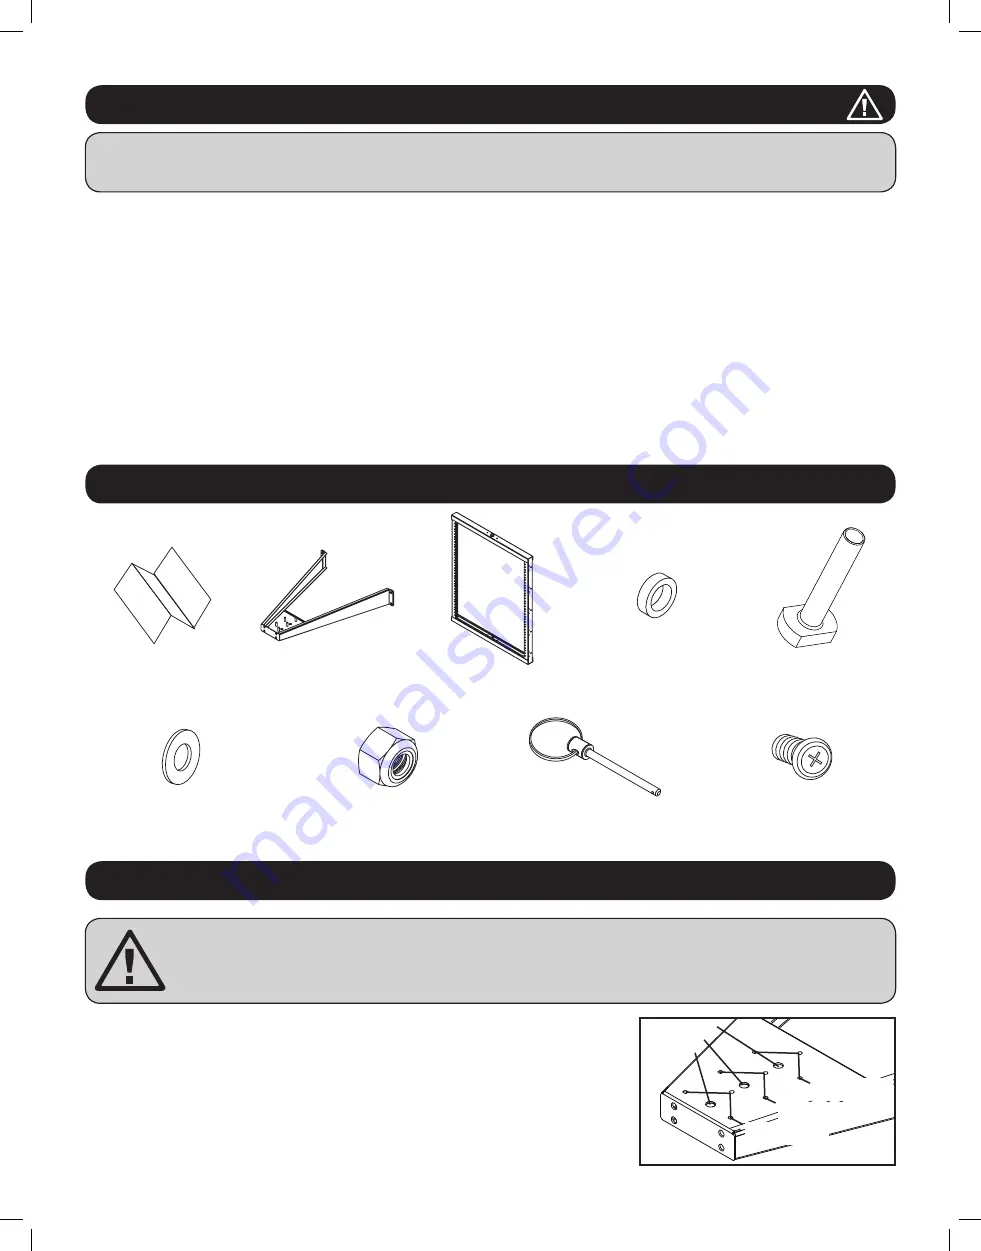
Parts List

SAVE THESE INSTRUCTIONS

This Manual contains instructions and warnings that must be followed during the installation and operation of the product described in this 

manual. Failure to comply may invalidate the warranty and cause property damage or personal injury.

•  Keep the rack in a controlled indoor environment, away from moisture, temperature extremes, flammable liquids and gasses, conductive 

contaminants and dust.

•  Leave adequate space at the front of the rack for proper ventilation.
•  Inspect the shipping container and the rack for shipping damage. Do not use the rack if it is damaged.
•  Leave the rack in the shipping container until it has been moved as close to the final installation location as possible.
•  Install the rack in a structurally sound area capable of handling the load, the weight of the rack, all equipment  that will be installed in the rack 

and any other equipment that will be installed nearby.

•  Save all packing materials for later use. Repacking and shipping the enclosure without the original packing materials may cause product damage 

that may affect the warranty.

•  Do not attempt to install the rack unassisted.
•  Do not attempt to install equipment without first wall mounting and stabilizing the rack.
•  Use of this equipment in life support applications where failure of this equipment can reasonably be expected to cause the failure of the life 

support equipment or to significantly affect its safety or effectiveness is not recommended.

Mounting Template (1)

Wall-Mount “A” Frame (2)

Equipment Mounting 

Frame (1)

Pivot Bearing (2)

T bolt (2)

Washers (4)

M10 Locknut (2)

Lock Pins (2)

#12-24 Equipment Mounting 

Screws (24)

WARNING: Do not attempt to mount the rack to the wall with equipment mounted to the rack.
WARNING: The wall surface, the wall studs and all user-supplied mounting hardware must be able to support 

the combined weight of the rack and all equipment that will be installed in the rack. The rack can support an 

equipment load up to 150 lb. maximum.

It should be noted before mounting that both top and bottom “A” Frames have 3 mounting 
holes and 3 sets of locking pin holes to accommodate 3 different mounting depth positions. 
Choose a position according to your configuration.

Important Safety Instructions

Position 2

Position 3

Position 1

Position 1  

Locking Pin Holes

Position 2  

Locking Pin Holes

Position 3  

Locking Pin Holes

17-11-211 93-2993.indb   2

11/29/2017   10:16:43 AM

Содержание SRWO12US

Страница 1: ...IL 60609 USA www tripplite com support Copyright 2017 Tripp Lite All rights reserved Tripp Lite s SRWO12US is the perfect 2 post open frame rack solution for applications where space is limited Space...

Страница 2: ...e warranty Do not attempt to install the rack unassisted Do not attempt to install equipment without first wall mounting and stabilizing the rack Use of this equipment in life support applications whe...

Страница 3: ...tional washers have been included that can be used in conjunction with the pivot bearing to provide additional spacing Note The Equipment Mounting Frame should be tightened to the 2 A Frames enough to...

Страница 4: ...p to 150 lb maximum Also be sure the two locking pins have been inserted to stabilize the rack You do not want the rack to swing at all while installing equipment see Installation section For all othe...

Страница 5: ...upport Copyright 2017 Tripp Lite Todos los derechos reservados SRWO12US de Tripp Lite es la soluci n de rack de bastidor abierto de 2 puestos ideal para aplicaciones en donde el espacio es limitado La...

Страница 6: ...ntes montar en la pared y estabilizar el rack No se recomienda usar este equipo en aplicaciones de mantenimiento artificial de la vida donde se puede esperar razonablemente que su falla cause la falla...

Страница 7: ...stalaci n entre los bastidores A se incluyen arandelas adicionales que pueden utilizarse en conjunto con el cojinete de giro para proporcionar espacio adicional Nota El bastidor de montaje de equipos...

Страница 8: ...lan los equipos consulte la secci n de Instalaci n Para el montaje de todos los otros equipos consulte el Manual del propietario de dichos equipos para obtener instrucciones de instalaci n En general...

Страница 9: ...tripplite com support Copyright 2017 Tripp Lite Tous droits r serv s Le SRWO12US de Tripp Lite est la solution parfaite pour un b ti cadre ouvert 2 supports pour des applications o l espace est limit...

Страница 10: ...pourraient annuler la garantie Ne pas tenter d installer le b ti sans aide Ne pas tenter d installer de l quipement sans avoir d abord mont au mur et stabilis le b ti Il est d conseill d utiliser cet...

Страница 11: ...on entre les b tis en A des rondelles additionnelles sont incluses et peuvent tre utilis es en conjonction avec la crapaudine afin d offrir de l espacement additionnel Remarque Le b ti de montage de l...

Страница 12: ...out autre quipement veuillez vous r f rer au Guide de l utilisateur pr vu pour cet quipement pour des instructions relatives l installation de l quipement Normalement ces informations sont disponibles...

Отзывы: