background image

13

4.2 Desempacado

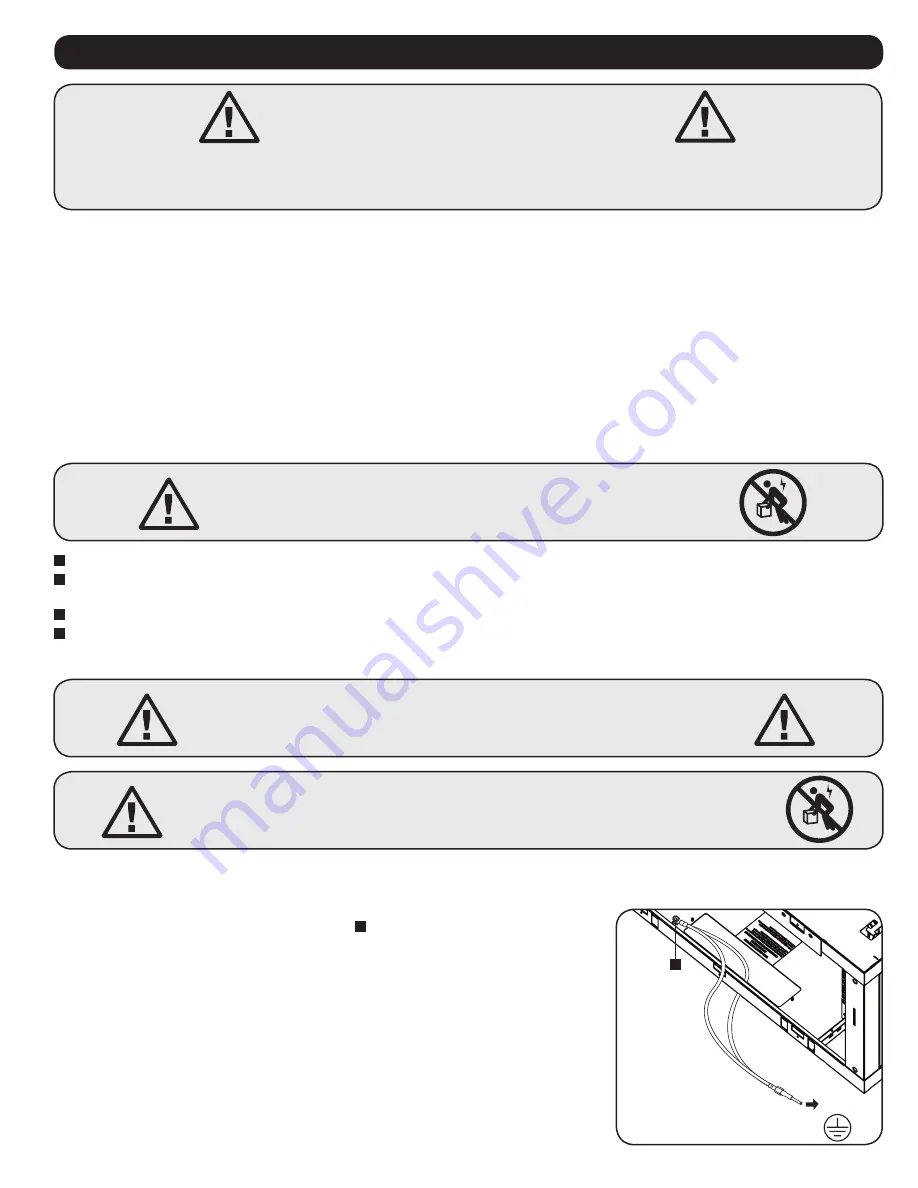
4.3 Conexión a Tierra

Todas las partes del gabinete se conectan a tierra con el bastidor del gabinete. Cerca de la parte 

trasera del gabinete, use el poste de conexión a tierra 

A

 y un tornillo M6 (incluido) y cable 8 AWG 

(3.264 mm) para conectar el bastidor del gabinete directamente a la conexión de tierra física de su 

instalación. Pase el cable a tierra ya sea quitando la tapa del orificio inferior posterior de paso del 
cable o conduciendo el cable por la parte trasera del gabinete. 

Advertencia: Conecte cada 

gabinete por separado a la conexión a tierra física. No use el gabinete sin una conexión a 

tierra física.

Use al menos dos personas para desempacar el gabinete.

Nunca extienda más de un componente del gabinete a la vez.

Advertencia: Nunca intente levantar o instalar sin la ayuda adecuada.  

No trate de levantar el gabinete solo.

1


Mueva la tarima de embarque a una superficie firme y nivelada.

2


Abra la caja y retire los cuatro esquineros de espuma. Guarde todos los materiales de empaque para uso posterior a menos que esté seguro de 

no necesitarlos. Los materiales de empaque son reciclables.

3


Con una persona en cada lado, levante cuidadosamente el gabinete fuera de la caja y colóquelo sobre una superficie firme y nivelada.

4


Examine el gabinete para detectar cualquier daño o parte floja. Confirme que todas las partes estén presentes. Si algo está faltante o dañado, 

póngase en contacto con Tripp Lite para solicitar ayuda. No intente usar el gabinete si ha sido dañado.

4. Instalación del Gabinete

¡Precaución! ¡Lea todas las instrucciones y  

advertencias antes de realizar la instalación!   

Advertencia: Los gabinetes son extremadamente pesados. No intente desempacar, mover o instalar el gabinete sin asistencia. 

Tenga mucho cuidado al manipular el gabinete y asegúrese de seguir todas las instrucciones de manejo e instalación. No 

intente instalar equipo sin estabilizar primero el gabinete.

4.1 Preparación

El gabinete debe instalarse en un área estructuralmente firme que sea capaz de soportar el peso del gabinete, todo el equipo que se instale en el 

gabinete y otros gabinetes y/o equipo que se instalen cerca. Antes de desempacar el gabinete, debe transportar el contenedor de embarque lo más 
cercano a la ubicación de instalación final para minimizar la distancia que se necesitará mover la unidad después de haber retirado el empaque 

protector. Si va a almacenar el gabinete durante un largo período antes de la instalación, siga las instrucciones en la sección de 

Almacenamiento y 

Servicio

.

Necesitará varias herramientas:
• Nivel 

•  Desatornillador Phillips 

•  Herramientas adecuadas para la instalación en pared

Necesitará además los siguientes accesorios:
•  Accesorios adecuados para la instalación en la pared 

(no se incluyen)

EARTH

GROUND

OR

A

O

TIERRA 

FÍSICA

Содержание SRW6UDPGVRT

Страница 1: ... 2 Alternate Mounting 7 Tapped Hole Mounting Rail 7 3 Rack Mount Installation 8 7 4 Cable Routing 8 8 Storage and Service 8 9 Warranty and Product Registration 9 Español 10 Français 19 28 Non Swinging Wall Mounted SmartRack Enclosure Models SRW6UDPVRT SRW6UDPGVRT Series Number AG 00EA Owner s Manual 1111 W 35th Street Chicago IL 60609 USA www tripplite com support Copyright 2018 Tripp Lite All tra...

Страница 2: ...ed in the enclosure and any other enclosures and or equipment that will be installed nearby For permanent wall mounting be sure to securely fasten the enclosure to the building structure before operation Use caution when cutting packing materials The enclosure could be scratched causing damage not covered by the warranty Save all packing materials for later use Repacking and shipping the enclosure...

Страница 3: ...s Adjustable 4 Cable Access Hole Cover Removable 5 Ventilation Fan Ports 6 Locking Removable Side Panels with Ventilation Fan Ports 7 Cable Pass Through with Brush Strip 8 Cable Tie Cut Outs 9 Vertical Cable Manager with Finger Ducts 10 Ground Stud 11 Mounting Notches 12 Mounting Plate with Hooks 12 11 9 9 4 4 10 2 2 3 3 5 6 6 7 7 8 8 1 ...

Страница 4: ...s Confirm all parts are present If anything is missing or damaged contact Tripp Lite for assistance Do not attempt to use the enclosure if it has been damaged 4 Enclosure Installation Caution Read All Instructions and Warnings Before Installation Warning Rack enclosures can be extremely heavy Do not attempt to unpack move or install the enclosure without assistance Use extreme caution when handlin...

Страница 5: ...o have access to the interior of the enclosure Several cable access and management options are available depending on your installation Cable Access Hole with Cover The top of the cabinet has a rectangular opening for cable access and management This opening can be opened or closed by unscrewing or screwing in the removable cable access panel Cable Pass Throughs with Brush Strips Four cable pass t...

Страница 6: ...with equipment in the enclosure Note Enclosure must be installed by a qualified technician Before mounting use a level and tape measure to position your mounting area precisely Use appropriate fasteners not included to secure the enclosure to the wall Use suitable mounting means when installing to cinder block concrete drywall or wood studs Warning The supporting surface must be able to safely sup...

Страница 7: ...ment You will install cage nuts included into the square openings in order to provide an attachment point for the mounting screws included Note Consult your equipment documentation to determine how many cage nuts will be required and where they will need to be installed 2 From the inside of the mounting rail insert one of the flanges of the cage nut through the square opening Press it against the ...

Страница 8: ...r general purchaser information The RMA number along with shipping instructions will be emailed to you Any damages direct indirect special or consequential to the product incurred during shipment to Tripp Lite or an authorized Tripp Lite service center are not covered under warranty Products shipped to Tripp Lite or an authorized Tripp Lite service center must have transportation charges prepaid M...

Страница 9: ...y lasts and some states do not allow the exclusion or limitation of incidental or consequential damages so the above limitations or exclusions may not apply to you This warranty gives you specific legal rights and you may have other rights which vary from jurisdiction to jurisdiction WARNING The individual user should take care to determine prior to use whether this device is suitable adequate or ...

Страница 10: ...ión 6 Instalación del Gabinete en la Pared 15 7 Instalación del Equipo 16 7 1 Instalación o Remoción de las 16 Tuercas de Fijación 7 2 Instalación Alternativa 16 Riel de Instalación con Orificio Roscado 7 3 Instalación en Rack 17 7 4 Conducción de Cable 17 8 Almacenamiento y Servicio 17 9 Garantía 18 English 1 Français 19 28 Gabinete SmartRack No Giratorio Para Instalación en Pared Modelos SRW6UDP...

Страница 11: ...anente en la pared asegúrese de fijar firmemente el gabinete a la estructura del edificio antes de la operación Tenga cuidado cuando corte el material de empaque El gabinete podría ser rayado causando daños no cubiertos por la garantía Guarde todo el material de empaque para uso posterior Volver a empacar y enviar el gabinete sin el material de empaque original puede ocasionar daños al producto qu...

Страница 12: ...ficio de Acceso de los Cables Removible 5 Puertos para Ventiladores 6 Paneles Laterales Asegurables Desprendibles con Puertos para Ventilador 7 Paso de Cable con Tira de Cepillo 8 Recortes para Amarres de Cableado 9 Administrador Vertical de Cable con Ductos de Peine 10 Poste para Conexión a Tierra 11 Muescas para Instalación 12 Placa de Instalación con Ganchos 12 11 9 9 4 4 10 2 2 3 3 5 6 6 7 7 8...

Страница 13: ... cualquier daño o parte floja Confirme que todas las partes estén presentes Si algo está faltante o dañado póngase en contacto con Tripp Lite para solicitar ayuda No intente usar el gabinete si ha sido dañado 4 Instalación del Gabinete Precaución Lea todas las instrucciones y advertencias antes de realizar la instalación Advertencia Los gabinetes son extremadamente pesados No intente desempacar mo...

Страница 14: ...rior del gabinete Están disponibles varias opciones de acceso y administración del cable dependiendo de su instalación Orificio para Acceso de Cable con Tapa La parte superior del gabinete tiene una abertura rectangular para acceso y administración del cableado Esta abertura puede ser abierta o cerrada desatornillando o atornillando el panel removible de acceso de cables Pasos de Cable con Tiras d...

Страница 15: ...el gabinete en la pared con el equipo en el gabinete Note El gabinete debe ser instalado por un técnico calificado Antes de instalar use un nivel y cinta métrica para ubicar con precisión el área de instalación Use sujetadores adecuados no incluidos para asegurar el gabinete a la pared Use los medios adecuados de soporte al instalar en bloques de concreto concreto tablarroca o travesaños de madera...

Страница 16: ...ipo Instalará tuercas de fijación incluidas en las aberturas cuadradas a fin de proporcionar un punto de fijación para los tornillos de instalación incluidos Nota Consulte la documentación de su equipo para determinar cuántas tuercas de fijación requerirá y en dónde necesitan instalarse 2 Desde la parte interior del riel de instalación inserte una de las bridas de la tuerca de fijación a través de...

Страница 17: ... general del comprador El número de RMA junto con las instrucciones de embarque le serán enviadas por correo electrónico Cualquier daño directo indirecto especial o consecuencial al producto incurrido durante el embarque a Tripp Lite o un Centro de Servicio Autorizado de Tripp Lite no está cubierto bajo la garantía Los productos embarcados a Tripp Lite o un Centro de Servicio Autorizado de Tripp L...

Страница 18: ...DE COMERCIALIZACIÓN O IDONEIDAD ESTÁN LIMITADAS EN DURACIÓN AL PERÍODO DE GARANTÍA ESTABLECIDO ASIMISMO ESTA GARANTÍA EXCLUYE EXPRESAMENTE TODOS LOS DAÑOS INCIDENTALES E INDIRECTOS Algunos estados no permiten limitaciones en cuanto a la duración de una garantía y algunos estados no permiten la exclusión o limitación de daños incidentales o indirectos de modo que las limitaciones anteriores pueden ...

Страница 19: ...tage mural du boîtier 24 7 Installation de l équipement 25 7 1 Installer ou retirer les écrous à cage 25 7 2 Autre possibilité de montage 25 Rail de fixation avec trous taraudés 7 3 Installation dans un bâti 26 7 4 Acheminement des câbles 26 8 Entreposage et entretien 26 9 Garantie 27 English 1 Español 10 28 Boîtier mural non mobile SmartRack Modèles SRW6UDPVRT SRW6UDPGVRT Numéro de série AG 00EA ...

Страница 20: ...tier ou équipement qui sera installé à proximité Pour un montage mural permanent s assurer de fixer solidement le boîtier à la structure du bâtiment avant l utilisation Faire preuve de vigilance au moment de couper le matériel d emballage Le boîtier pourrait être égratigné causant des dommages qui ne sont pas couverts par la garantie Conserver tout le matériel d emballage en vue d une utilisation ...

Страница 21: ...ccès aux câbles amovible 5 Ports de ventilateurs soufflants 6 Panneaux latéraux verrouillables amovibles avec ports de ventilateurs soufflants 7 Câble d intercommunication avec joint brosse 8 Découpes pour attaches de câbles 9 Gestion des câbles verticaux avec conduits à griffes 10 Montant de mise à la masse 11 Encoches de montage 12 Plaque de montage avec crochets 12 11 9 9 4 4 10 2 2 3 3 5 6 6 7...

Страница 22: ...l n y a pas de pièces desserrées Confirmer qu il ne manque aucune pièce Si quoi que ce soit manque ou est endommagé contacter Tripp Lite pour obtenir de l aide Ne pas tenter d utiliser le boîtier s il a été endommagé 4 Installation du boîtier Mise en garde Lire toutes les instructions et les avertissements avant l installation Avertissement Les boîtiers pour bâti peuvent être extrêmement lourds Ne...

Страница 23: ...ccès à l intérieur du boîtier Plusieurs options de gestion et d accès aux câbles sont offertes en fonction de l installation Trou d accès aux câbles avec couvercle La partie supérieure de l armoire comporte une ouverture rectangulaire pour l accès aux câbles et leur gestion L ouverture peut être ouverte ou fermée et dévissant ou en vissant le panneau d accès aux câbles amovible Câble d intercommun...

Страница 24: ...oit être confiée uniquement à un technicien qualifié Avant le montage utiliser un niveau et un ruban à mesurer pour placer avec précision les zones de montage Utiliser des fixations appropriées non incluses pour retenir le boîtier au mur Utiliser des moyens de montage appropriés pour une installation sur des blocs de béton de mâchefer du béton des cloisons sèches ou des colombages en bois Avertiss...

Страница 25: ...e montage où l équipement sera installé Les écrous à cage inclus seront installés dans les ouvertures carrées afin de fournir un point de fixation pour les vis de montage incluses Remarque Consulter la documentation de l équipement pour déterminer combien d écrous à cage seront requis et où ils doivent être installés 2 Depuis l intérieur du rail de montage insérer l une des brides de l écrou à cag...

Страница 26: ...ons générales Le numéro RMA ainsi que des instructions d expédition seront envoyés par courriel Les dommages directs indirects particuliers ou consécutifs encourus par le produit lors du transport vers Tripp Lite ou vers un centre de réparation agréé Tripp Lite ne sont pas couverts par la garantie Les frais liés au transport des produits expédiés à Tripp Lite ou à un centre de service autorisé Tri...

Страница 27: ...É MARCHANDE OU D ADAPTATION SONT LIMITÉES À LA PÉRIODE DE GARANTIE CI DESSUS ET CETTE GARANTIE EXCLUT EXPRESSÉMENT TOUS DOMMAGES DIRECTS ET INDIRECTS Certains États ne permettent pas de limitations sur la durée d une garantie implicite et certains États ne permettent pas l exclusion ou la limitation des dommages fortuits ou consécutifs de sorte que les limitations ou exclusions susmentionnées peuv...

Страница 28: ...ого монтажа шкафа 33 7 Установка оборудования 34 7 1 Установка или снятие закладных гаек 34 7 2 Альтернативный способ монтажа 34 Монтажная направляющая с резьбовыми отверстиями 7 3 Монтаж в стойку 35 7 4 Прокладка кабелей 35 8 Хранение и техническое обслуживание 35 9 Гарантийные обязательства 36 English 1 Español 10 Français 19 Фиксированный настенный шкаф семейства SmartRack Модели SRW6UDPVRT SRW...

Страница 29: ...т установлены вблизи него Перед началом работы со шкафом обязательно прикрепите его к несущей конструкции здания При разрезании упаковочных материалов соблюдайте осторожность Это может привести к нанесению царапин на поверхность шкафа что представляет собой ущерб не покрываемый действующей гарантией Все упаковочные материалы следует сохранить для последующего использования Повторная упаковка и тра...

Страница 30: ... 4 Заглушки отверстий для ввода кабелей съемные 5 Вентиляционные отверстия 6 Запираемые съемные боковые панели с вентиляционными отверстиями 7 Панель для прохода кабелей с щеточным уплотнителем 8 Прорези под кабельные стяжки 9 Вертикальный кабельный организатор с решетчатыми кабельными желобами 10 Заземляющий контакт 11 Монтажные отверстия 12 Монтажная пластина с защелками 12 11 9 9 4 4 10 2 2 3 3...

Страница 31: ...ичия каких либо повреждений или незакрепленных деталей Убедитесь в наличии всех деталей В случае отсутствия или повреждения каких либо деталей обратитесь за помощью в компаниюTripp Lite Не пользуйтесь шкафом в случае его повреждения 4 Порядок установки шкафа Внимание Перед установкой внимательно ознакомьтесь со всеми указаниями и предупреждениями Внимание Шкаф является крайне тяжеловесным Не пытай...

Страница 32: ...анелей необходимо иметь доступ внутрь шкафа В зависимости от типа установки предусмотрено несколько вариантов прокладки и оптимизации кабелей Отверстие для ввода кабеля с заглушкой В верхней панели шкафа имеется прямоугольное отверстие для ввода и оптимизации кабелей Это отверстие может открываться и закрываться путем снятия или установки съемной панели с винтовым креплением Панели для прохода каб...

Страница 33: ... крепить шкаф к стене с находящимся внутри него оборудованием Примечание Установка шкафа должна производиться только квалифицированным техническим специалистом Перед началом монтажа следует точно наметить место будущего расположения шкафа с помощью уровня и рулетки Для крепления шкафа к стене используйте подходящие для этой цели крепежные детали в комплект поставки не входят При креплении к бетону...

Страница 34: ...а в квадратные отверстия с целью обеспечения точки крепления для монтажных винтов поставляемых в комплекте Примечание Для определения необходимого количества закладных гаек и мест их установки ознакомьтесь с сопроводительной документацией к оборудованию 2 Проденьте один из отгибов кромки закладной гайки через квадратное отверстие с внутренней стороны монтажной направляющей Вдавите ее по направлени...

Страница 35: ...казать номер модели и серийный номер вашего изделия а также общие сведения о покупателе Номер RMA вместе с указаниями по транспортировке будет направлен вам по электронной почте На какие бы то ни было убытки прямые косвенные последующие или вызванные особыми обстоятельствами связанные с транспортировкой изделия в адрес компанииTripp Lite или ее уполномоченного сервисного центра действие гарантии н...

Страница 36: ...Ы ПО ПРОДОЛЖИТЕЛЬНОСТИ ДЕЙСТВИЯ ВЫШЕУКАЗАННЫМ ГАРАНТИЙНЫМ СРОКОМ КРОМЕ ТОГО ИЗ НАСТОЯЩЕЙ ГАРАНТИИ ЯВНЫМ ОБРАЗОМ ИСКЛЮЧАЮТСЯ ВСЕ ПОБОЧНЫЕ СЛУЧАЙНЫЕ И КОСВЕННЫЕ УБЫТКИ В некоторых штатах не допускается введение ограничений на продолжительность действия тех или иных подразумеваемых гарантий а в некоторых исключение или ограничение размера побочных или косвенных убытков В этих случаях вышеизложенные о...

Отзывы: