background image

3

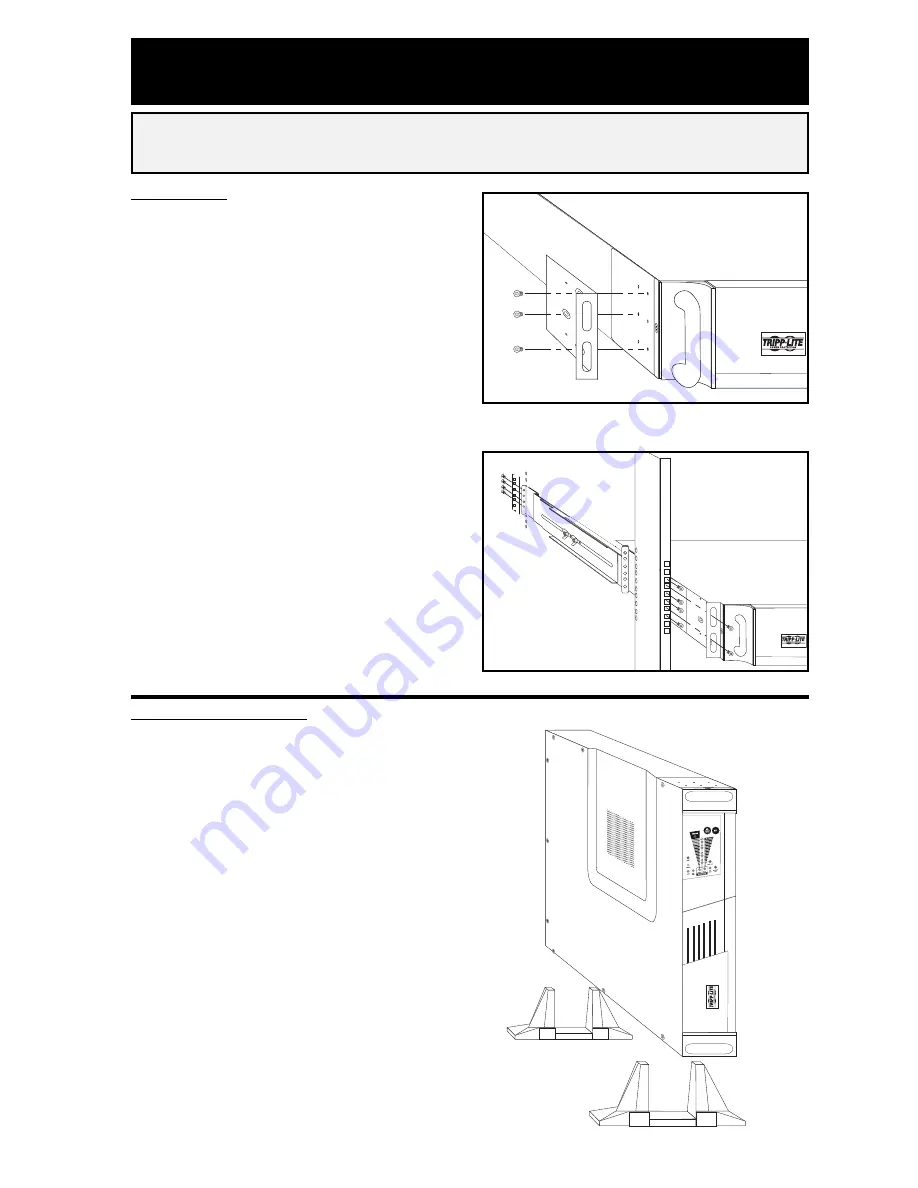
Mounting

Rackmount

1)

Loosen the wingnuts on each of the

two UPS Side Supports; adjust the
length of the supports to match the
depth of your rack; tighten wingnuts. 

2)

Mount both UPS Side Supports in

your rack on the inside surfaces of the
rack rails.

Note: Both support ledges should face inward. The side
supports' front and back holes are threaded and do not
require nuts to secure rack bolts.

3)

Attach mounting ‘ears’ to the front

end of the UPS’s sides using the screws
provided.

4)

Lift UPS and slide it onto the UPS

Side Supports within your rack. Mount
the UPS by screwing rack bolts through
the UPS mounting ‘ears’, through the
rack rails and through the UPS Side
Supports.

Note: The side supports' front holes are threaded and do
not require nuts to secure rack bolts.

Vertical Tower Mount

1)

Cover the rackmount screw holes on

the UPS's sides with supplied snap-in
hole-cover caps. 

2) 

Place the UPS upright in a flat, sta-

ble location with its control panel on
the high corner facing forward. Position
stabilizer feet 4 in. from each end of the
UPS.

Installation

SU2200RT2U Shown

SU2200RT2U Shown

Содержание SmartOnline SU1000RT2UHV

Страница 1: ...L 60609 USA Customer Support 773 869 1234 www tripplite com Installation p 3 5 Basic Operation p 6 9 Storage Service p 11 Specifications p 11 12 Important Safety Instructions p 2 Owner s Manual SMARTO...

Страница 2: ...of a life support device Battery Warnings Your UPS does not require routine maintenance Do not open your UPS except to replace batteries There are no user serviceable parts inside Battery replacement...

Страница 3: ...s sides using the screws provided 4 Lift UPS and slide it onto the UPS Side Supports within your rack Mount the UPS by screwing rack bolts through the UPS mounting ears through the rack rails and thro...

Страница 4: ...our UPS is plugged in the fan and all Indicator Lights will turn ON The LINE and LOAD ACTIVE METER LEDs will illuminate and the UPS will emit a beep to indicate nor mal operation However power is not...

Страница 5: ...y connector Plug either end of the battery connection cable supplied with the bat tery pack into the UPS s External Battery Connector and the other end into the Battery Output Connector on the rear pa...

Страница 6: ...elease it The UPS will continue charging and the fan will continue to cool internal com ponents even after you turn the UPS receptacles off To turn the UPS OFF completely including the charger disconn...

Страница 7: ...OVERLOAD LED This red light will illuminate constantly to indi cate that your UPS s capacity has been exceeded while it is in on line operation The UPS alarm will beep continuously Immediately remove...

Страница 8: ...ack Connector Use to connect optional Tripp Lite Battery Packs for additional runtime Contact Tripp Lite Customer Support at 773 869 1234 for the appropriate Tripp Lite battery pack to connect Refer t...

Страница 9: ...e 15 20 and 30 amp receptacles provide your connected equipment with pure sine wave AC output from the AC line during normal operation and from battery power during blackouts and severe brownouts Powe...

Страница 10: ...e rack handle plates B on either side of the UPS 4 Disconnect the microprocessor circuit board plug C located on the right side of the UPS 5 Disconnect battery connectors D Note while batteries are di...

Страница 11: ...ve Transfer Time 0 ns Maximum Harmonic Distortion with Linear Load 3 Maximum Harmonic Distortion with Nonlinear Load 6 Battery Recharge Time to 80 Capacity 2 4 hours Model SU1000RT2U SU1000RT2UHV Inpu...

Страница 12: ...device complies with part 15 of the FCC Rules Operation is subject to the following two conditions 1 This device may not cause harmful interference and 2 this device must accept any interference rece...

Отзывы: