2
Safety Instructions
Warranty and Product Registration
Note: Read the entire instruction manual before you start assembly and installation.
WARNING
• Do not begin the installation until you have read and understood the instructions and warnings contained in this
manual. If you have questions regarding any of the instructions or warnings, please visit tripplite.com/support.
• This product was designed to be installed and utilized ONLY as specified in this manual. Improper installation of
this product may cause damage or serious injury.
• Make sure the unit can safely support the combined load of the equipment and all attached hardware and
components.
• Make sure the unit can safely support the combined load of the equipment and all attached hardware and
components.
• Tighten screws firmly, but do not over-tighten. Over tightening can cause damage to the items, greatly reducing
their holding power.
• This product is intended for indoor use only. Using this product outdoors could lead to product failure and personal
injury.
• By reason of the many large television construction types available, the wall-mount screen installation materials
cannot accommodate every screen type. Therefore, it is possible the provided screws may not fit your TV.
• Make sure that before and after the installation of the screen and the mounting bracket, neither you nor somebody
else can be injured and other objects can be damaged. If in doubt, request for help from an expert.
• This unit is not a toy and is not suitable for use by children. Children should be supervised at all times around this
unit.
• This unit contains glass parts. Do not subject the glass parts to sudden shock, knocks or quick changes in
temperature. The unit may fracture and will form small, sharp shards. Take extreme care when handling broken
glass.
5-Year Limited Warranty
Seller warrants this product, if used in accordance with all applicable instructions, to be free from original defects in material and workmanship for a
period of 5 years from the date of initial purchase. If the product should prove defective in material or workmanship within that period, Seller will repair or
replace the product, at its sole discretion.
THIS WARRANTY DOES NOT APPLY TO NORMAL WEAR OR TO DAMAGE RESULTING FROM ACCIDENT, MISUSE, ABUSE OR NEGLECT.
SELLER MAKES NO EXPRESS WARRANTIES OTHER THAN THE WARRANTY EXPRESSLY SET FORTH HEREIN. EXCEPT TO THE EXTENT
PROHIBITED BY APPLICABLE LAW, ALL IMPLIED WARRANTIES, INCLUDING ALL WARRANTIES OF MERCHANTABILITY OR FITNESS, ARE
LIMITED IN DURATION TO THE WARRANTY PERIOD SET FORTH ABOVE; AND THIS WARRANTY EXPRESSLY EXCLUDES ALL INCIDENTAL AND
CONSEQUENTIAL DAMAGES. (Some states do not allow limitations on how long an implied warranty lasts, and some states do not allow the exclusion
or limitation of incidental or consequential damages, so the above limitations or exclusions may not apply to you. This warranty gives you specific legal
rights, and you may have other rights which vary from jurisdiction to jurisdiction.)
WARNING: The individual user should take care to determine prior to use whether this device is suitable, adequate or safe for the use intended. Since
individual applications are subject to great variation, the manufacturer makes no representation or warranty as to the suitability or fitness of these
devices for any specific application.
PRODUCT REGISTRATION
Visit tripplite.com/warranty today to register your new Tripp Lite product. You’ll be automatically entered into a drawing for a chance to win a FREE
Tripp Lite product!*
* No purchase necessary. Void where prohibited. Some restrictions apply. See website for details.
Tripp Lite has a policy of continuous improvement. Specifications are subject to change without notice. Photos and illustrations may differ slightly from
actual products.
Содержание DMCS3770SG75
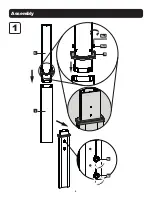
Страница 4: ...4 Assembly 1 M A M J I O M M C ...
Страница 5: ...5 Assembly 2 D E M J Twist these two screws loose before install ...
Страница 6: ...6 Assembly 3 N A M G M F M C M J 4 K J J K M K ...
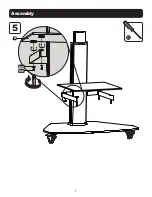
Страница 7: ...7 Assembly 5 B M H M E ...
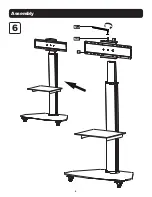
Страница 8: ...8 Assembly 6 M J M D F ...
Страница 16: ...16 Ensamble 1 M A M J I O M M C ...
Страница 17: ...17 Ensamble 2 D E M J Gire estos dos tornillos sueltos antes de instalarlos ...
Страница 18: ...18 Ensamble 3 N A M G M F M C M J 4 K J J K M K ...
Страница 19: ...19 Ensamble 5 B M H M E ...
Страница 20: ...20 Ensamble 6 M J M D F ...
Страница 28: ...28 Assemblage 1 M A M J I O M M C ...
Страница 29: ...29 Assemblage 2 D E M J Desserrer ces deux vis avant l installation ...
Страница 30: ...30 Assemblage 3 N A M G M F M C M J 4 K J J K M K ...
Страница 31: ...31 Assemblage 5 B M H M E ...
Страница 32: ...32 Assemblage 6 M J M D F ...
Страница 40: ...40 Порядок сборки 1 M A M J I O M M C ...
Страница 41: ...41 Порядок сборки 2 D E M J Перед установкой выверните эти два винта ...
Страница 42: ...42 Порядок сборки 3 N A M G M F M C M J 4 K J J K M K ...
Страница 43: ...43 Порядок сборки 5 B M H M E ...
Страница 44: ...44 Порядок сборки 6 M J M D F ...
Страница 52: ...52 Montage 1 M A M J I O M M C ...
Страница 53: ...53 Montage 2 D E M J Lockern Sie diese beiden Schrauben vor der Installation ...
Страница 54: ...54 Montage 3 N A M G M F M C M J 4 K J J K M K ...
Страница 55: ...55 Montage 5 B M H M E ...
Страница 56: ...56 Montage 6 M J M D F ...

