background image

3

Mounting

Your UPS may be rack mounted in 4- or 2-post racks. To mount the UPS (power external battery module) in a 2-post rack, 
purchase the appropriate hardware, sold separately (order Tripp Lite model # 2POSTRMKITHD). See 2POSTRMKITHD owner’s manual 

for installation instructions. To mount the UPS in a 4-post rack, use the included hardware and follow the procedure outlined below. The 
procedures are for common rack types and may not be appropriate for all rack configurations. User must determine the fitness of rack-

mount hardware and procedures before mounting.

CAUTION: Rack-mount equipment may be extremely heavy—be careful when moving or lifting equipment. Use one or more 

assistants if necessary.

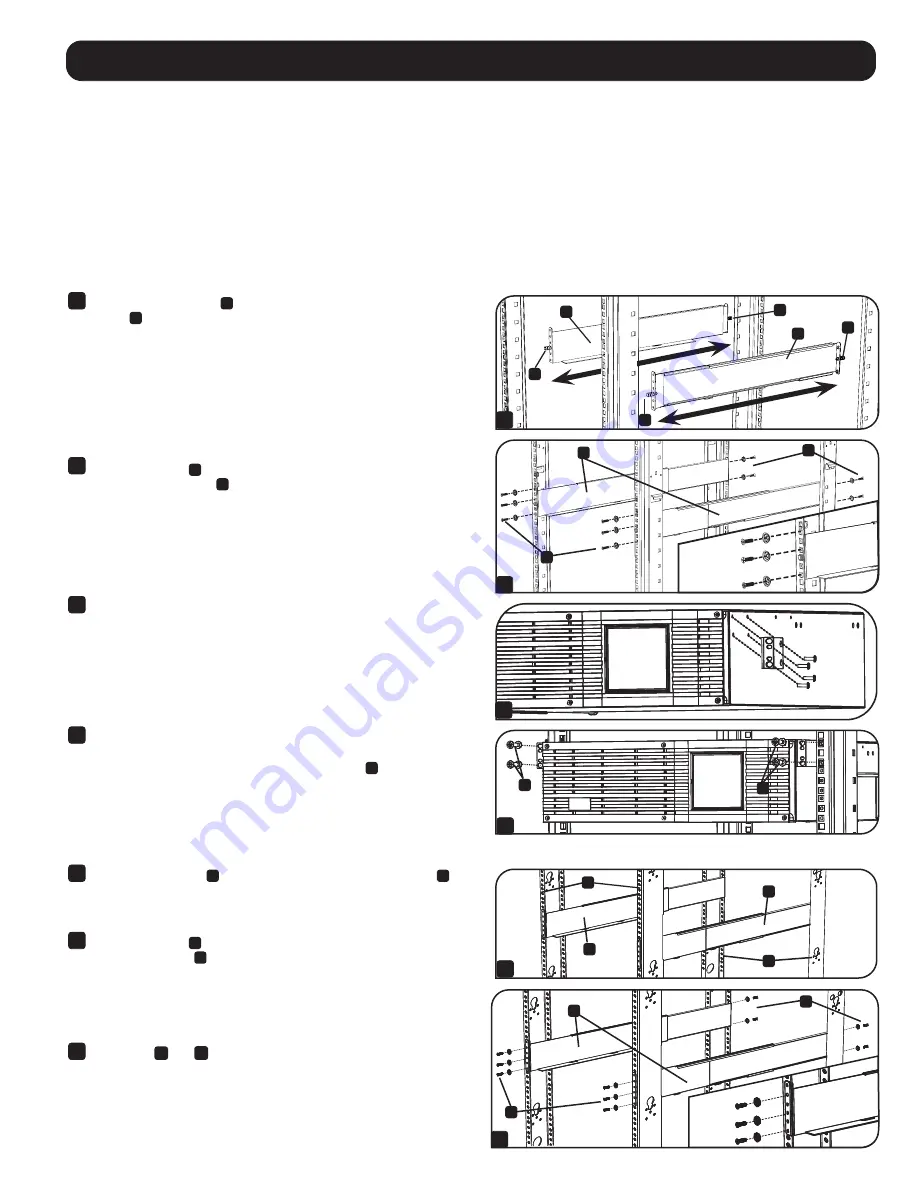
4-Post Rack Mounting

Square-Hole Rack Installation

1

 The included plastic pegs 

A

 will temporarily support the empty rack-mount 

shelves 

B

 while you install the permanent mounting hardware. Insert a peg 

near the center of the front and rear bracket of each shelf as shown. (Each 

front bracket has 6 holes and each rear bracket has 3 holes.) The pegs will 
snap into place.


After installing the pegs, expand each shelf to match the depth of your rack 
rails. The pegs will fit through the square holes in the rack rails to support 
the shelves. Refer to the rack unit labels to confirm that the shelves are 
level in all directions.


Note: 

The support ledge of each shelf must face inward.

2

 Secure the shelves 

B

 to the mounting rails permanently using the included 

screws and cup washers 

C

 as shown. Place 6 screws total at the front and 

4 screws total at the back.


Tighten all screws before proceeding.


Warning: Do not attempt to install your equipment until you 

have inserted and tightened the required screws. The plastic 

pegs will not support the weight of your equipment.

3

 Attach your equipment’s mounting brackets to the forward mounting holes 

of the cabinet using the hardware included with your equipment. The 
mounting bracket "ears" should face forward. (Some equipment may have 
pre-installed or integral mounting brackets.)

4

 With the aid of an assistant (if necessary), lift your equipment and slide it 

into the shelves. Attach the equipment mounting brackets to the forward 
mounting rails with user-supplied screws and washers 

D

. Tighten all screws 

securely.

Threaded-Hole Rack Installation

1


Align the mounting rail 

A

 along the inside surface of the rack posts 

B

 so 

that the flanges on the ends of the rail wrap around to the front and rear 
surfaces of the posts and the rail holes meet the threaded holes on the rack 
post.

2


Secure the shelves 

A

 to the mounting rails permanently using user-supplied 

screws and washers 

C

 for your rack as shown. Place 6 screws total at the 

front and 4 screws total at the back.


Tighten all screws before proceeding.

  Warning: Do not attempt to install your equipment until you 

have inserted and tightened the required screws.

3


Follow steps 

3

 and 

4

 of the Square-Hole Rack Installation instructions 

(above) to securely mount your 3U equipment.

1

2

A

A

A

A

3

B

B

B

C

C

4

D

D

1

2

A

A

C

C

A

B

B

Содержание AGBP4860Y3U

Страница 1: ...rt Copyright 2021 Tripp Lite All rights reserved SmartPro is a registered trademark of Tripp Lite WARRANTY REGISTRATION Register your product today and be automatically entered to win an ISOBAR surge...

Страница 2: ...rs or extension cords to the output of your UPS This might overload the UPS and will void the surge protector and UPS warranties Battery Warnings Batteries can present a risk of electrical shock and b...

Страница 3: ...he mounting rails permanently using the included screws and cup washers C as shown Place 6 screws total at the front and 4 screws total at the back Tighten all screws before proceeding Warning Do not...

Страница 4: ...input breaker to the ON position towards the left side of the rear panel 3 Plug your UPS line cord into an electrical outlet Once your UPS is plugged in the UPS will enter STANDBY mode The fan will ac...

Страница 5: ...plug is disconnected Connection Optional 1 2 3 2 USB Port Connection Using the USB cable provided connect a USB port from a computer to a USB port on your UPS On the computer install the Tripp Lite p...

Страница 6: ...may test its batteries by pressing the MUTE TEST button for two seconds The UPS will switch to INVERT mode for several seconds Normally the INVERT alarm four short beeps will sound indicating that th...

Страница 7: ...nect the UPS to a DB9 port on any workstation or server Use with Tripp Lite cabling and PowerAlert Software to monitor and manage network power and automatically save open files and shut down equipmen...

Страница 8: ...ace it in the OFF mode by reversing the Connection procedure use the POWER button to place the UPS in STANDBY mode unplug the UPS set the double pole input breaker to the OFF position and disconnect t...

Страница 9: ...o the following two conditions 1 This device may not cause harmful interference and 2 this device must accept any interference received including interference that may cause undesired operation Note T...

Страница 10: ...10 1111 W 35th Street Chicago IL 60609 USA tripplite com support 21 10 009 932159_RevD...

Страница 11: ...ter as AGBP4860Y3U No conveniente para los usos m viles 1111 W 35th Street Chicago IL 60609 USA tripplite com support 2021 Tripp Lite Todos los derechos reservados SmartPro es una marca registrada de...

Страница 12: ...de su UPS Esto puede sobrecargar al UPS y anular las garant as del supresor de sobretensiones y del UPS Advertencias Sobre las Bater as Debido a que las bater as presentan un peligro de choque el ctr...

Страница 13: ...ermanentemente los entrepa os B a los rieles de instalaci n usando los tornillos y las arandelas de copa C como se muestra Coloque 6 tornillos en total en el frente y 4 tornillos en total en la parte...

Страница 14: ...DO hacia el lado izquierdo del panel trasero 3 Enchufe el cable del sistema UPS a una toma el ctrica Una vez conectado el sistema UPS ste se encuentra en modo STANDBY reserva Se activa el ventilador y...

Страница 15: ...s Opcionales 1 2 3 2 Conexi n con un puerto USB Con ayuda del cable USB proporcionado conecte un puerto USB de una computadora a un puerto USB de su sistema UPS Instale en la computadora el software d...

Страница 16: ...a emite sonidos r pidos y breves para avisarle de la necesidad de reducir la carga La tercera alarma es la de Low Battery bater a baja Cuando el sistema UPS est en modo INVERT y las bater as est n cas...

Страница 17: ...exiones USB en su sistema UPS para reiniciar de manera remota el equipo conectado encienda y apague el sistema UPS con ayuda del software PowerAlert de Tripp Lite Para encender y apagar de manera remo...

Страница 18: ...de onda presentes en la entrada de CA Cuando se producen dichas distorsiones el sistema UPS normalmente hace un cambio para entregar una alimentaci n sinusoidal pura mediante sus bater as y durante t...

Страница 19: ...consecuencial del producto que ocurra durante el env o a Tripp Lite o a un centro de servicio t cnico de Tripp Lite autorizado Los productos enviados a Tripp Lite o a un centro de servicio t cnico de...

Страница 20: ...junto con los s mbolos de aprobaci n e informaci n requeridos Al solicitar informaci n sobre el cumplimiento de las normas para este producto siempre mencione el n mero de serie El n mero de serie no...

Страница 21: ...es AGBP4860Y3U Non appropri aux applications mobiles 1111 W 35th Street Chicago IL 60609 USA tripplite com support Tripp Lite 2021 Tous droits r serv s SmartPro est une marque d pos e de Tripp Lite Im...

Страница 22: ...c de l air de l oxyg ne ou de l oxyde nitreux Ne pas brancher de parasurtenseurs ou de rallonges lectriques la sortie de l onduleur Cela risquerait de surcharger l onduleur et annulerait la garantie d...

Страница 23: ...Le rebord du support de chaque tag re doit tre tourn vers l int rieur 2 Retenir les tag res B aux rails de montage de fa on permanente en utilisant les vis et les rondelles collerette incluses C tel...

Страница 24: ...entation de votre syst me UPS dans une prise de secteur D s que votre syst me UPS est branch ce dernier se met en mode STANDBY attente Le ventilateur d marre et les voyants se mettent clignoter Les pr...

Страница 25: ...2 Connexion du port USB En utilisant le c ble USB fourni reliez le port USB de l ordinateur celui de votre syst me UPS Installez dans l ordinateur le logiciel de protection de l alimentation lectrique...

Страница 26: ...on totale du mat riel branch d passe la capacit de sortie de l unit La troisi me l alarme de batterie faible met un signal sonore en continu quand le syst me UPS est en mode INVERT et que ses batterie...

Страница 27: ...s rie ou USB votre syst me UPS vous pouvez r initialiser distance le mat riel branch en utilisant le logiciel PowerAlert de Tripp Lite pour allumer ou teindre votre unit Vous pouvez m me s lectionner...

Страница 28: ...d une montre pour prot ger le syst me UPS contre la distorsion de l onde d entr e c a Quand une telle distorsion se produit le syst me UPS basculera normalement vers l alimentation de batterie pour fo...

Страница 29: ...uctions concernant le transport vous seront achemin es par courriel Tout dommage direct indirect sp cial ou fortuit survenu au produit pendant le transport Tripp Lite ou un centre de service autoris T...

Страница 30: ...tion requises Lors d une demande d information de conformit pour ce produit utilisez toujours le num ro de s rie Il ne doit pas tre confondu avec le nom de la marque ou le num ro de mod le du produit...

Страница 31: ...31...

Страница 32: ...32 1111 W 35th Street Chicago IL 60609 USA tripplite com support 21 10 009 932159_RevD...

Отзывы: