3
Mounting
Your UPS may be rack mounted in 4- or 2-post racks. To mount the UPS (power external battery module) in a 2-post rack,
purchase the appropriate hardware, sold separately (order Tripp Lite model # 2POSTRMKITHD). See 2POSTRMKITHD owner’s manual
for installation instructions. To mount the UPS in a 4-post rack, use the included hardware and follow the procedure outlined below. The
procedures are for common rack types and may not be appropriate for all rack configurations. User must determine the fitness of rack-
mount hardware and procedures before mounting.
CAUTION: Rack-mount equipment may be extremely heavy—be careful when moving or lifting equipment. Use one or more
assistants if necessary.
4-Post Rack Mounting
Square-Hole Rack Installation
1
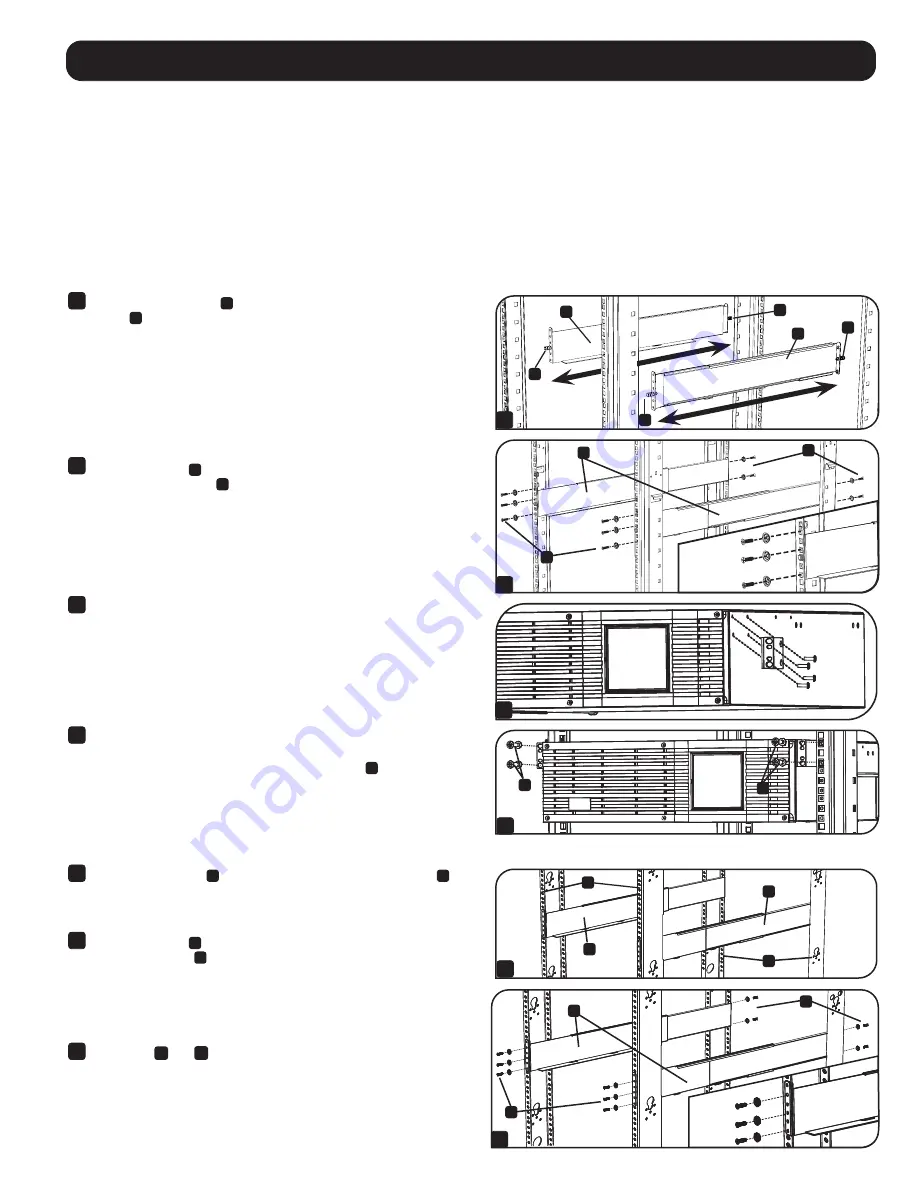
The included plastic pegs
A
will temporarily support the empty rack-mount
shelves
B
while you install the permanent mounting hardware. Insert a peg
near the center of the front and rear bracket of each shelf as shown. (Each
front bracket has 6 holes and each rear bracket has 3 holes.) The pegs will
snap into place.
After installing the pegs, expand each shelf to match the depth of your rack
rails. The pegs will fit through the square holes in the rack rails to support
the shelves. Refer to the rack unit labels to confirm that the shelves are
level in all directions.
Note:
The support ledge of each shelf must face inward.
2
Secure the shelves
B
to the mounting rails permanently using the included
screws and cup washers
C
as shown. Place 6 screws total at the front and
4 screws total at the back.
Tighten all screws before proceeding.
Warning: Do not attempt to install your equipment until you
have inserted and tightened the required screws. The plastic
pegs will not support the weight of your equipment.
3
Attach your equipment’s mounting brackets to the forward mounting holes
of the cabinet using the hardware included with your equipment. The
mounting bracket "ears" should face forward. (Some equipment may have
pre-installed or integral mounting brackets.)
4
With the aid of an assistant (if necessary), lift your equipment and slide it
into the shelves. Attach the equipment mounting brackets to the forward
mounting rails with user-supplied screws and washers
D
. Tighten all screws
securely.
Threaded-Hole Rack Installation
1
Align the mounting rail
A
along the inside surface of the rack posts
B
so
that the flanges on the ends of the rail wrap around to the front and rear
surfaces of the posts and the rail holes meet the threaded holes on the rack
post.
2
Secure the shelves
A
to the mounting rails permanently using user-supplied
screws and washers
C
for your rack as shown. Place 6 screws total at the
front and 4 screws total at the back.
Tighten all screws before proceeding.
Warning: Do not attempt to install your equipment until you
have inserted and tightened the required screws.
3
Follow steps
3
and
4
of the Square-Hole Rack Installation instructions
(above) to securely mount your 3U equipment.
1
2
A
A
A
A
3
B
B
B
C
C
4
D
D
1
2
A
A
C
C
A
B
B


