background image

4

STEP 1:

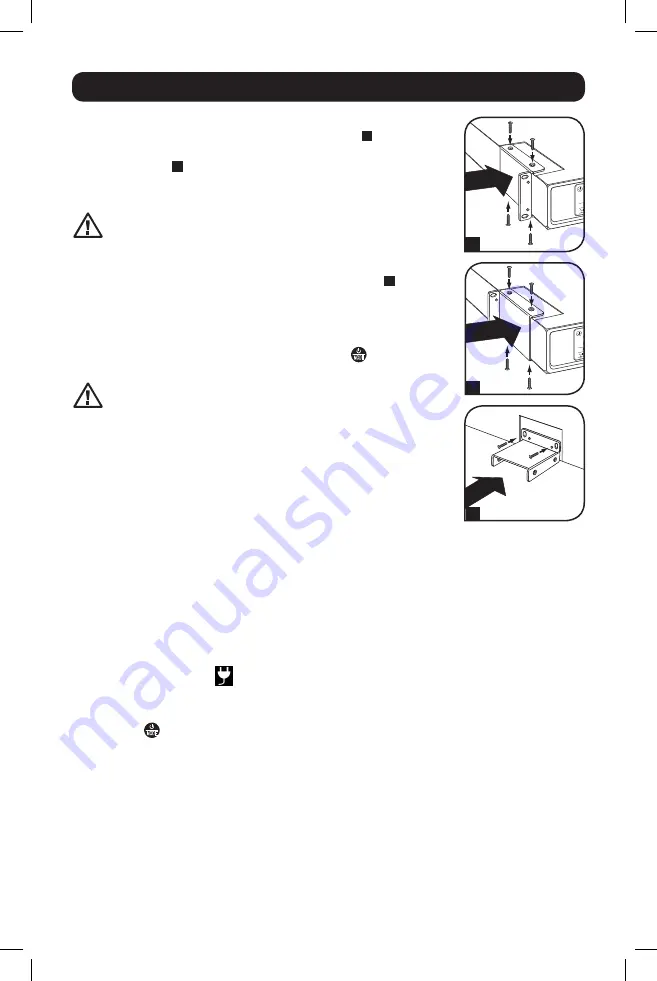
 To install the UPS in a 4-post rack, attach the included 

mounting hardware to the UPS as shown in diagram 

A

. To mount the 

UPS in a 2-post rack, attach the included hardware to the UPS as 

shown in diagram 

B

. Then, using an assistant if necessary, lift the 

UPS and attach it to a standard rack or rack enclosure with user-

supplied hardware. 

If the UPS is placed flat on a surface, do NOT stack any 

other object directly on top of the unit.

The UPS will stand in a tower position without the aid of the included 

hardware. However, for added stability Tripp Lite recommends that 

the included hardware be attached as shown in diagram 

C

. The UPS 

and included hardware are designed for common rack and rack 

enclosure types and may not be appropriate for all applications.

STEP 2: Plug the UPS into a properly grounded outlet.

After plugging the UPS into a wall outlet, push the


MODE


button for two 

seconds to turn the UPS on (see Basic Operation section). 

The UPS will not turn on automatically in the presence 

of live utility power. 

Note: 

UPS system will function properly upon initial startup; however, 

maximum runtime for the unit’s battery will only be accessible after it has 
been charged for 24 hours.

STEP 3: Plug your equipment into the UPS.

* Your UPS is designed to support electronic equipment only. You will overload 
the UPS if the total VA ratings for all the equipment you connect to the outlets 
exceeds the UPS’s Output Capacity. To find your equipment’s VA ratings, look 
on their nameplates. If the equipment is listed in amps, multiply the number 

of amps by 120 to determine VA. (Example: 1 amp × 120 = 120 VA).If you 
are unsure if you have overloaded the outlets, run a self-test (see Self-Test 
description in Basic Operation section).

Quick Installation

C

B

A

STEP 4: Optional Installation. 

All models include USB and RS-232 communication ports as well as Tel/DSL/network surge 

protection jacks. These connections are optional; the UPS will work properly without these 

connections. See the connector's description in the Basic Operation section for connection 
instructions.

If the LINE POWER icon 

 does not illuminate when the UPS is turned ON, try the 

following:

1. Make sure the UPS is plugged into a live AC outlet.
2. Press the


MODE


button for 2 seconds to start the UPS. (A beep should sound when the  

  UPS starts.)
3. If the UPS still does not start, contact Tripp Lite Tech Support for assistance.

17-02-143-9336B5.indb   4

3/14/2017   2:03:51 PM

Содержание AG-8869

Страница 1: ...eatures 8 Battery Replacement 9 Storage and Service 11 Product Registration 11 Espa ol 13 Fran ais 25 SMART1500LCD Series Number AG 8869 SMART1500LCDXL Series Number AGSM8191 Not suitable for mobile a...

Страница 2: ...under warranty UPS Connection Warnings Connect your UPS directly to a properly grounded AC power outlet Do not plug the UPS into itself this will damage the UPS Do not modify the UPS s plug and do not...

Страница 3: ...Battery replacement should be performed only by authorized service personnel using the same number and type of batteries Sealed Lead Acid The batteries are recyclable Refer to your local codes for dis...

Страница 4: ...r the unit s battery will only be accessible after it has been charged for 24 hours STEP 3 Plug your equipment into the UPS Your UPS is designed to support electronic equipment only You will overload...

Страница 5: ...ll tool in the slots on the sides of the display to pop it out of the UPS housing rotate the display and snap it back into the UPS housing LCD Features Tap the MODE button to advance from one display...

Страница 6: ...ast option displayed before navigating away from this menu option will be the selected setting This setting is normally set to 100 which enables the UPS to protect against waveform distortions in its...

Страница 7: ...L model only Tap the MODE button repeatedly to advance to the External Battery screen as shown here Press the MUTE button to advance to the next available option The last option displayed before navig...

Страница 8: ...EE download at www tripplite com and appropriate USB or DB9 cable Both a USB and a DB9 cable are included with your UPS Notes 1 This connection is optional The UPS will work properly without this conn...

Страница 9: ...ery cartridge For the SMART1500LCDXL model only Tripp Lite BP24V15RT2U external battery pack rated 24Vdc 14Ahr with overcurrent protection should be connected to the external battery pack connector Fo...

Страница 10: ...place the new batteries into the UPS and connect the positive red connectors and negative black connectors 5 Reattach the bottom panel and secure using the retaining screw removed in step 1 17 02 143...

Страница 11: ...ucts shipped to Tripp Lite or an authorized Tripp Lite service center must have transportation charges prepaid Mark the RMA number on the outside of the package If the product is within its warranty p...

Страница 12: ...Technical Requirements Document s The Department does not guarantee the equipment will operate to the user s satisfaction Before installing this equipment users should ensure that it is permissible to...

Страница 13: ...LCD 18 Autodiagn stico 18 Sensibilidad de Potencia 18 Control de Desplazamiento 19 de Pantallas Calibraciones de 19 Bater as Externas Mensajes de Error 19 Caracter sticas 20 Reemplazo de Bater a 21 Al...

Страница 14: ...n cubiertos por la garant a Advertencias sobre la conexi n del UPS Conecte su UPS directamente a un tomacorriente de CA puesto a tierra apropiadamente No conecte el UPS a s mismo ya que podr a da arse...

Страница 15: ...s con mangos aislados y reemplace las bater as existentes con el mismo n mero y tipo de bater as nuevas plomo cido selladas Las bater as del UPS son reciclables Consulte la reglamentaci n local para l...

Страница 16: ...a unidad solo se alcanzar despu s de que se haya cargado durante 24 horas PASO 3 Conecte sus equipos al UPS Su UPS s lo est dise ado para dar soporte a equipos electr nicos Si la capacidad total en VA...

Страница 17: ...en las ranuras en los lados de la pantalla y ret rela de la caja del UPS gire la pantalla y col quela a presi n nuevamente en la caja del UPS Caracter sticas de LCD Oprima brevemente el bot n MODE par...

Страница 18: ...nado Este calibraci n est establecida normalmente al 100 lo que permite al UPS proteger contra distorsiones de forma de onda en su entrada de corriente alterna Cuando ocurren dichas distorsiones norma...

Страница 19: ...Control de Calibraciones de Bater as Externas modelo XL solamente Toque repetidamente el bot n MODE para avanzar hasta la pantalla de Bater a Externa como se muestra aqu Oprima el bot n MUTE para avan...

Страница 20: ...ITA en www tripplite com y con un cable USB o DB9 adecuado Con su UPS se incluir n un cable USB y un cable DB9 Notas 1 Esta conexi n es opcional El UPS funcionar correctamente sin esta conexi n 2 Este...

Страница 21: ...azo RBC1500 de Tripp Lite Para el modelo de SMART1500LCDXL s lo debe conectarse al conector del m dulo de bater a externa un m dulo de bater a externa BP24V15RT2U de Tripp Lite clasificado 24VCD 14Ahr...

Страница 22: ...cuidado las bater as nuevas en el UPS y conecte los conectores positivo rojo y negativo negro 5 Vuelva a colocar el panel inferior y aseg relo con el tornillo de sujeci n que quit en el paso 1 17 02 1...

Страница 23: ...de las instrucciones 2 Si el problema persiste no se comunique ni devuelva el producto al mayorista En cambio visite www tripplite com support 3 Si el problema exige servicio t cnico visite www trippl...

Страница 24: ...ormaci n sobre el cumplimiento de las normas para este producto siempre mencione el n mero de serie El n mero de serie no debe ser confundido con el nombre de identificaci n ni con el n mero de modelo...

Страница 25: ...sit de l cran LCD 30 Autotest 30 Sensibilit la puissance 30 Commande de d filement 31 R glages de la batterie externe 31 Messages d erreur 31 Caract ristiques 32 Remplacement des batteries 33 Entrepos...

Страница 26: ...l angle Monter de cette fa on va entraver s rieusement le refroidissement interne de l unit endommageant le produit non couvert sous garantie Mise en garde Connexions de l UPS Connecter votre UPS dir...

Страница 27: ...isol es et remplacer les batteries existantes par des batteries neuves du m me num ro et du m me type batterie sans entretien Les batteries UPS sont recyclables Consultez les codes locaux concernant...

Страница 28: ...avoir t recharg e durant 24 heures Installation rapide TAPE 3 branchez votre quipement dans le UPS Votre onduleur UPS est seulement con u pour prot ger de l quipement lectronique Vous surchargerez l o...

Страница 29: ...faciliter la vision peu importe si le UPS est en position horizontale ou verticale tour Pour faire pivoter l afficheur ins rez d licatement un petit outil dans les fentes situ es sur le c t de l affi...

Страница 30: ...lectionn Ce r glage est normalement tabli 100 cela permet l onduleur UPS d assurer une protection contre les distorsions de forme d onde son entr e de secteur Quand une telle distorsion se produit l o...

Страница 31: ...ellement Commande de r glage de la batterie externe mod le XL seulement Taper le bouton MODE plusieurs reprises pour avancer l affichage External Battery batterie externe tel qu illustr ici Appuyer su...

Страница 32: ...eux appareils partageant une seule ligne La connexion de votre quipement ces prises est facultative Votre onduleur fonctionnera correctement sans cette connexion Un c ble RJ 11 sera inclus avec votre...

Страница 33: ...inales de l onduleur dureront plusieurs ann es Le remplacement des batteries ne devrait tre effectu que par un personnel qualifi Se r f rer aux Avertissements portant sur les batteries de la section A...

Страница 34: ...puis retirer d licatement les vieilles batteries de l appareil 4 Placer d licatement les nouvelles batteries dans l onduleur puis raccorder les connecteurs positifs rouge et les connecteurs n gatifs n...

Страница 35: ...se lecture des directives 2 Si le probl me persiste ne pas communiquer ou renvoyer le produit au vendeur la place visitez www tripplite com support 3 Si le probl me n cessite une r paration visitez ww...

Страница 36: ...ce dernier ou suite des r parations ou modifications apport es par l utilisateur Dans l int r t de leur propre s curit les utilisateurs devraient s assurer que la prise de terre du secteur des lignes...

Отзывы: