background image

USER GUIDE

6

6.

The KVM Extender cables

The Transmitter comes with built-in KVM cables that connect
to the computer’s Video card, Mouse and Keyboard ports.

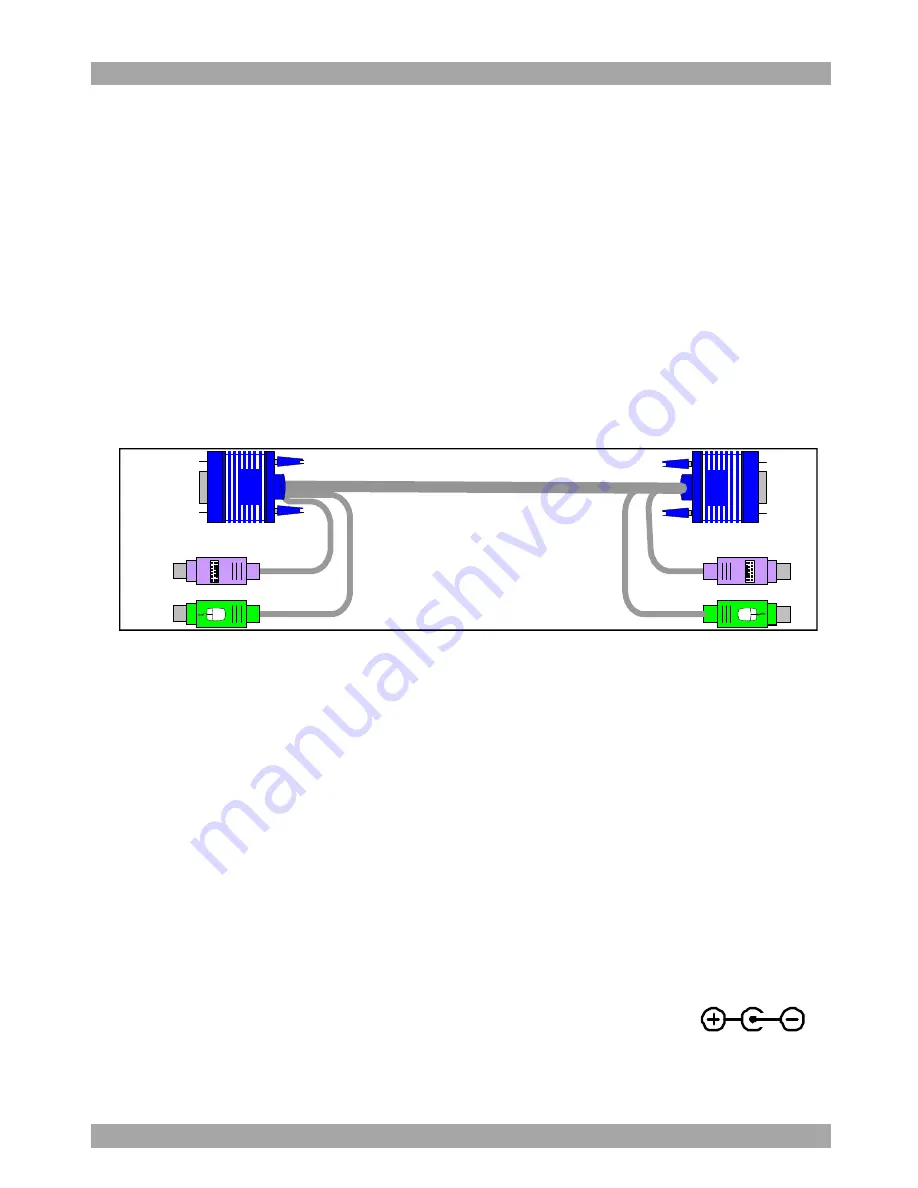
The 3 in 1 CPU cable

The 3 in 1 CPU cable –illustrated below – is only used when
the Receiver connects to a computer. The cable connects to the
Computer section of the Receiver rear panel.

Figure 5 3 in 1 CPU cable

7.

Power supply

Connect the Receiver to the power supply with the Power
adapter and cord provided.

The Transmitter receives its power from the connected
computer and does not generally need an external power supply.
However, when cascading Smart Extenders, some of the
Transmitters need an external power supply. Use a Minicom
Power adapter p/n 5PS20025. The power supply specifications

are: Regulated 6VDC 2 Amp, minus on internal pin

.

Cascading is discussed on page 16.

Содержание 0DT23001

Страница 1: ...1111 W 35th Street Chicago IL 60609 USA www tripplite com support Copyright 2012 Tripp Lite All rights reserved CAT5 Smart KVM Extender User Guide ...

Страница 2: ...nstructions 5 6 The KVM Extender cables 6 7 Power supply 6 8 Using the KVM Extender as an extender 7 9 Giving 2 users access to 1 computer 8 10 The KVM Extender as a 2 port KVM Switch 9 11 Operating the KVM Extender 10 12 KVM Extender Settings mode 11 13 Cascading Smart Extenders 16 14 Technical specifications 19 15 KVM Extender configuration 20 ...

Страница 3: ...against such interference when operating the equipment in a commercial environment If operation of this equipment in a residential area causes radio frequency interference the user and not Minicom Advanced Systems Limited will be responsible Changes or modifications made to this equipment not expressly approved by Minicom Advanced Systems Limited could void the user s authority to operate the equi...

Страница 4: ... at 2 workstations control of 1 computer A 2 port KVM switch for 1 or 2 users Throughout this guide computer also means a KVM switch 3 The system components The KVM Extender system consists of Transmitter Receiver 3 in 1 CPU cable 1 Power adapter for the Receiver A Shielded CAT5 FTP Foil Twisted Pair Solid Wire 2x4x24 AWG cable with RJ 45M connectors connects the KVM Extender system The Receiver c...

Страница 5: ... Transmitter and Receiver units Figure 1 Transmitter side panels Figure 2 Receiver front panel SYSTEM CPU Built in KVM cables System cable 6VDC Green Control LED Mouse Monitor Keyboard Side A Side B Yellow Power LED Power connector SELECT POWER CONTROL Select button LEDs ...

Страница 6: ...ect all computers from the power supply Place cables away from fluorescent lights air conditioners and machines that are likely to generate electrical noise COMPUTER USER Keyboard Mouse Monitor Computer Mouse port Computer Keyboard port Computer Monitor port 6VDC SYSTEM PICTURE Picture adjuster System cable Power connector ...

Страница 7: ...f the Receiver rear panel Figure 5 3 in 1 CPU cable 7 Power supply Connect the Receiver to the power supply with the Power adapter and cord provided The Transmitter receives its power from the connected computer and does not generally need an external power supply However when cascading Smart Extenders some of the Transmitters need an external power supply Use a Minicom Power adapter p n 5PS20025 ...

Страница 8: ...r 4 Connect a Power adapter to the Receiver Figure 6 illustrates the connections Figure 6 KVM Extender as an extender CAT5 S M A R T Extender RECEIVER MINICOM www minicom com CAT5 S M A R T Extender TRANSMITTER MINICOM www minicom com 6VDC To Video card SD DESKPRO To wall socket SD P110 Computer To Keyboard port To Mouse port Transmitter Receiver To System port CAT5 FTP cable Up to 110m 360ft Powe...

Страница 9: ...workstation for user 2 Access to the computer is on a first come first served basis Figure 7 Giving 2 users access to 1 computer CAT5 SM ART Extender RECEIVER MINICOM www minicom com CAT5 SM ART Extender TRANSMITTER MINICOM www minicom com 6VDC SD DESKPRO SD P110 Computer Transmitter Receiver CAT5 FTP cable Up to 110m 360ft To Monitor port SD P110 To Keyboard port To Mouse port User 1 User 2 ...

Страница 10: ... KVM Switch The option in Figure 8 can also work with only 1 user workstation connected at the Receiver There is another configuration diagram on the last page of this Guide and more on the Marketing Documentation CD CAT5 SM ART Extender RECEIVER MINICOM www minicom com CAT5 SM ART Extender TRANSMITTER MINICOM www minicom com 6VDC SD DESKPRO S D P 110 Computer Transmitter Receiver CAT5 FTP cable U...

Страница 11: ...r computer Transmitter Receiver controls the Transmitter computer N A Working at Transmitter computer Adjusting the picture When the Transmitter computer is controlled from the Receiver you can adjust the picture quality using a small flat screwdriver to turn the Picture adjuster located on the Receiver s rear panel See Figure 4 Timeout When there are 2 workstations in the system you can gain cont...

Страница 12: ...he keyboard press Shift then Esc In the Settings mode you can disable the lock control function as explained on page 12 12 KVM Extender Settings mode Enter the Settings mode to Change the hotkey Change the Timeout period Enable disable lock control Make advanced adjustments View settings Note Settings changed at the Receiver location are saved in the system Settings changed at the Transmitter loca...

Страница 13: ... refer to the new hotkey To change the hotkey To Type the letters Alt HA Ctrl HC Shift HS Changing the Timeout period At the Receiver you can change the Timeout period To do so Press T followed by a 2 digit number of between 01 99 seconds The 3 keyboard LEDs blink and the new setting is now functional Enabling disabling lock control By default both users can lock control At the Receiver you can di...

Страница 14: ...When a computer is replaced with a different computer type while the KVM Extender is in use we recommend turning the new computer off before connecting it to the KVM Extender When turning the computers off is inconvenient do the following At the Receiver or Transmitter location enter the Settings mode to adjust the keyboard and mouse modes making them compatible with the new computer See the table...

Страница 15: ... 3 button mouse PS 5 button mouse EP Set the mouse mode to IN when the computer has an operating system that supports Wheel mouse functionality Windows 98 and Linux Set the mouse setting to PS when the computer has an operating system that does not support Wheel mouse functionality Windows 95 NT4 DOS Linux UNIX and Novell Depending on the version Set the mouse setting to EP when the computer has a...

Страница 16: ...e the Select button after your monitor blinks once Viewing the settings At the Receiver or Transmitter location view the settings and firmware revision in any text editor To view the settings 1 Before entering to the Settings mode switch the keyboard layout to English 2 Open any text editor e g Notepad 3 Press Shift then F2 to enter the Settings mode 4 Press F The settings appear in the text edito...

Страница 17: ... GUIDE 16 13 Cascading Smart Extenders You can cascade two or more Smart Extenders to get more than one remote workstation working from one computer One possible configuration is shown on the diagram below ...

Страница 18: ...inicom com SYST EM 6VD C 6VD C SYS T EM CAT5 SM ART Extender RECEIVER MINICOM www minicom com PI CT URE SELECT U SER C OM PU T ER S D P 1 1 0 6 VDC SYST EM CAT5 SM ART Extender RECEIVER MINICOM www m inicom com PICT U RE SELEC T USE R CO M PUT ER CAT5 Cable CAT5 Cable Remote Workstation 2 Remote Workstation 1 Smart Extender Transmitter 1 Smart Extender Transmitter 2 Smart Extender Receiver 2 Smart...

Страница 19: ...nsures mouse and keyboard functionality See Figure 9 above Order of switching on When cascading switch the system on in the following order 1 The second Smart Extender Transmitter unit 2 The rest of the system including the shared computer ...

Страница 20: ... 1600X1200 75Hz depends on cable length Operating temperature 0 to 40 C 32 to 104 F Storage temperature 40 C to 40 C 40 F to 104 F Transmitter Receiver Cables Built in KVM 3 in 1 CPU Connectors VGA HDD15M Keyboard MiniDin6M Mouse MiniDin6M System RJ45 VGA HDD15F Keyboard MiniDin6F Mouse MiniDin6F System RJ45 Dimensions 85 x 113 x 25mm 3 3 x 4 4 x 0 98 85 x 49 x 25mm 3 3 x 1 9 x 0 98 Weight 380g Sh...

Страница 21: ... TRANSMITTER MINICOM www minicom com SYS TEM 6VDC SD DESKPRO COMPUTER 1 COMPUTER 2 COMPUTER 6 COMPUTER 5 STATION 2 SCREEN PS 2 MOUSE KB POWER SERIAL MOUSE COMPUTER 3 COMPUTER 4 COMPUTER 8 COMPUTER 7 KVM Switch SD P110 ProLiant DL360 9 1 GB 10k ULTRA2 SCSI 9 1 GB 10k ULTRA2 SCSI ProLiant DL360 9 1 GB 10k ULTRA2 SCSI 9 1 GB 10k ULTRA2 SCSI ProLiant DL360 9 1 GB 10k ULTRA2 SCSI 9 1 GB 10k ULTRA2 SCSI...

Страница 22: ...CAT5 SMART KVM EXTENDER 21 201204204 933188_EN ...

Отзывы: