background image

7

OPERATING INSTRUCTIONS

CAUTION: 

The add-ons with the coupler

system are to be used in the primary hole only.
Using the wrong hole could lead to personal
injury or damage to the unit.

The turbo blower add-on should be installed with the
release button in the 

primary hole

.

Check Flex Shaft Engagement Prior to Using

1. Start the unit.

2. Briefly engage and release the trigger.

3. Check that add-on is operating.

4. If the add-on is not operating, remove add-on and

repeat steps for installing the add-on.

5. Recheck operation of add-on.

3. Turn the knob clockwise to tighten (Fig. 3).

CAUTION:

Lock the release button in the 

primary hole (Fig. 2) and securely tighten the
knob before operating this unit.

ASSEMBLING THE COUPLER

The following TrimmerPlus® Add-Ons are also available for
your unit:

AeroFlex™ Trimmer  . . . . . . . . . . . . . . . . . . . . . . . .AF720

Brushcutter . . . . . . . . . . . . . . . . . . . . . . . . . . . . . .BC720

*

Bladed Pruner . . . . . . . . . . . . . . . . . . . . . . . . . . . . .BP720
Blower Trimmer  . . . . . . . . . . . . . . . . . . . . . . . . . .BT720

*

Blower Vacuum . . . . . . . . . . . . . . . . . . . . . . . . . . . .BV720
Garden Cultivator  . . . . . . . . . . . . . . . . . . . . . . . . . GC720
Lawn Edger  . . . . . . . . . . . . . . . . . . . . . . . . . . . . . . LE720
Articulating Hedge Trimmer  . . . . . . . . . . . . . . . . AH720

*

Pole Saw  . . . . . . . . . . . . . . . . . . . . . . . . . . . . . . . . PS720
Snow Thrower  . . . . . . . . . . . . . . . . . . . . . . . . . . . . .ST720
Straight Shaft Trimmer . . . . . . . . . . . . . . . . . . . . . . SS725

*

Do NOT use this add-on with an electric powered product.

WARNING: 

Read and understand operator’s

manual for unit to be used with this add-on
prior to operation.

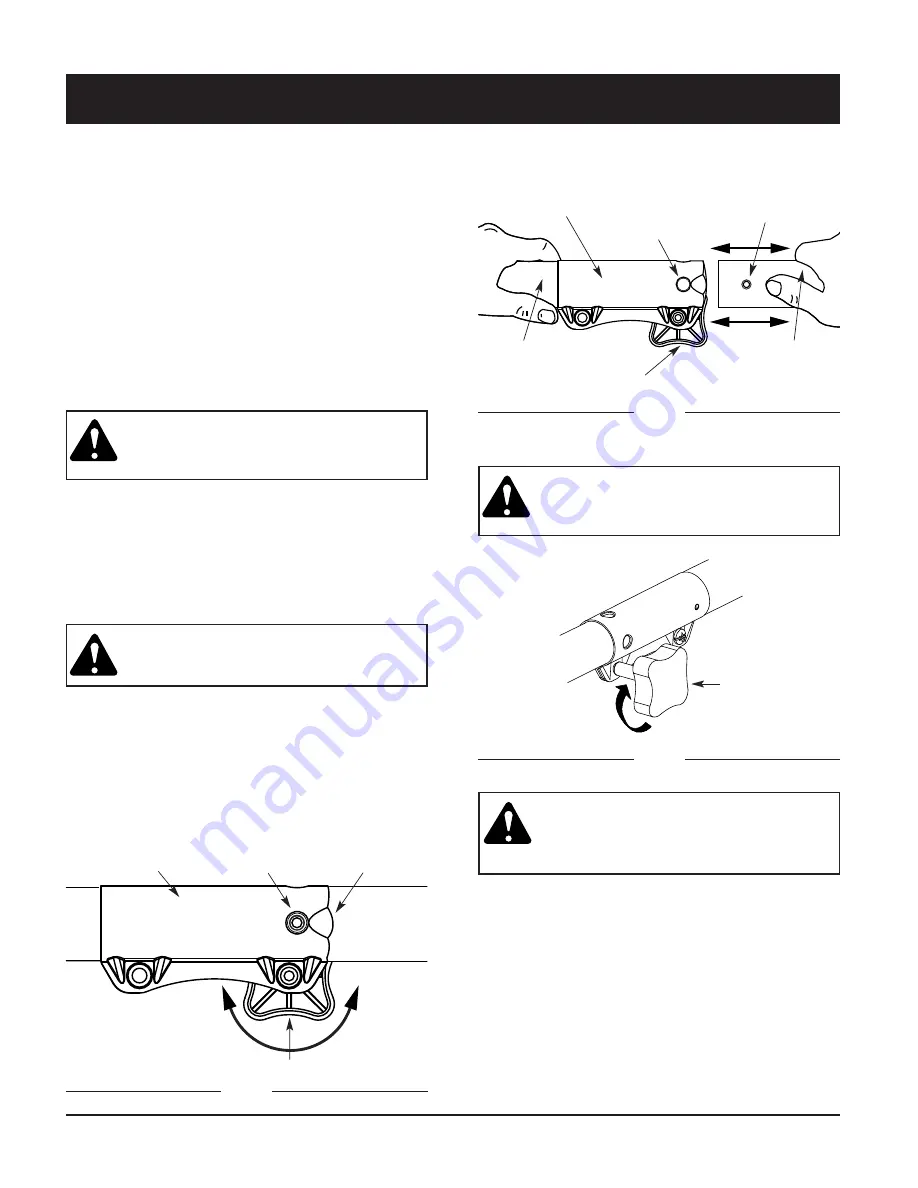
Removing the add-on:

1. Turn the knob counterclockwise to loosen (Fig. 1).

2. Press and hold the release button (Fig. 1).

3. While firmly holding the upper shaft housing, pull the

turboblower attachment out of the coupler (Fig. 2).

Installing the add-on:

WARNING: 

To avoid serious personal injury 

and damage to the unit, shut unit off before
removing or installing add-ons.

NOTE:

To make installing or removing the add-on 
easier, place the unit on the ground or on a 
work bench.

1. Remove the hanger from the top of the shaft housing.
2. Turn knob counterclockwise to loosen (Fig. 1).

3. While firmly holding the add-on, push it straight into

the coupler (Fig. 2).

Fig. 1

Coupler

Release Button

Guide Recess

Knob

Primary Hole

Upper Shaft

Housing

Coupler

NOTE:

Aligning the release button with the guide recess
will help installation (Fig. 1).

Fig. 2

Fig. 3

Knob

Lower Shaft

Housing

Release Button

Knob

Clockwise

Counterclockwise

Содержание TB720

Страница 1: ...FOR QUESTIONS CALL 1 800 345 8746 in U S or 1 800 668 1238 in CANADA www TrimmerPlus com IMPORTANT MANUAL DO NOT THROW AWAY Turbo Blower OPERATOR S MANUAL TB720 ...

Страница 2: ...tions 10 A Storage 10 B Transporting 10 C Accessories Replacement Parts 10 IV Specifications 11 V Warranty 12 VI Parts List E11 CONTENTS OF CARTON This unit should consist of the following TB720 Turbo Blower Add On Flare Nozzle Concentrator Nozzle Hanger Operator s Manual NOTE This product has been rated for use on both gas and electric powerheads Read the Operator s Manual s and follow all warnin...

Страница 3: ... the safety rules must be followed For your own safety and that of bystanders please read these instructions before operating the unit Please keep the instructions safe for later use BEFORE OPERATING Carefully read and understand the operator s manual of the unit that powers this add on Read this operating instruction manual carefully Be thoroughly familiar with the controls and the proper use of ...

Страница 4: ...on is a sign of trouble Inspect thoroughly for loose nuts bolts or damage before continuing Repair or replace affected parts as necessary Stop and switch the unit to off for maintenance repair or for changing add ons The unit must be stopped and the impeller no longer turning to avoid injury Use only genuine MTD replacement parts and accessories for this unit These are available from your authoriz...

Страница 5: ...tion of any power tool can be the source of thrown objects and loud noise which can cause severe eye injury and hearing loss Always wear safety glasses or goggles eye protection meeting ANSI Z87 1 1989 standards and ear protection when operating this unit Use a full face shield when needed KEEP BYSTANDERS AWAY WARNING Keep all bystanders especially children and pets at least 50 feet 15 m from the ...

Страница 6: ... 145 MPH Velocity Air Flow for Fast Clearing of Large Areas Flare Nozzle for Large Areas Concentrated Nozzle for Hard to Reach Places Shaft Housing Hanger Housing Concentrator Nozzle Flare Nozzle KNOW YOUR UNIT RULES FOR SAFE OPERATION Air intake ...

Страница 7: ...ng Hedge Trimmer AH720 Pole Saw PS720 Snow Thrower ST720 Straight Shaft Trimmer SS725 Do NOT use this add on with an electric powered product WARNING Read and understand operator s manual for unit to be used with this add on prior to operation Removing the add on 1 Turn the knob counterclockwise to loosen Fig 1 2 Press and hold the release button Fig 1 3 While firmly holding the upper shaft housin...

Страница 8: ...LES Use the following instructions to attach or interchange the two nozzles Figs 4 and 5 WARNING To reduce the risk of injury disconnect power source before removing nozzles INSTALLING FLARE OR CONCENTRATOR NOZZLE ONTO BLOWER HOUSING 1 Align the indexing button on the inside of the nozzle with the detent on the housing Fig 6 2 Push the nozzle onto the housing and turn the nozzle clockwise until it...

Страница 9: ... the blower housing Fig 8 Pull the nozzle off of the blower housing Detent Indexing Button Fig 8 Fig 10 Fig 9 9 OPERATING INSTRUCTIONS USING THE FLARE NOZZLE Use the flare nozzle for large hard surfaces such as driveways and sidewalks Fig 9 USING THE CONCENTRATOR NOZZLE Use the concentrator nozzle for hard to reach places such as corners in a garage or to control dust in a dust laden environment F...

Страница 10: ... instruction labels as necessary For gas powerhead units Allow the unit to cool before storing in any enclosure Drain fuel from unit Never store the unit with fuel in the fuel tank inside a building where ignition sources are present such as hot water and space heaters clothes dryers etc TRANSPORTING Allow the unit to cool before transporting Secure the unit while transporting For gas powerhead un...

Страница 11: ...11 SPECIFICATIONS TURBO BLOWER ADD ON Weight of Attachment 3 375 lbs 1 531 kg Drive Shaft Housing Steel Tube Air Velocity Up to 145 MPH ...

Страница 12: ...h new merchandise purchased and used in the United States its possessions and territories MTD warrants this product against defects in material and workmanship for a period of two 2 years commencing on the date of original purchase and will at its option repair or replace free of charge any part found to be defective in material or workmanship This limited warranty shall only apply if this product...

Страница 13: ...Turbosouffleuse TB720 SI VOUS AVEZ DES QUESTIONS APPELEZ LE 1 800 345 8746 aux ÉTATS UNIS ou le 1 800 668 1238 au CANADA www TrimmerPlus com MANUEL IMPORTANT À NE PAS JETER MANUEL DE L UTILISATEUR ...

Страница 14: ...ur tous Respectez toujours les consignes de sécurité afin de réduire les risques d incendie de choc électrique et de blessures MISE EN GARDE le non respect d un avertissement risque d entraîner des dommages matériels ou des blessures graves pour tous Respectez toujours les consignes de sécurité afin de réduire les risques d incendie de choc électrique et de blessures Les symboles de sécurité attir...

Страница 15: ...nez soin de lire ces instructions avant de faire fonctionner la machine Veuillez garder les instructions en lieu sûr pour usage ultérieur AVANT L UTILISATION Prenez soin de bien lire et comprendre le manuel de l appareil qui alimente cet accessoire Veuillez lire le manuel de l utilisateur attentivement Familiarisez vous avec les commandes et l utilisation correcte de l appareil Sachez comment arrê...

Страница 16: ...eusement qu il n y a ni écrous ni boulons desserrés ni aucun dommage avant de continuer Réparez ou remplacez au besoin les pièces affectées Arrêtez et éteignez l appareil dans ces cas ci entretien réparation changement d accessoires L appareil et les hélice doivent être arrêtés pour éviter toute blessure Utilisez uniquement des pièces de rechange et accessoires MTD d origine pour cet appareil Vous...

Страница 17: ...ter des objets et faire beaucoup de bruit ce qui peut gravement blesser les yeux et endommager l ouïe Portez toujours des lunettes de sécurité conformes aux normes ANSI Z87 1 1989 ainsi que des protège oreilles durant l utilisation de l appareil Protégez vous le visage avec un masque intégral au besoin ÉLOIGNEZ LES SPECTATEURS AVERTISSEMENT éloignez les spectateurs les enfants et les animaux domes...

Страница 18: ...l air de 235 km h 145 mi h max permettant de nettoyer de larges surfaces Embout évasé pour les larges surfaces Embout concentrateur pour emplacements difficiles d accès Corps de l arbre Crochet Boîtier Embout concentrateur Embout évasé SAVOIR VOTRE UNITÉ Prise d air ...

Страница 19: ...appareil AeroFlex débroussailleuse AF720 Débroussailleuse BC720 L élagueuse à lame circulaire BP720 Souffleuse débroussailleuse BT720 Souffleuse aspirateur BV720 Motobineuse de jardin GC720 Coupe bordures pour gazon LE720 Taille haie articulés AH720 Scie à long manche PS720 Souffleuse à neige ST720 Débroussailleuse à arbre droit SS725 N utilisez PAS cet accessoire avec un produit électrique AVERTI...

Страница 20: ...u échanger les deux embouts Fig 4 et 5 AVERTISSEMENT pour réduire les risques de blessures débranchez l appareil avant de retirer les embouts INSTALLATION DE L EMBOUT ÉVASÉ OU CONCENTRATEUR SUR LE BOÎTIER DE LA SOUFFLEUSE 1 Alignez le bouton de positionnement à l intérieur de l embout avec la détente sur le boîtier Fig 6 2 Enfoncez l embout dans le boîtier et tournez le dans le sens des aiguilles ...

Страница 21: ...fleuse Fig 8 Tirez l embout du boîtier de la souffleuse Détente Bouton de positionnement Fig 8 Fig 10 Fig 9 F9 UTILISATION DE L EMBOUT ÉVASÉ Utilisez l embout évasé pour les grandes surfaces dures telles une entrée de garage ou un trottoir Fig 9 UTILISATION DE L EMBOUT CONCENTRATEUR Utilisez l embout concentrateur pour les emplacements difficiles d accès tels les coins dans un garage ou pour contr...

Страница 22: ...dir avant de l entreposer dans une enceinte Vidangez tout le carburant de l appareil Ne rangez jamais l appareil avec du carburant dans le réservoir à l intérieur d un bâtiment où se trouvent des sources potentielles d allumage tels que des radiateurs à eau chaude ou indépendants des sécheuses etc TRANSPORT Laissez le moteur refroidir avant de l entreposer Attachez bien l appareil lors du transpor...

Страница 23: ...F11 Poids de l accessoire 1 531 kg 3 375 lb Logement de l arbre d entraînement Tube en acier Vitesse de l air 235 km h 145 mph max CARACTÉRISTIQUES ACCESSOIRE DE TURBOSOUFFLEUSE ...

Страница 24: ...che composer le 1 800 345 8746 aux États Unis ou le 1 800 668 1238 au Canada MTD LLC P O Box 361131 Cleveland OH 44136 0019 U S A La garantie limitée énoncée ci après est accordée par MTD LLC MTD et concerne les marchandises neuves achetées et utilisés aux Etats Unis ainsi que dans leurs possessions et territoires MTD garantit ce produit contre tout vice de matière ou de façon pendant une période ...

Страница 25: ...Turbosoplador TB720 SI TIENE PREGUNTAS LLAME AL 1 800 345 8746 en EE UU o al 1 800 668 1238 en CANADÁ www TrimmerPlus com ESTE MANUAL ES IMPORTANTE NO LO DESCARTE MANUAL DEL OPERADOR ...

Страница 26: ...anadá para obtener una lista de los proveedores de servicio autorizado más cercanos a usted NO LE DEVUELVA LA UNIDAD AL VENDEDOR NOTA PARA SOLICITAR SERVICIO DE GARANTIA DEBERA PRESENTAR UN COMPROBANTE DE COMPRA Antes de arrancar u operar este equipo asegúrese de leer y comprender bien este manual ESTE PRODUCTO ESTÁ CUBIERTO POR UNA Ó MÁS PATENTES DE EE UU OTRAS PATENTES EN TRAMITE PELIGRO El no o...

Страница 27: ...e deben seguir las siguientes reglas de seguridad cuando use la unidad Por favor lea estas instrucciones para su propia seguridad y las de los espectadores antes de hacer funcionar la unidad Por favor mantenga estas instrucciones en un lugar seguro para uso futuro ANTES DE LA OPERACIÓN Lea cuidadosamente y entienda el manual del operador de la unidad que impulsa a este aditamento Lea este manual d...

Страница 28: ...si hay tuercas o pernos flojos o daños antes de continuar Repare o cambie las piezas afectadas según sea necesario Pare y apague la unidad para hacerle mantenimiento arreglos o para cambiarle aditamentos Debe detener la unidad y el impulsor debe dejar de voltear para evitar lesiones Use únicamente piezas de repuesto y accesorios MTD genuinos para esta unidad Se encuentran disponibles en el distrib...

Страница 29: ...lanzamiento de objetos y ruidos elevados que pueden causar lesiones oculares severas y pérdida auditiva Use siempre gafas de seguridad o protección visual que cumpla con las normas ANSI Z87 1 1989 y protección auditiva cuando maneje esta unidad Use una careta completa cuando la necesite MANTENGA ALEJADOS A LOS ESPECTADORES ADVERTENCIA Mantenga a todos los espectadores en especial a los niños y ani...

Страница 30: ... h de Velocidad del Flujo de Aire para el Despeje Rápido de Áreas Extensas Boquilla ancha para áreas extensas Boquilla concentradora para lugares de difícil acceso Cubierta del eje Suspensor Cubierta Boquilla concentradora Boquilla ancha CONOZCA SU UNIDAD Toma de aire ...

Страница 31: ...car o instalar accesorios NOTA Para facilitar la instalación o remoción de los accesorios coloque la unidad sobre el suelo o sobre un banco de trabajo 1 Quite el colgador de encima de la cubierta del eje 2 Apriete el botón girándolo hacia la derecha Fig 1 3 Mientras sostiene el accesorio con firmeza empújelo en línea recta en el acoplador Fig 2 PRECAUCIÓN Los aditamentos junto con el sistema de ac...

Страница 32: ... cambiar las dos boquillas Figuras 4 y 5 ADVERTENCIA Para reducir el peligro de lesiones desconecte la corriente antes de quitar las boquillas INTALACIÓN DE LA BOQUILLA ANCHA O LA CONCENTRADORA EN LA CUBIERTA DEL SOPLADOR 1 Alinee el botón de indexado dentro de la boquilla con el anclaje de la cubierta Fig 6 2 Empuje la boquilla dentro de la cubierta y voltéela hacia la derecha hasta que asegure F...

Страница 33: ...dor Fig 8 Hale la boquilla fuera de la cubierta del soplador Anclaje Botón de indexado Fig 8 Fig 10 Fig 9 E9 USO DE LA BOQUILLA ANCHA Use la boquilla ancha para superficies grandes y duras tales como caminos de acceso y aceras Fig 9 USO DE LA BOQUILLA CONCENTRADORA Use la boquilla concentradora para lugares de difícil acceso tales como esquinas en un garaje o para controlar el polvo en un ambiente...

Страница 34: ...omo sea necesario Para unidades a gasolina Permita que la unidad se enfríe antes de guardarla en cualquier lugar encerrado Vacíe el combustible de la unidad Nunca guarde la unidad con combustible dentro del tanque en un edificio en donde haya presentes fuentes de ignición tales como calentadores portátiles secadoras de ropa etc TRANSPORTE Espere que el motor se enfríe antes de su transporte Asegur...

Страница 35: ...ncludes 4 6 791 181853 Mounting Screw 7 791 181996 Upper Housing 8 791 181560 Palnut 9 791 181636 Bushing Assembly Housing 10 791 181634 Shaft Impeller 11 791 181635 Impeller 12 791 181637 Nut and Washer 13 791 181997 Lower Housing 14 791 181345 Mounting Screw 15 791 181632 Flare Nozzle 16 791 181633 Concentrator Nozzle 7 1 4 3 6 5 2 8 15 10 9 16 13 12 11 14 REPLACEMENT PARTS MODEL TB720 BLOWER AD...

Страница 36: ...P O Box 361131 Cleveland OH 44136 0019 A continuación expone una garantía limitada MTD LLC MTD en relación con su nueva mercadería adquirida y utilizada en los Estados Unidos sus posesiones y territorios MTD garantiza su producto en cuanto a defectos en el material y mano de obra por un período de dos 2 años comenzando a partir de la fecha de la compra original y según su criterio reparará o reemp...

Отзывы: