background image

Setup Menu

Press 

MENU

 button to display the main menu.

 Press ◄ / ► button to select 

SETUP

 in the main


menu,  it will highlight the first option.

Steup

Move

MENU:

Return

EXIT

:

Exit

OSD Language                                                 English

Audio


Language       


Subtitle            

Teletext                      

Time Settings                     

First Time Setup                             

Reset

Software


Update(USB)

OSD Language

Press ▼ / ▲ button to select 

th


▼ / ▲ /◄ / ►button 

to select 

.

OSD Language

,

en press

OK

button to enter sub-menu

.

Press

OSD Language


Audio Language                    


then press 

OK


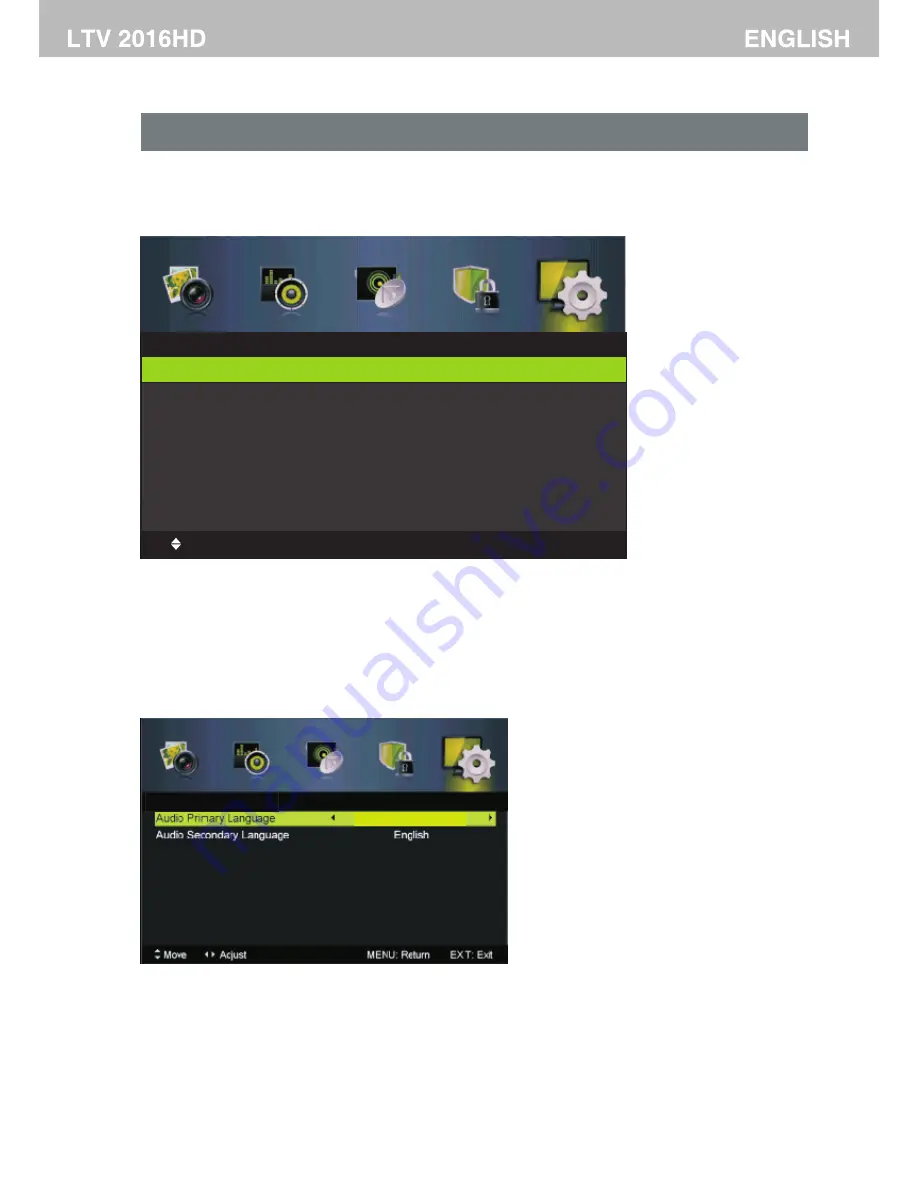
Press ▼ / ▲ button to select

button to enter submenu.

Audio Language,

Press

 ▼ / ▲ /◄ / ► button to select the Audio Primary Language and Audio Secondary Language

25 

Italiano

Audio Language                    


Содержание LTV 2016HD

Страница 1: ...LTV 2016HD 16 HD LED TV with DVB T CI ...

Страница 2: ... 2 1 PREFACE FRONT AND CONNECTIONS OF THE TV 6 4 5 REMOTE CONTROL 6 INSTALLATION BASIC IN THE CARTON 5 3 7 15 20 Select Input Source Sound Menu BACK OSD menu Picture Menu Channel Menu 16 18 1 14 Remote control setup 29 Media Multimedia Menu 23 Lock Menu 25 Setup Menu 28 ATV SCART HDMI AV YPbPr PC Menu DTV Menu 16 ...

Страница 3: ...8 32 34 9 35 10 If you re having problems Your TV s specification Wall mounting assembly instruction 2 ...

Страница 4: ...g to the model it and contact 2 SAFETY PRECAUTIONS Power cord and cables must be properly routed and protected to prevent people from stepping on them and causing the TV to fall Put the TV on a stable surface Do not place any material on the TV Do not block or cover the ventilation openings on the TV If you have a wall mount check that it is steady Do not use the with fixtures other than those pro...

Страница 5: ...V to clean the TV Only clean the TV with a soft and dry cloth In case of troubleshooting do not use spare parts other than those suggested by the manufacturer Using inadequate spare parts can shocks short circuits fire or other incidents lead to electric Unplug the TV during lightening storms or when unused for long periods of time 4 ...

Страница 6: ...3 IN THE CARTON Remote Control User Manual User Manual TV SET 5 Switch Adaptor DTV PC AUDIO SLEEP ASPECT ...

Страница 7: ...R or DVD 7 Video Connect the VIDEO output jack of DVD R L Connect the R L audio output jack of DVD 8 Coax Connect the SPDIF 1 RF Connect the antenna 11 HDMI Connect the HDMI output jack of DVD 12 USB Connect to portable USB device 13 CI Connect to the CI card 9 a suitable amplifier 0 4 FRONT AND BACK CONNECTIONS OF LED TV 6 STANDBY SOURCE MENU CH CH VOL VOL HDMI RF USB Coax CI VGA Head phone PC Au...

Страница 8: ...he power indicator on the front panel lights up in green or blue To ensure good picture and sound TV antenna system needs to be installed The antenna system as shown can be sourced from TV equipment shops which will provide service for correct installation and connection After installation insert the 75 OHM antenna plug into the antenna jack as shown 7 AC Adaptor POWER Cord DC IN ...

Страница 9: ... the set The picture quality is improved compared to connecting a regular VCR to the video input Connect the Audio output of the DVD or VCR to the Audio input jacks on the set using the RCA cable 3 5mm plug 2 X RCA plug Match the jacks colours Y is green Pb is blue Pr is red Audio left is white and Audio right in red Select YPbPr input source using the SOURCE button on the remote control 8 PC Audi...

Страница 10: ...UDIO jack on the set Select the PC input source using button on the remote control SOURCE HDMI connection allows the user to transfer both audio and video control signals through one cable only These signals are transferred in digital 9 HDMI RF USB Coax CI PC Audio Head phone VGA Video R L SCART YPbPr DC IN ...

Страница 11: ...on the external video device to the SCART connector on the LED TV using a SCART cable Connection SCART USB Connect to portable usb device MEDIA Connection 10 HDMI RF USB Coax CI PC Audio Head phone VGA Video R L SCART YPbPr DC IN ...

Страница 12: ... PC NUMBER BUTTONS Press 0 9 to select a TV channel directly when you are watching TV The channel change after 2 seconds THUMBSTICK OK Allows you to navigate the on screen menus and adjust the system settings to your preference MENU Brings up the main TV menu to the screen EXIT Exit the main TV menu to the screen VOL VOL Press to increase decrease the sound level CH CH Press to scan through channe...

Страница 13: ...age TEXT Press to switch between TV and Teletext mode SUBTITLE To display subtitle HOLD Freeze the current page SIZE Change the picture size REVEAL Reveal or hide the hidden words INDEX Request index page when index link is valid SUBPAGE TELETEXT Subpage Remote control instruction in TELETEXT mode ...

Страница 14: ... in TIMESHIFT and MEDIA mode Jump to previous and next track in MEDIA mode Fast reverse and forward key in MEDIA mode Stop in MEDIA mode or exit the REC or TIMESHIFT mode Remote control instruction in DTV mode THUMBSTICK OK Allows you to navigate the on screen menus and adjust the system settings to your preference CH CH When watching a channel changes the channel COLOUR BUTTONS Colour buttons res...

Страница 15: ...own within the battery compartment 3 Replace the battery cover To prevent battery leakage which may result in bodily injury or damage to the remote 1 Install all batteries correctly and as marked on the remote control 2 Do not mix batteries OLD and NEW or CARBON and ALKALINE etc Remove batteries when the remote is not used for a long time 3 Recommended use ALKALINE type batteries 14 ...

Страница 16: ...ote control to display the input source list Press button to select the input source you want to watch Press OK button to enter the input source Press EXIT button to quit SOURCE ATV AV PC YPbPr SCART HDMI Select Input Source USB SOURCE Exit DTV 15 ...

Страница 17: ...ton to enter sub menu Press button to adjust Press button to select Sharpness then press button to adjust Sharpness Press button to select Color Temperature then press button to select Available Color Temperature Standard Cool Warm Color Temp 3 After finishing your adjustment Press MENU button to return back to the previous menu 1 Press button to select the option that you want to adjust in the PI...

Страница 18: ...ction then press button to select Available options Off Weak Medium Strong NR Noise Reduction Press button to select MPEG NR Noise Reduction then press button to select Available options Off Weak Medium Strong MPEG NR Noise Reduction Press button to select then press button to select Available options Off Weak Medium Strong Dynamic Contrast Dynamic Contrast ...

Страница 19: ...on to enter sub menu Press button to adjust Available Sound mode Standard Music Movie Personal You can change the value of Treble and Bass when the sound is in Personal mode TIPS You can press SMODE button on the remote control to change the Sound Mode directly Press button to select Sound Mode then press OK button to enter sub menu Press button to select Sound Mode Balance Press button to select ...

Страница 20: ... press button to select On or Off AVL Press button to select then press button to select Off Auto PCM SPDIF SPDIF Audio Description then press OK Press button to select button to enter submenu Audio Description Sound Type Press button to select then press button to select Sound Type 19 EQ Setting Audio Description ...

Страница 21: ...r finishing your adjustment Press MENU button to return back to the previous menu 1 Press button to select the option that you want to adjust in the CHANNEL menu 2 Press button to adjust 20 Press button to select then press button to select Air or Cable Tuner Type Tuner Type Auto Scan then press OK The default password is 0000 Press button to select button to enter submenu Auto Scan Move Adjust ME...

Страница 22: ...ect then press OK button to enter submenu Analog Manual Scan Move OK Select MENU Return EXIT Exit Manual Scan Digital Manual Scan Analog Manual Scan 21 Analog Manual Scan Analog Scan 855 20MHz Channel to Save Color System Sound System AFC Start CH005 PAL Off Move Fine tune MENU Return EXIT Exit 0 9 Input Digital Scan Start Frequency Strength Digital Manual Scan CH21 0 Move Adjust MENU Return EXIT ...

Страница 23: ...g CH to view the channels Press the button to to set the channel to moving state then press to move it to the position you want to put Red Green Blue Common interface then press OK Press button to select button to enter submenu Common interface Only available when there is Cl card under DTV Signal lnformation Press about the signal Only available when there is signal under DTV button to select Sig...

Страница 24: ...Default Password 0000 2 Press button to adjust Enter Password Press button to select then press OK button to make the following 4 options valid Default password is 0000 Enter Password Enable Press button to select then press button to select On or Off Enable Channel Locks Parental Rating and Lock Keypad are available when Enable is On Channel Locks then press ok Press button to select button to en...

Страница 25: ...or then enter a 4 digital number you want to set twice Clear Lock then press Press button to select button to select Clear Lock Hotel Mode then press OK Press button to select button to enter submenu Hotel Mode Hotel Mode Active Hotel Mode Max Vol Default Vol Source Lock Default Source Default Dtv Program Default Atv Program Backup To USB Restore From USB Recall Move Adjust EXIT Exit On 100 20 DTV...

Страница 26: ...uage Subtitle Teletext Time Settings First Time Setup Reset Software Update USB OSD Language Press button to select th button to select OSD Language en press OK button to enter sub menu Press OSD Language Audio Language then press OK Press button to select button to enter submenu Audio Language Press button to select the Audio Primary Language and Audio Secondary Language 25 Italiano Audio Languag...

Страница 27: ...ress button to select Teletext then press OK button to enter submenu Under DTV source press button to select Digital Teletext Language Under ATV source press button to select Decoding Page Language Time Settings then press OK Press button to select button to enter submenu Time Settings 26 Italiano Italiano Italiano Subtitle Teletext Time Settings Teletext ...

Страница 28: ...Reset Press button to select Reset then press OK button to enter If you are sure to reset press Yes to reset First Time Setup OSD Language English Country Italy Auto Scan DTV ATV Start Move Adjust MENU Return EXIT Exit 27 Software Update USB This menu lets you install the software firmware onto the television ...

Страница 29: ...28 ...

Страница 30: ...Media Menu 29 OK OK OK ok 1 43 12 jpg Previous Next OK Slide Show SingleView Quick Menu EXIT Back Rotate ...

Страница 31: ...30 ok ok ok ok Music USB1 seasons in the sun mp3 Move CH FileList OK Select Quick Menu EXIT Return ...

Страница 32: ...TXT txt 10 Most Unique Fall Date Ideas 10 Most Unique Fall Date Ideas TXT txt If you are been dating your boyfriend for over a year it might be difficult to spice up your date nights Romantic dinners and strolling down the streets hand in hand are great but your boyfriend and you may want to try something more exciting Move Change Page OK Select Quick Menu EXIT Return ...

Страница 33: ... set the timer to control the socket which has your TV power cord on Check that you have not set auto standby with the broadcast signal source which is connected to your TV The picture on my TV appears slowly after I have switched it on This is normal The image takes a few seconds to appear after you have switched the TV on Please contact your service centre if picture has not appeared after five ...

Страница 34: ...to last longer Make sure you turn the power off and unplug the power cord on your TV before you begin to clean it Cleaning the screen 1 Here s a great way to keep the dust off your screen Wet a soft cloth in a mixture of lukewarm water and a small amount of fabric softener or washing up liquid Wring the cloth until it s almost dry and then use it to wipe the screen 2 Make sure there is no excess w...

Страница 35: ...anual is only for your reference any change to the design and specification will not be advised 0 252 H x V 0 252 1366 x 768 16 9 16 7M 500 1 200 cd m 5 ms 90 H 50 V 2x3 W 16 inch Power consumption Panel 12V 2A 50 000 hours 24 W 34 ...

Страница 36: ...ce face down on a protective surface Place the stand on the neck of the Wall mounting the device If you are mounting the device place consult a qualified installer for further insturctions on 6 6 6 75mm 75mm 35 75 75 ...

Отзывы: