background image

English

3

  3. Driver Installation

Note: After inserting the TU-P1284 into one of your USB slots, Windows 
(XP/2000/ME/98SE) will automatically detect the device. Proceed to the 
appropriate section below for driver installation.

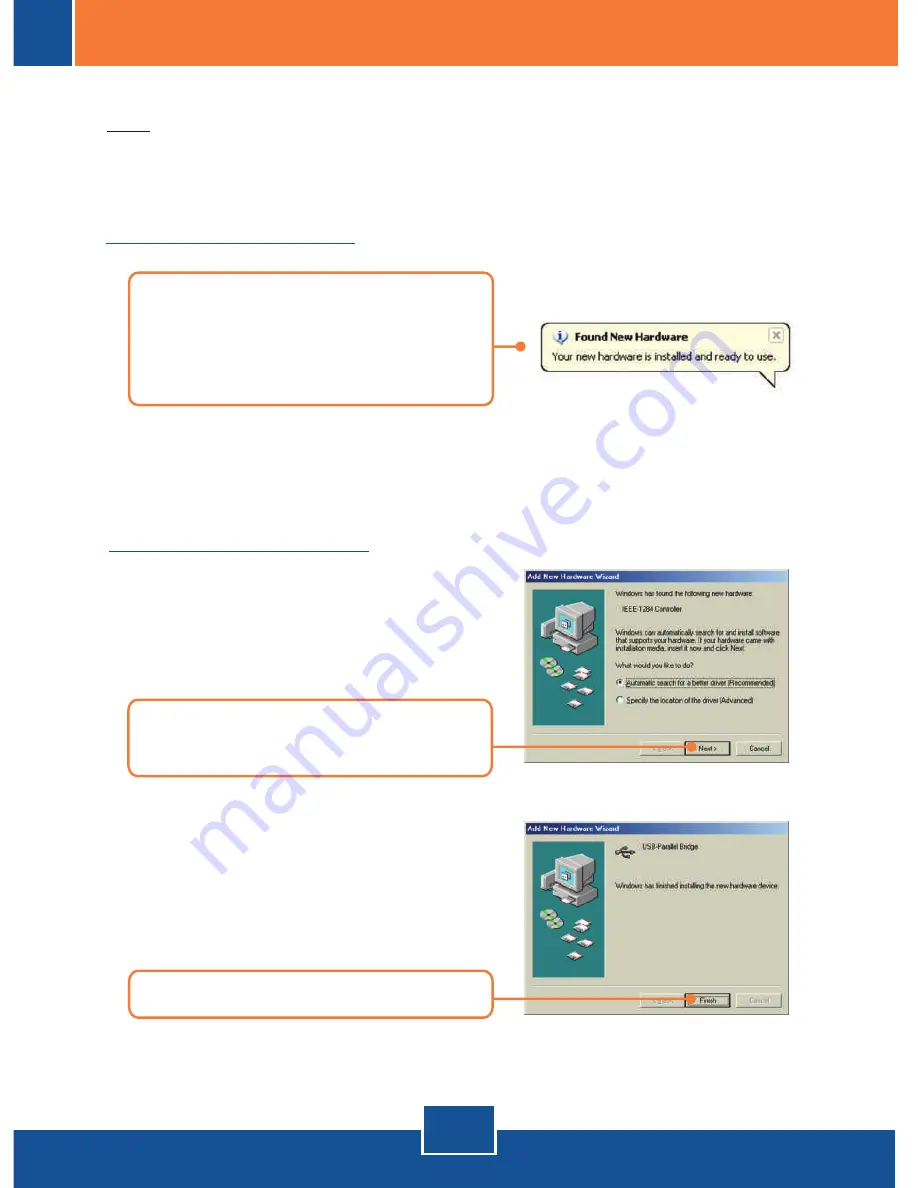
Windows 2000/XP

Windows ME/98SE

1.

 After your computer reboots,               

Windows will automatically                  
complete the installation of your       
new hardware.

2. 

Insert Driver CD-ROM, and then          

click

 Next.

3. 

Click 

Finish

.

Your installation is now complete.

Your installation is now complete.

Содержание TU-P1284

Страница 1: ...TU P1284 Quick Installation Guide ...

Страница 2: ...Table of Contents Table of Contents Version 01 23 2006 English Troubleshooting 1 1 2 3 4 5 1 Before You Start 2 4 Verify Installation Install Hardware 3 Driver Installation ...

Страница 3: ...ation TU P1284 Driver CD ROM Quick Installation Guide PC with supported operating systems Available USB port Package Content 1 Before You Start English 1 Parallel Printer Notebook USB to Parallel Converter TU P1284 USB Parallel ...

Страница 4: ...driver for your printer Refer to your printer s user manual for driver installation 1 Turn on your computer and wait until the Windows desktop appears 3 Connect the Adapter to an available USB port on your computer 2 Connect the parallel connector to your printer s parallel port and turn printer ON ...

Страница 5: ...ect the device Proceed to the appropriate section below for driver installation Windows 2000 XP Windows ME 98SE 1 After your computer reboots Windows will automatically complete the installation of your new hardware 2 Insert Driver CD ROM and then click Next 3 Click Finish Your installation is now complete Your installation is now complete ...

Страница 6: ...e visible USB Printing Support 1 Right click My Computer and click Properties Under the Hardware tab click Device Manager Windows 2000 XP For detailed information regarding the TU P1284 configuration and advanced settings please refer to the User s Guide CD ROM or TRENDnet s website at www trendnet com ...

Страница 7: ...rmation regarding BIOS settings please refer to your computer s User Manual If you still encounter problems or have any questions regarding the TU P1284 please contact TRENDnet s Technical Support Department Certifications This equipment has been tested and found to comply with FCC and CE Rules Operation is subject to the following two conditions 1 This device may not cause harmful interference 2 ...

Страница 8: ...r memory data of customer contained in stored on or integrated with any products returned to TRENDnet pursuant to any warranty There are no user serviceable parts inside the product Do not remove or attempt to service the product by any unauthorized service center This warranty is voided if i the product has been modified or repaired by any unauthorized service center ii the product was subject to...

Страница 9: ...ZED ATTEMPTS TO REPAIR OR MODIFY OR ANY OTHER CAUSE BEYOND THE RANGE OF THE INTENDED USE OR BY ACCIDENT FIRE LIGHTNING OR OTHER HAZARD LIMITATION OF LIABILITY TO THE FULL EXTENT ALLOWED BY LAW TRENDnet ALSO EXCLUDES FOR ITSELF AND ITS SUPPLIERS ANY LIABILITY WHETHER BASED IN CONTRACT OR TORT INCLUDING NEGLIGENCE FOR INCIDENTAL CONSEQUENTIAL INDIRECT SPECIAL OR PUNITIVE DAMAGES OF ANY KIND OR FOR L...

Страница 10: ...support trendnet com European Support Center Contact Tech Support Hours Telephone Deutsch 49 0 6331 268 460 Français 49 0 6331 268 461 0800 907 161 numéro vert Español 49 0 6331 268 462 English 49 0 6331 268 463 Italiano 49 0 6331 268 464 Dutch 49 0 6331 268 465 Fax 49 0 6331 268 466 8 00am 6 00pm Middle European Time Monday Friday Product Warranty Registration Please take a moment to register you...

Отзывы: