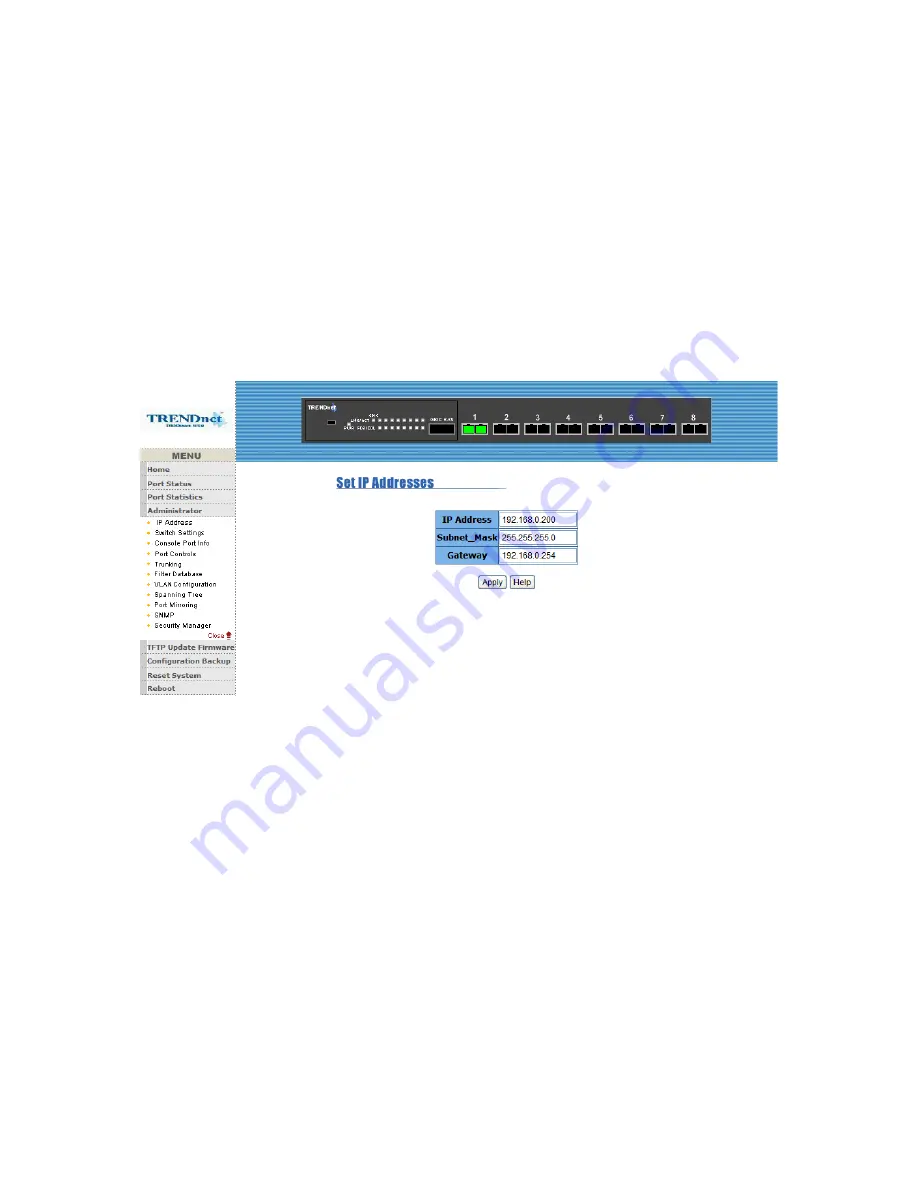
TRENDnet TEG-S081FMi Скачать руководство пользователя страница 55

5-4-1. IP Address 

1. User can configure the IP Settings and fill in the new value, than clicks 

apply button. 

2. User must be reset switch and use new IP address to browser this web 

management. 

Default IP:192.168.16.1   
Subnetmask:255.255.255.0 
Gateway:192.168.16.254  


 55 

Содержание TEG-S081FMi

Страница 1: ...1...

Страница 2: ...lows high performance low cost connection The Switch features a store and forward switching and it can auto learn and MAC address on an 8K entry MAC address table Figure 1 1 The TEG S081FMi Switch The...

Страница 3: ...indicators for Power LNK ACT FDX COL LNK ACT GBIC 19 inch Rack Mount size design Intelligent Management Features Web based management SNMP network management Console and Telnet management Port Base V...

Страница 4: ...User Guide TEG S081FMi Switch Power Cord Rubber Feet RS 232 cable User Guide Figure 1 2 Package Contents Compare the contents of your TEG S081FMi switch package with the standard checklist above IF an...

Страница 5: ...S081FMi Switch is on the network you can use Telnet to Log in and change the configuration Web based Management The Switch provides an embedded HTML web site residing in flash memory It offers advance...

Страница 6: ...nagement Switch Console Port Console management can be done through the Console Port It requires a direct connection between the Switch and an end station PC via a RS 232 cable Figure 2 2 The Front Pa...

Страница 7: ...ime indication of systematic operation status LED Status Color Description Power On Green Power On LNK ACT On Green The port is successfully connecting with the device on 100Mbps Blinks Green The port...

Страница 8: ...ntly large flat space with a power outlet nearby The surface where you put your Switch should be clean smooth level and sturdy Make sure there is enough clearance around the Switch to allow attachment...

Страница 9: ...used In general the TEG S081FMi Switch is designed to be used as a desktop or segment switch Segment Application For enterprise networks where large data broadcast are constantly processed this switc...

Страница 10: ...access the server s data The Switch automatically learns node address which are subsequently used to filter and forward all traffic based on the destination address You can use any of the Fiber port...

Страница 11: ...f the console program user has access to manage the functions of the Switch Connecting a Terminal or PC to the Console Port Use the supplied RS 232 cable to connect a terminal or PC to the console por...

Страница 12: ...Menu 1 The switch also provide a serial interface to manage and monitor the switch user can follow the Console Port Information provide by web to use windows HyperTerminal program to link the switch 2...

Страница 13: ...re the protocol function Reboot Switch Restart the system or reset switch to default configuration Logout Exit the menu line program Control Key The control key as follow provided in all menus Tab Mov...

Страница 14: ...every port status Type Display the port type Enabled Display the port is enabled or disable depended on user setting Enable will be display Yes disable will be display No Status Display the port is li...

Страница 15: ...ab or Backspace to choose action menu and press Enter key to select item Quit Exit the page of port status and return to previous menu 4 2 2 Port Counters The following information provides a view of...

Страница 16: ...revious menu Reset All Set all count to 0 4 2 3 System Information System Description Display the name of device type MAC Address The unique hardware address assigned by manufacturer Firmware Version...

Страница 17: ...4 3 Switch Static Configuration You can press the key of Tab or Backspace to choose item and press Enter key to select item 17...

Страница 18: ...on This page provide user to configure the device information Actions Edit Configure all items Finished configure press BackSpace to go back action menu line Save Save all configure value Quit Exit th...

Страница 19: ...figure the IP setting and fill in the new value Actions Edit Configure all items Finished configure press ESC to go back action menu line Save Save all configure value Quit Exit the page of IP configu...

Страница 20: ...Note Always restart the computer after finishing the setup 4 3 1 3 Change Username Use this page user can change web management user name 20...

Страница 21: ...ys is enabled can t be disable 2 Auto Negotiate port 1 to 8 100Mbps Fiber is disabled port 9 GBIC port is enabled 3 Speed Duplex Config For port 1 to 8 100 Mbps Fiber port only can set Full or Half du...

Страница 22: ...fic port That is traffic goes in or out monitored ports will be duplicated into monitoring port Press Space key to change configure of per item 1 Port Mirroring State Type space key for enable disable...

Страница 23: ...ctions Quit Exit the page of port monitoring configuration and return to previous menu Edit Configure all items Finished configure press ESC to go back action menu line Save Save all configure value 2...

Страница 24: ...t support tagging Only one untagged VLAN is allowed per port 2 Ingress Filter 1 It matches that Ingress Filtering Rule 1 on web Forward only packets with VID matching this port s configured VID Press...

Страница 25: ...VID between 1 4094 The default is 1 3 Protocol VLAN Press Space key to choose protocols type 4 Mode Press Space key to choose VLAN member There are three types to selected as 802 1Q 802 1Q with GVRP...

Страница 26: ...dit or delete a VLAN group 1 Press Edit or Delete item 2 Choose the VLAN group that you want to edit or delete and then press enter 3 User can modify the protocol VLAN item and the member port is tagg...

Страница 27: ...priority level can map to high or low queue 2 High Low Queue Service Ration User can select the ratio of high priority packets and low priority packets Actions Edit Configure all items Finished config...

Страница 28: ...igh priority queue These options represent the number of high priority packets sent before one low priority packet is sent For example 2 High 1 Low means that the switch sends 2 high priority packets...

Страница 29: ...Edit key to add a static MAC or edit address 2 Enter the MAC address to and from which the port should permanently forward traffic regardless of the device s network activity 3 In the Port num item en...

Страница 30: ...t you want to modify and then press enter 3 Press Edit key to modify all the items 4 Press ESC to go back action menu line and then select Save to save all configure value Delete static MAC address 1...

Страница 31: ...e MAC address that you want to delete and then press enter 3 After delete Filtering MAC address you have to press Save to complete the deleting operation 4 3 7 Misc Configuration 4 3 7 1 Port Security...

Страница 32: ...le disable item 3 Press ESC to go back action menu line and then select Save to save all configure value 4 3 7 2 MAC Age Interval Type the number of seconds that an inactive MAC address remains in the...

Страница 33: ...configure value Quit Exit this page and return to previous menu 4 3 7 3 Broadcast Storm Filtering This page is configuring broadcast storm control press Edit to configure the broadcast storm filter m...

Страница 34: ...me in switch If enable the packets queued exceed will be drop Press Space key to set the time These valid values are 1sec 2sec 4sec and off Default is 1 seconds Enable Delay Bound Limit the low priori...

Страница 35: ...Delay Bound must be work under Max bridge transit delay bound control is enabled situation Actions Edit Configure all items Finished configure press ESC to go back action menu line Save Save all conf...

Страница 36: ...4 4 1 1 STP Enable This page is enable or disable Spanning Tree function Press Space key to select enable or disable 36...

Страница 37: ...Configuration 1 You can view spanning tree information about the Root Bridge on the left 2 On the right user can setting new value for STP parameter You must enable STP function then can select config...

Страница 38: ...f you change the value you need to restart the switch for valid value 3 Priority This is mean port priority you can make it more or less likely to become the root port If you change the value you need...

Страница 39: ...39...

Страница 40: ...ocation of the switch 4 4 2 2 Community Strings Use this page to enter SNMP community strings 1 Community Name Type the name of current strings Default public 2 Write Access Enable the rights is read...

Страница 41: ...ve to complete the deleting operation Save Save all configure value Quit Exit this page and return to previous menu 4 4 2 3 Trap Managers A trap manager is a management station that receives traps the...

Страница 42: ...e Delete Delete a trap manager After delete item press Save to complete the deleting operation Save Save all configure value Quit Exit this page and return to previous menu 4 4 3 GVRP This page you ca...

Страница 43: ...it Configure all items Press Space key to choose Enable or Disabled mode Finished configure press ESC to go back action menu line Save Save all configure value Quit Exit this page and return to previo...

Страница 44: ...p If disable the group is local static trunking group 3 LACP Work Port Num The max number of ports can be aggregated at the same time If LACP static trunking group the exceed ports is standby and able...

Страница 45: ...Actions Edit Configure all items Finished configure press ESC to go back action menu line Save Save all configure value Quit Exit this page and return to previous menu 45...

Страница 46: ...ts and responds only if it receives LACP protocol packets from the opposite device Actions Edit Configure all items Finished configure press ESC to go back action menu line Save Save all configure val...

Страница 47: ...Actions Quit Exit this page and return to previous menu 4 5 Reboot Switch Default Reset switch to default configuration Restart Reboot the switch in software reset 47...

Страница 48: ...ess X key to start Xmodem receiver message if Regarding this issue user must wait console appear that message then can shut down power Note RS 232 Local console firmware upgrade X modem 1 Press X key...

Страница 49: ...le under transfer menu from menu bar 4 Press browse button to select the path 5 Select 1K Xmodem of protocol and press Send button 6 After successfully upgraded the new firmware please modify baud rat...

Страница 50: ...50...

Страница 51: ...fault values as follows If you need change IP address in first time you can use console mode to modify it IP Address 192 168 16 1 Subnet Mask 255 255 255 0 Default Gateway 192 168 6 254 User Name root...

Страница 52: ...k Auto Negotiation auto negotiation mode Speed status Display link speed Port 1 8 is 100Mbps Port 9 is 1000Mbps Duplex status Display full duplex or half duplex mode Flow control Display flow control...

Страница 53: ...53...

Страница 54: ...unit 5 4 Administrator Those management functions include IP address Switch settings Console port information Port controls Link aggregation Filter database VLAN configuration Spanning Tree Port Mirro...

Страница 55: ...figure the IP Settings and fill in the new value than clicks apply button 2 User must be reset switch and use new IP address to browser this web management Default IP 192 168 16 1 Subnetmask 255 255 2...

Страница 56: ...device type 2 MAC Address The unique hardware address assigned by manufacturer default 3 Firmware Version Display the switch s firmware version 4 Hardware Version Display the switch s Hardware versio...

Страница 57: ...witch If enable the packets queued exceed will be drop This valid value are 1sec 2 sec 4 sec and off Default is 1 seconds Broadcast Storm Filter To configure broadcast storm control enable it and set...

Страница 58: ...ets sent before low priority packets Weighted Round Robin Select the preference given to packets in the switch s high priority queue These options represent the number of high priority packets sent be...

Страница 59: ...ridge transit delay bound control is enabled before enable Delay Bound because Enable Delay Bound must be work under Max bridge transit delay bound control is enabled situation Qos Policy High Priorit...

Страница 60: ...ted Switch which has the smallest IP address will be set for the IGMP Queryer 2 Enable Mode Enable one of Switch to be the IGMP Queryer 3 Disable Mode Disable the other Switches to be the IGMP Queryer...

Страница 61: ...other Switch in subnet Note This Router supports IGMP protocol but IGMP has to be in enable mode and the Router has to be the Queryer 3 This topology must be set for when the Switch s IP address is n...

Страница 62: ...utomatic VLAN configuration between the switch and nodes If the switch is connected to a device with GVRP enabled you can send a GVRP request using the VID of a VLAN defined on the switch the switch w...

Страница 63: ...ys enable Auto Negotiation Port 1 8 is fixed to disable mode and port 9 is enabled Speed setting The speed mode is fixed 100Mbps 1 8 port 1000Mbps GBIC port Duplex setting port 1 8 support Full or Hal...

Страница 64: ...to which the link belongs move the link to that Link Aggregation Group and enable its transmission and reception functions in an orderly manner In conclusion Link aggregation lets you group up to eigh...

Страница 65: ...king group All ports support LACP dynamic trunking group If connecting to the device that also supports LACP the LACP dynamic trunking group will be created automatically 3 Work ports The max number o...

Страница 66: ...ol packets and responds only if it receives LACP protocol packets from the opposite device 1 A link having either two active LACP ports or one active port can perform dynamic LACP trunking A link has...

Страница 67: ...hen display the IGMP snooping information in this page you can view difference multicast group VID and member port in here IP multicast addresses range from 224 0 0 0 through 239 255 255 255 The Inter...

Страница 68: ...to be or is a member of a given group indicated in the report message Leave Group A message sent by a host to the querier to indicate that the host has quit to be a member of a specific multicast gro...

Страница 69: ...Type the VID tag based VLANs to associate with the MAC address 6 Click add 5 4 6 3 Port Security A port in security mode will be locked without permission of address learning Only the incoming packet...

Страница 70: ...FMi Switchsupport port based and protocol base VLAN in web management page NOTE The default VLAN can t be deleted Support Port based VLANs IEEE 802 1Q VLAN Port based Tagging rule VLAN is an IEEE 802...

Страница 71: ...3 Type a name for the new VLAN 4 Type a VID between 2 4094 The default is 1 5 From the Available ports box select ports to add to the switch and click Add 6 Click Apply 5 4 7 2 Port VID Configure por...

Страница 72: ...Rule 1 Forward only packets with VID matching this port s configured VID Ingress Filtering Rule 2 Drop Untagged Frame 5 4 8 Spanning Tree The Spanning Tree Protocol STP is a standardized method IEEE...

Страница 73: ...You can view spanning tree status about the switch Such as below screen Prameter Description Priority You can change priority value A value used to identify the root bridge The bridge with the lowest...

Страница 74: ...tocol learning and listening states to the forwarding state Enter a number 4 through 30 3 The following parameter can be configured on each port click set Apply button to modify Paramet er Description...

Страница 75: ...l be copied to mirror port You can select max 9 monitor ports in the switch If you want to disable the function you must select monitor port to none Monitor Rx Monitored receive frames from the port M...

Страница 76: ...Enter the location of the switch Contact Enter the name of a person or organization 2 Community strings serve as passwords and can be entered as one of the following Read only Enables requests accomp...

Страница 77: ...ap manager by entering the IP address of the station and a community string 5 4 11 Security Manager 1 Use this page user can change web management user name and password User name root default Passwor...

Страница 78: ...version image bin to TFTP software directory In web management select administrator TFTP update firmware Download new image bin file then in web management press update firmware 5 4 13 Configuration B...

Страница 79: ...ation Use this page to set TFTP server IP address You can save current EEPROM value from here then go to the TFTP restore configuration page to restore the EEPROM value 5 4 14 Reset System Reset Switc...

Страница 80: ...5 4 15 Reboot Reboot the Switch in software reset 80...

Страница 81: ...Gigabit Fiber Protocol CSMA CD Max Forwarding and Max Filtering Rate 14 8800 pps per Fast Ethernet port 148 8000 pps per Gigabit Ethernet port GBIC LED Indicators Fiber Port LINK ACTIVE Full Duplex C...

Страница 82: ...d miswired cables may cause numerous network collisions and other network problem and can seriously impair network performance Improper Network Topologies It is important to make sure that you have a...

Страница 83: ...cord is plugged in you may have a problem with power outlet or power cord However if the Switch powers off after running for a while check for loose power connections power losses or surges at power...

Страница 84: ...h any products returned to TRENDware pursuant to any warranty There are no user serviceable parts inside the product Do not remove or attempt to service the product by any unauthorized service center...

Страница 85: ...GE OF THE INTENDED USE OR BY ACCIDENT FIRE LIGHTNING OR OTHER HAZARD LIMITATION OF LIABILITY TO THE FULL EXTENT ALLOWED BY LAW TRENDWARE ALSO EXCLUDES FOR ITSELF AND ITS SUPPLIERS ANY LIABILITY WHETHE...

Страница 86: ...86...

Отзывы: