TRENDnet TE100-MP1U - Multi-Function Print Server Скачать руководство пользователя страница 53


53

3.


Click Display the Computers of Workgroup   


4.


Double click Microsoft Windows Network icon. 


5.


Double click the Workgroup that the Server belongs to. The default 

Workgroup name is “WORKGROUP”. You can refer to Control Center or the 
Server’s web pages to get it. You will see that the Server is displayed as its 
server name.   


6.


If you cannot find Workgroup name of the Server in Microsoft Windows 

Network, you can select Search for Computer… in My Network Places and 
enter the Server Name of the Server to find it. 


7.


Double click this Server Name icon.   


8.


If you clear Enable SMB/CIFS Print/File Server Authentication in 
Supported Protocols
, you login to the SMB server without requiring 
authentication; otherwise you have to enter user name and password to login 

to the Server. You can add user name and password in User Account box by 
the Control Center or the Server’s Web page.   

#

 Note: 

If you use SMB on Windows 98 SE/ME, you must login to your Windows 98 

SE/ME using the same user name as in the Server’s User Account. 


9.


The shared folders will be listed as USB1_DyPz, and USB2_DyPz where Dy 

represents the y-th disk and Pz represents the z-th partition with respect to 
USB1 port and USB2 port. 


10.


Perform Open, Paste, Remove or Copy the files to the shared folders. 


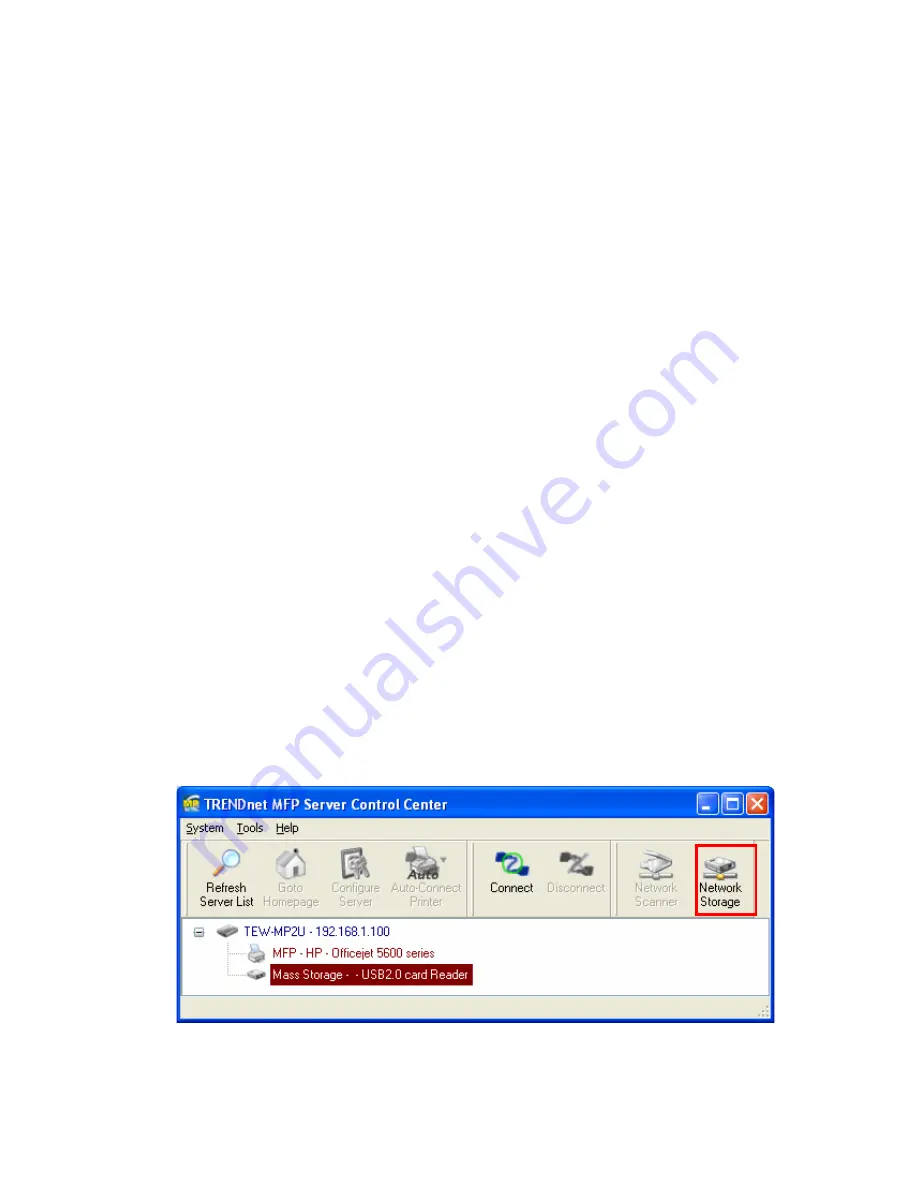
Note: Another way to use shared storages by SMB/CIFS method : In Control Center, 
click the “Network Storage” button, as the following figure. 


6.5.4  Using Shared Storage by FTP Methods for Windows


A.


Use Microsoft IE to the shared USB Mass Storages   

Содержание TE100-MP1U - Multi-Function Print Server

Страница 1: ...1...

Страница 2: ...Rules 17 3 3 6 Setting the IP Address Using DHCP 17 3 3 7 Setting the IP Address Using the Control Center 17 3 3 8 Setting the IP Address Using the Server s Web Pages 19 3 4 Name of USB Device 21 3 4...

Страница 3: ...Remote Installation 56 7 3 2 NetUSB Printing 58 7 3 3 NetUSB Scanning 60 7 3 4 NetUSB Scanning using Network Scan 62 7 3 5 Accessing USB Storage using NetUSB Technology 63 7 4 Limitations 64 CHAPTER8...

Страница 4: ...4 CHAPTER14 UPGRADE FIRMWARE 86 CHAPTER15 THE INIT BUTTON 89...

Страница 5: ...for the wireless configuration most configuration and operations are the same for TE100 MP1U and TEW MP2U Similarly almost all of the configuration and operations are the same for TE100 MP1U and TEW M...

Страница 6: ...for TEW MP2U IEEE 802 11 b g Wireless Compliant with non detachable fixed antenna 5 USB Host Ports USB 1 1 2 0 low full and Hi Speed compliant 6 Indicators Power Indicator is lit while power is appli...

Страница 7: ...n OS Method Description Standard Windows Add Printer Wizard Installation of LPR Raw TCP JetDirect Local Port Using SMB and IPP Windows Control Center Tool Installation of LPR Raw TCP Local Port Using...

Страница 8: ...y to Install The Server installs operates and is managed in a reliable and easy fashion 4 Security You can assign administrator name and password to restrict login 5 Monitoring The Server s web pages...

Страница 9: ...ly You have to setup the first wireless parameter set through LAN wired connection Wireless access can be set as 1 Infrastructure station mode which need an access point to route network messages or 2...

Страница 10: ...Server button and type the server s administrator default admin and password default admin 5 After you login successfully from the Server menu select wireless The set Wireless dialog appears 6 In ord...

Страница 11: ...11 8 If the wireless network is secured by WPA PSK TKIP the shared key must be set correctly...

Страница 12: ...ad hoc mode TEW MP2U searches all channels to join the matched wireless ad hoc service set too however if none are found TEW MP2U creates that service set in the assigned channel In ad hoc mode WPA PS...

Страница 13: ...o access Web Pages If the TCP IP parameters of TEW MP2U are not correct you have to use MFP Server Control Center to set the TCP IP parameters first 2 Go to the web page and click CONFIG icon 3 Login...

Страница 14: ...network you have to set the correct network type infrastructure or ad hoc SSID and the correct security method with the correct key information 6 If the wireless network is secured by WEP64 or WEP128...

Страница 15: ...15 7 If the wireless network is secured by WPA PSK TKIP the shared key must be set correctly...

Страница 16: ...ile server are exactly the same 3 3 Assigning an IP Address to the Server 3 3 1 Preliminary If you have a DHCP server on your network your Server will receive an IP address automatically The IP addres...

Страница 17: ...mon The entries included in this scope should contain the following parameters y range of IP addresses y subnet mask y default router IP address y DNS server IP address y lease duration 2 Activate the...

Страница 18: ...lick the highlight list and enter the Server s administrator default admin and password default admin 15 After you have logged in successfully select TCP IP from the Server s menu The Set IP Address d...

Страница 19: ...DNS 17 Click Apply to save your settings And the Server will reboot 18 You have now finished the procedure of setting the IP address 3 3 8 Setting the IP Address Using the Server s Web Pages 1 If you...

Страница 20: ...20 4 Enter administrator default admin and password default admin 5 Click TCP IP icon 6 Click the button corresponding to your choice of IP setting methods static or...

Страница 21: ...mple the printer model name is LaserJet 3030 PCL 6 and then the default printer name will be set as LaserJet 303 2 If system cannot get the printer model For example you use some parallel printers and...

Страница 22: ...s Add Printer Standard Windows Add Printer Wizard Windows 2000 XP and 2003 Raw TCP JetDirect Printing The Control Center s Add Printer Steps for Installing Network Printer 4 2 Connecting the Server To...

Страница 23: ...rs and Other Hardware and then click Printers and Faxes 2 Double click Add Printer to start the Add Printer Wizard and then click Next 3 Click Local printer clear the Automatically detect and install...

Страница 24: ...n Use Printer Online in installed network printer driver and then you can use the printer 3 A computer using LPR or IPP printing and a computer using NetUSB printing can not print documents to the sam...

Страница 25: ...s of the Server In the Port Name box enter your desired names or USB1_LPR or USB2_LPR for printer connected to USB1 port and USB2 port respectively If your Server is running on a different LAN than yo...

Страница 26: ...26 Address box 6 Click Next 7 Click Custom settings 8 Click Settings and confirm that the settings are as below The queue names are USB1_LQ USB2_LQ for USB1 port 1 and USB2 port respectively Click OK...

Страница 27: ...27 9 Click Finish...

Страница 28: ...ight click on your Server and select Set Printer 2 Select USB1 Port or USB2 Port to add the printer in Set printer in box choose to use Server Name or IP address to represent the Server in Select IP a...

Страница 29: ...for which you want to change settings and then click Properties 3 Clear Enable bidirectional support and click Add port and then click Standard TCP IP Port from the dropdown and click New port 4 The A...

Страница 30: ...30 Number values are 9100 9101 for USB port 1 and USB port 2 respectively Refer to the Server s web pages or the Control Center you can get exact values Click OK 9 Click Finish...

Страница 31: ...the Control Center right click on your Server and select Set Printer 2 Select USB1 Port or USB2 Port to add the printer in Set printer in box choose to use or IP address to represent the Server in Sel...

Страница 32: ...ing on a different LAN than your Windows PC such as Internet PC you must choose IP address in Select IP Address or Host Name in printer port box 3 Click Apply 4 Select the desired printer driver and c...

Страница 33: ...n the Server s User Account Windows Platform Windows 98SE ME 2000 XP and 2003 1 Open Printers and Faxes 2 Right click the printer for which you want to change settings and then click Properties 3 Clic...

Страница 34: ...ore using SMB CIFS printing you have to login the SMB CIF Print File server in advance and then you may use it otherwise you have to disable SMB CIFS Print File Server authentication If you use SMB on...

Страница 35: ...ing on a different LAN than your Windows PC such as Internet PC you must choose IP address in Select IP address or Host Name in printer port box 3 Click Apply 4 Select the desired printer driver and c...

Страница 36: ...Printer to start the Add Printer Wizard and then click Next 3 In this window select A network printer or a printer attached to another computer and click Next 4 Click the Next button On the next windo...

Страница 37: ...37 5 Click Next and then continue Windows Add Printer Wizard...

Страница 38: ...ommand ping MP2U If there is no response or error occurs there may be problems with IP address configuration host file editing or network status Please contact your network administrator 5 2 Printing...

Страница 39: ...Example To create the spool directory Printer1 and error log file Printer1_errs mkdir var spool lpd Printer1 Create the spool directory touch var spool lpd Printer1 Printer1_errs Create the error log...

Страница 40: ...40 2 Click on the New button in the Printer configuration window 3 Click on the Forward button in the Add a new print queue window...

Страница 41: ...ify which Printer Queue type you are using select the one option form Networked Unix LPD Networked CUPS IPP Networked Windows SMB and Networked JetDirect options Click on the Forward button 6 Fill in...

Страница 42: ...e name in Queue box as USB1_LQ B Networked JetDirect Fill in the Server s IP address and protocol s TCP port and then click the Forward button Example If your Server s IP address is 192 168 1 100 and...

Страница 43: ...s SMB i Click on the Specify button to specify SMB server Authentication ii Fill in the Workgroup Server Name User name and Password in Authentication window and then click on the OK button iii Click...

Страница 44: ...If your Server s IP address is 192 168 1 100 and its printer name is psc 1300 ser You can enter IP address in Server box as 192 168 1 100 and printer name in Path box as psc 1300 ser 7 Select your pr...

Страница 45: ...45 8 Click Finish button...

Страница 46: ...manipulation loss or corruption of data in memory devices connected to the Server after unauthorized access 3 In order to use the USB Mass Storage device connected to the Server the SMB protocol or F...

Страница 47: ...gure codepage The Server supports Windows codepages If users want to communicate files using FTP client tool or SMB on Windows 98 Me 2000 with the Server they have to set their Server codepage to be s...

Страница 48: ...Codepage box and click Apply B Using Server s Web Pages 1 Go to the web page click CONFIG 2 Login your administrator default admin and password default admin 3 After you have logged in successfully se...

Страница 49: ...Supported Protocols box of the Control Center or the Server s web pages 6 5 1 Setting up File Server Using the Control Center 1 Start the Control Center and Auto searching Server window will appear 2...

Страница 50: ...item you allow Internet users can access your storage using the SMB CIFS protocol Enable Server Authentication select the item if you want to share your storage with user level security which requires...

Страница 51: ...want to allow the user anonymous to login your FTP server with read only permission and the Server will not check the password If you clear the item your FTP server will not support anonymous login fu...

Страница 52: ...e is 21 Maximum Session Number select the item and fill in desired number Enable Passive Mode select the item if you want to allow that your FTP server can accept passive mode command Enable Server Au...

Страница 53: ...he SMB server without requiring authentication otherwise you have to enter user name and password to login to the Server You can add user name and password in User Account box by the Control Center or...

Страница 54: ...Server s Web pages 4 The shared folders will be listed in IE 5 Perform Paste Remove or Copy the files to the shared folders B Use Microsoft Dos s FTP client 1 Enter Dos command as ftp 2 Enter open se...

Страница 55: ...E100 MP2U TEW MP2U has a totally different technology NetUSB to deal with printers and scanners MFPs A For printers some special kinds of printers such as GDI printers or host based printers can not w...

Страница 56: ...be how to use the NetUSB technology to do remote installation for a USB device Before using the NetUSB technology you must first make sure that your PC can access USB MFP Server via TCP IP The simples...

Страница 57: ...o plug in the USB device into PC s USB port either before running the driver setup program or during the execution of the driver setup program This depends on the USB device Please check the user manu...

Страница 58: ...PC If the USB device is a MFP you can see a new printer and a new scanner from the Control Panel 7 3 2 NetUSB Printing After the driver is installed as described in the previous section you can see a...

Страница 59: ...ed on the MFP Server this is a physical printer Then click the Apply button E Then the printer will be marked as an Auto Connected Printer in red If you choose Auto Connected Printer List in the Tools...

Страница 60: ...ws In order to skip this manual operation you can make the Control Center be run automatically after you login Windows To do this choose the Configuration item in the Tools menu The following window w...

Страница 61: ...ptions as your need Then submit the scan job F After the scanning finished click the Disconnect button in the Control Center to release the ownership of the scanner or MFP The steps described above re...

Страница 62: ...mmend you use Network Scan as the following steps A In the Control Center click the MFP Server that has the desired MFP attached B Click the desired MFP C Click the Network Scanner button Then you can...

Страница 63: ...w 7 3 5 Accessing USB Storage using NetUSB Technology Before you use NetUSB technology to access USB storage please make sure the storage access mode is in NetUSB mode A In the Control Center click th...

Страница 64: ...ease note that by this way FAT32 and NTFS file system can be fully supported 7 4 Limitations There are some limitations to use the NetUSB technology A Only supports Windows 2000 XP 2003 Windows 98 ME...

Страница 65: ...ck Install Utility button 3 Click Next if you see any Next button in installation windows 4 Click Finish 8 2 Using the Control Center 8 2 1 Using Tools of Control Center You can use the following tool...

Страница 66: ...If users want to communicate files using FTP client tool or SMB on Windows 98 SE Me 2000 with the Server they have to set their Server codepage to be same as the codepage that their Windows PC is usi...

Страница 67: ...TP Port Enter an integer number to set FTP server s TCP port default 21 Set Maximum Session Number select or clear Set Maximum Session Number support You can limit the FTP session number by selecting...

Страница 68: ...the details about NetUSB technology Mode FAT16 32 NTFS Concurrency Server Writable Read Only Multiuser NetUSB Writable Writable Single User User Accounts You can change administrator name and passwor...

Страница 69: ...effect once shown in the blank below 5 Delete delete the existing user account SNMP You can set community and some parameters for SNMP server Furthermore you can enable SNMP v3 for more security Set...

Страница 70: ...tion password of SNMP v3 5 Privacy Password set privacy password of SNMP v3 Email If you want to receive some alerting mail from the Server you have to enable SMTP Protocol and set Email configuration...

Страница 71: ...he Server restore the Server to factory defaults download new firmware file from product s public website and upgrade new firmware you can use the Maintenance tool Restart Server click this button the...

Страница 72: ...right corner of the window Instead it just minimizes itself to the system tray There are two ways to really close the Control Center The first way is choosing Exit item in the File menu in the Control...

Страница 73: ...Server s system status and configure the Server 9 2 Using the Server s Web Pages 9 2 1 Displaying Server Status You can see the status of Host Information TCP IP Support Protocol and USB devices Under...

Страница 74: ...o connect TCP IP network Please see Chapter 3 Basic Installation for more details Supported Protocols The Server supports the following TCP IP protocols TCP IP 5 Enable LPR Line Printer Remote Printin...

Страница 75: ...support it means that FTP server will have not any limitation in session number Set Passive Mode select or clear Set Passive Mode support that FTP server can accept passive mode Enable Server Authenti...

Страница 76: ...ts You can change administrator name and password or add a user account for SMB CIFS Print File server and FTP File server If you forgot administrator name and password you must perform Restore Factor...

Страница 77: ...Set SNMP Configuration 5 Authentic Community set Community name of SNMP server 5 Trap Community set Trap Community name for SNMP server to send trap packets 5 Trap Address enter an IP address to send...

Страница 78: ...V3 select or clear Enable SnmpV3 support 5 User Security name set user security name of SNMP v3 5 Auth Password set authentication password of SNMP v3 5 Privacy Password set privacy password of SNMP...

Страница 79: ...actory Default click this button the Server will restore factory default values 5 Download New Firmware from Website click this button to download new firmware or user software from this product s pub...

Страница 80: ...80...

Страница 81: ...1 SNMP This Server runs an SNMP daemon supporting SNMP v1 v2c and v3 protocols Simple Network Management Protocol Users can use SNMP client software such as HP OpenView to manage the Server The Server...

Страница 82: ...Off No physical connection to network Blinking Activity on network Status Off No activity on network On USB device connected Blinking Connected USB device error USB1 Off No physical connection to USB...

Страница 83: ...ars 5 Click Factory Default 13 2 Using the Server s Web Pages 1 Go to the Server s web page and click CONFIG 2 Enter administrator default admin and password default admin 3 Click Maintenance 4 Click...

Страница 84: ...Internet Access Disabled Server Authentication Disabled z FTP Server Enabled FTP Port 21 Set Maximum Session Number 5 Enabled Passive Mode Enabled Server Authentication Enabled Allow Anonymous Login...

Страница 85: ...SMTP Protocol Disabled z SMTP Server Name None z SMTP Port Number 25 z Subject None z From Address None z To Address None z Cc None z SMTP Server requires authentication Disabled Account Name None Pas...

Страница 86: ...s 2 Select the Server that you want to upgrade the firmware Double click the selected Server and enter Administrator default admin and Password default admin 3 Select the Maintenance button 4 Click Op...

Страница 87: ...or http Server s Server Name to access the Server s home page 5 Click CONFIG at the top of the menu 6 Login the Server with Administrator default admin and Password default admin 7 Click Maintenance...

Страница 88: ...s configuration will recover to Factory Default values 2 Start the TFTP client Tool Image Burner 3 Click Open Image to open your new firmware Please note that you must configure your PC s TCP IP such...

Страница 89: ...y USB1 LED indicator will blink After that the Server will do the following tasks A Perform a Factory Default of the MFP Server which will restore most of the parameters and settings to factory defaul...

Страница 90: ...IES EXCLUSIVE IF THE TRENDNET PRODUCT DOES NOT OPERATE AS WARRANTED ABOVE THE CUSTOMER S SOLE REMEDY SHALL BE AT TRENDNET S OPTION REPAIR OR REPLACEMENT THE FOREGOING WARRANTIES AND REMEDIES ARE EXCLU...

Страница 91: ......

Отзывы: