TREND MICRO
TM
Cloud Edge 50 G2
Routing Mode/Bridge Mode
Routing Mode
1. In the
Uplink configuration
section, specify information for the WAN interface.
DHCP
PPPoE
: Specify user name and password.
Static
: Specify IPv4 address, netmask, and gateway.
2. Specify DNS server IP addresses (if not assigned by DHCP or PPPoE).
3. Under
System settings
section:
a. Specify a FQDN in the
Host name
field.
b. Configure time settings.
Automatically: Select
Enable NTP server
and enter the NTP server IP address.
Manually: Select
Manually set time
and enter time in the
Local time
field.
4. Click
Start Configuration Test
to verify and then click
Save & Register
.
5. Click on the
Cloud Edge On-Premises Console
link.
6. Go to
Network tab
Interfaces
.
7. Click the LAN1 interface, select L3 type, and configure IP address settings.
DHCP
Static
: Specify IPv4 address, netmask, and optionally, a gateway.
8. Click
Apply
.
After logging on for the first time, the Quick Setup screen opens automatically.
Perform one set of initial configuration steps below - either for Bridge Mode or for
Routing Mode, depending on the deployment mode you chose.
Bridge Mode
1. In the
Uplink configuration
section, specify information for br0.
DHCP
Static
: Specify IPv4 address, netmask, and gateway.
2. Specify DNS server IP addresses (if not assigned by DHCP).
3. Under
System settings
section:
a. Specify a FQDN in the
Host name
field.
b. Configure time settings.
Automatically: Select
Enable NTP server
and enter the NTP server IP address.
Manually: Select
Manually set time
and enter time in the
Local time
field.
4. Click
Start Configuration Test
to verify and then click
Save & Register
.
Performing the Initial Configuration
8
Verifying Connectivity
9
© 2021 Trend Micro Incorporated. All Right Reserved. Trend Micro and the t-ball logo are
trademarks or registered trademarks of Trend Micro Incorporated. All other company and/or product
names may be trademarks or registered trademarks of their owners. Information contained in this
document is subject to change without notice.
Item Code: APEQ69160/201125
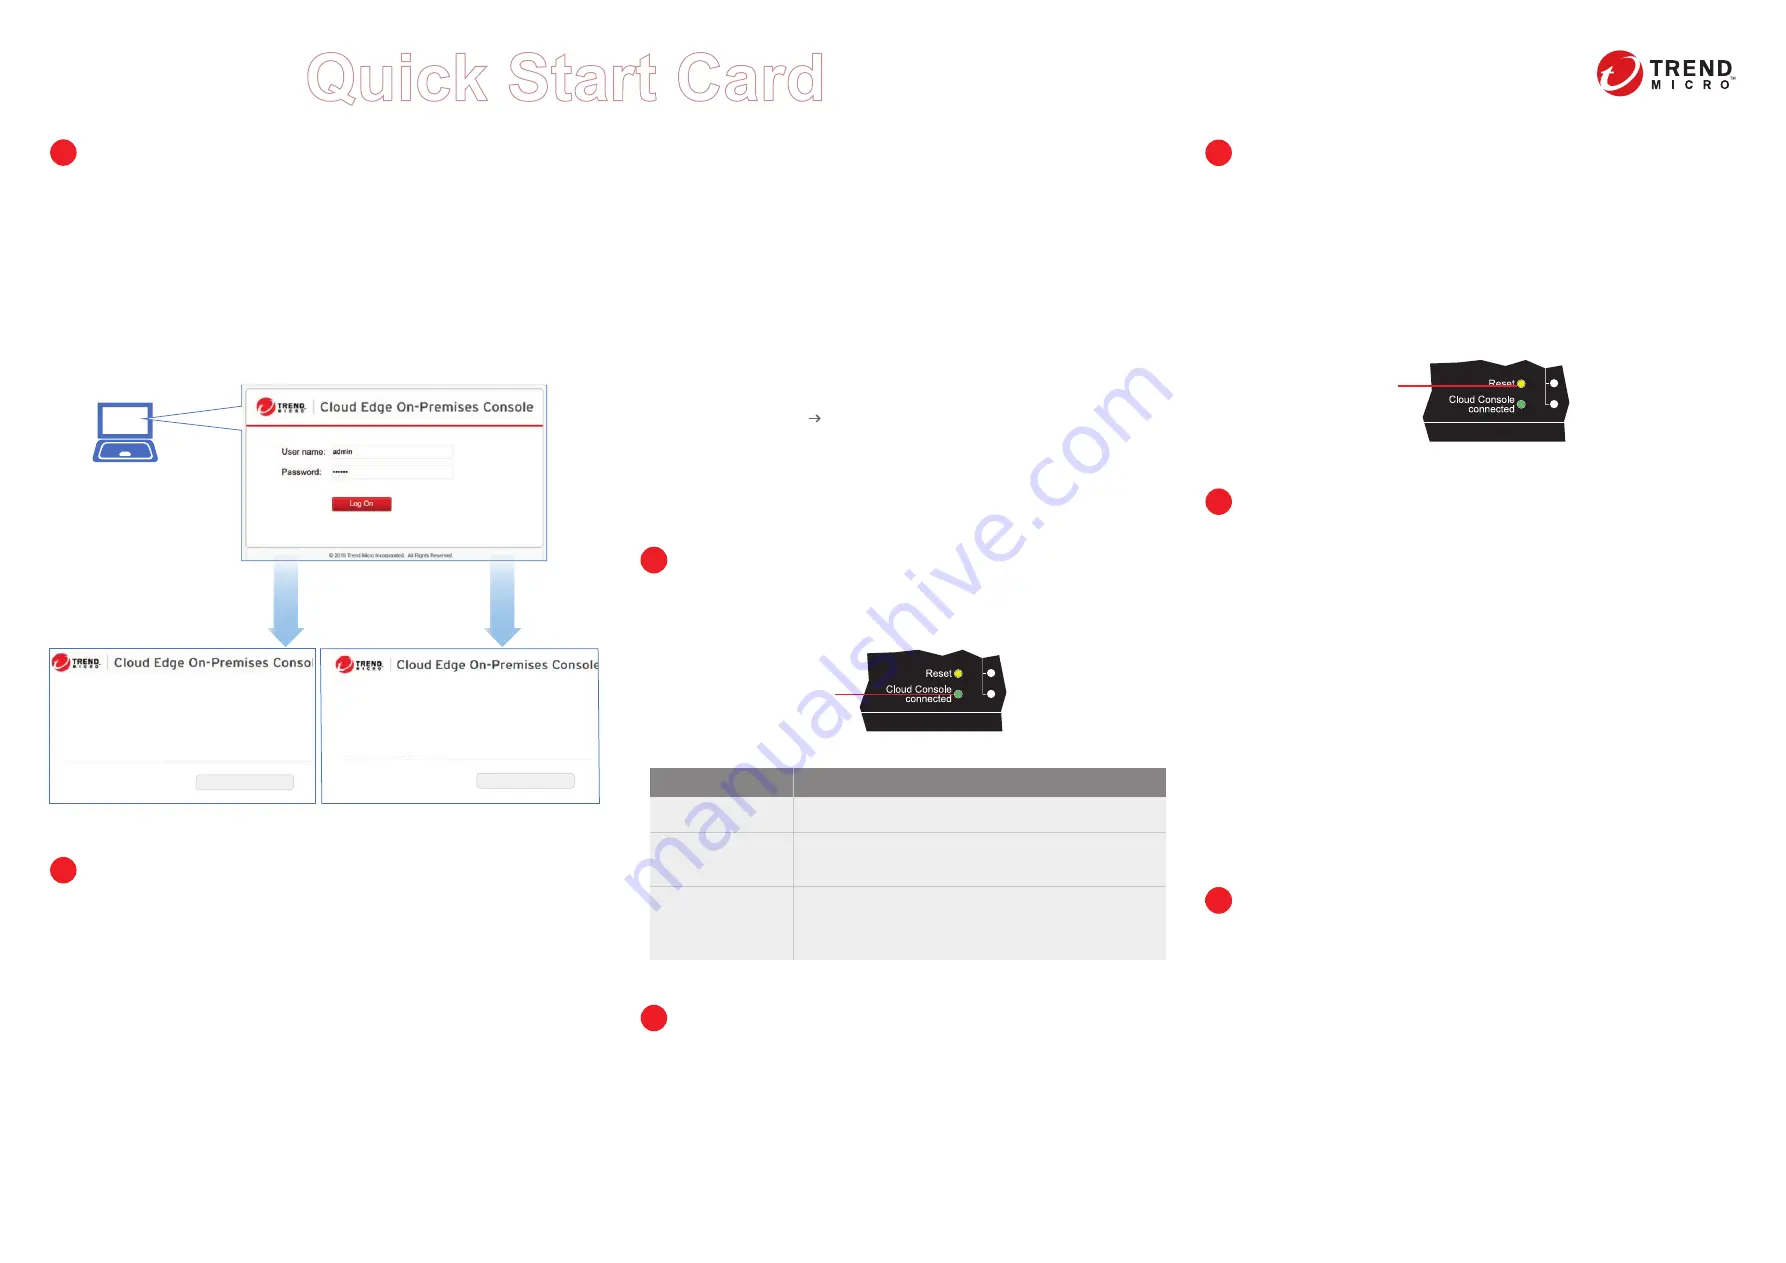
Logging on the Web Console
1. Open a supported web browser.
2. Go to the URL: https://setup.cloudedge or https://192.168.252.1:8443.
3. Specify the logon credentials.
User name
: admin
Password
: adminCloudEdge
4. Press
Enter
or click
Log On
.
If you see a warning message in your browser, you can ignore the message and
proceed to the Cloud Edge Cloud Console web site.
7
Management laptop
The Green LEDs (Light-Emitting Diodes) on the front panel shows the
deployment status.
Green LED
Yellow LED
1. Power on the Cloud Edge gateway and wait for the system to start.
2. Press and hold the reset button located on the back panel for about 10
seconds until the yellow reset LED on the front panel starts to blink.
3. Release the reset button. The gateway starts the factory reset. The gateway
will restart two times during this process.
Restore the Cloud Edge gateway to factory settings to reconfigure your network
settings or to decommission hardware. The yellow LED on the front panel shows
the factory settings restore status.
Restoring Factory Settings
11
Cautions
1. Lithium Battery Caution
There is risk of explosion if the battery is replaced by an incorrect type.
Dispose of used batteries according to the instructions.
Installation should be performed only by a skilled person who knows all
installation and applicable device specifications.
Do not carry power supplies by the handle when moving to another place.
Please conform to your local laws and regulations regarding safe disposal of
lithium batteries.
Disposal of a battery into a fire or a hot oven, or mechanically crushing or
cutting of a battery can result in an explosion.
Leaving a battery in an extremely high temperature environment can result in an
explosion or the leakage of flammable liquid or gas.
A battery subjected to extremely low air pressure may result in an explosion or
leakage of flammable liquid or gas.
2. Grounding Caution
This equipment must be grounded and the power cord for the product should be
connected to a socket outlet with a grounded connection.
12
Cloud Edge Website:
https://www.trendmicro.com/en_us/small-business/cloudedge-network-security.html
Cloud Edge Documents Website:
http://docs.trendmicro.com/en-us/smb/cloud-edge.aspx
List of worldwide offices and phone numbers:
http://www.trendmicro.com/us/about-us/contact/index.html
Contact Information
13
Deployment mode: Bridge Mode
Quick Setup
Uplink configuration
This setup enables you to quickly configure your Cloud Edge applia
Deployment mode: Routing Mode
Uplink configuration
Quick Setup
This setup enables you to quickly configure your Cloud Edge applia
Cloud Console LED
Status
Gateway cannot communicate with the Internet.
No light
Gateway is not registered or cannot communicate with
Cloud Edge Cloud Console. Contact your managed service
provider for assistance.
Blinking green
Gateway is registered and communicating with Cloud Edge
Cloud Console.
Solid green light
Register Cloud Edge with Cloud Edge Cloud Console
After your MSP creates an account for you, you will receive an email with a link
to access Customer Licensing Portal (CLP).
1. Open the email sent from Trend Micro.
2. Log in to CLP using the account information provided in the email.
3. In the
Products/Services
screen of CLP, click
Open Console
to open the
Cloud Edge Cloud Console.
4. If your product has not been registered, register the product using the
gateway serial number located on the gateway appliance.
10


