background image


- 37 - 

Working procedure 

The  procedure  has  5  recycling  steps  as  followings:  pumping  the  water

—ice  making-pulling  out  the 

water

—ice cubes drop down—water tray back to normal position. It recycles until the ice cubes is full or 

water is lack of 

Operation 

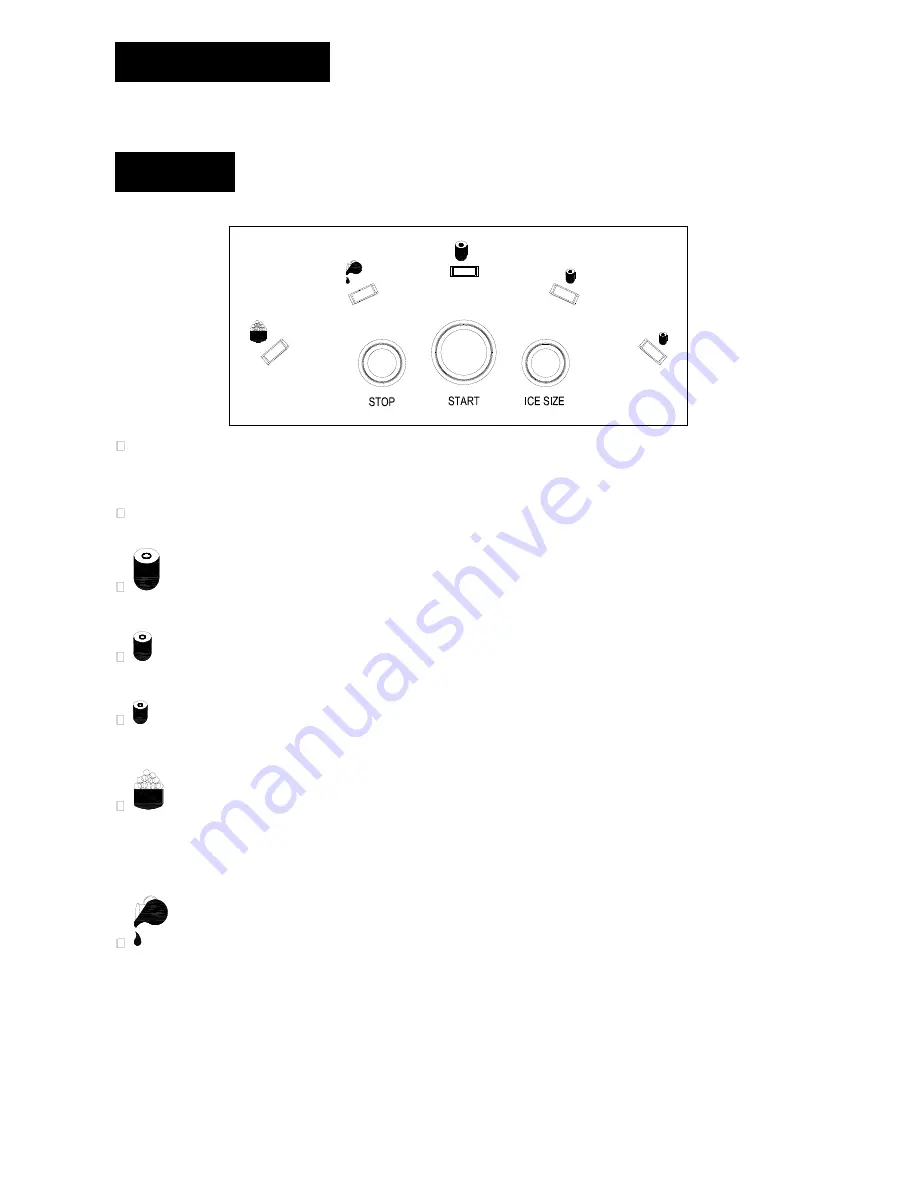
7.  Control panel operation 


‘START’

 and


‘STOP’

 button: When the power is connected, the unit will enter the standby status(the 

ice selection mode light will flash); when pressing the 

‘START’ 

button, (the related ice selection light will 

turn green), then the unit starts to work. When press the 

‘STOP’

 button, the unit will be back to the status 

of standby;


‘ICE SIZE’

 button: When pressing the button one time, the ice selection will change accordingly (the 

default mode is small mode, from small mode-medium-big); 


big  size  indicator

(green): When  this  light  is  on,  indicating  that  the  unit  is  making  big  size  ice 

cubes and it will adjust the ice making time as well; 


medium size indicator

(green): When this light is on, indicating that the unit is making medium 

size ice cubes and it will adjust the ice making time as well; 


small size indicator

(green): When this light is on, indicating that the unit is making big small ice 

cubes and it will adjust the ice making time as well; 


Ice full indicator

(red): When the Ice Storage basket is full, the indicator will turn red, the unit will 

still working until the next round

then stop. If you need to restart the unit ,press 

―stop‖, then press ―start‖ , 

the unit will restart.


lack  of water  indicator

(red):  The  ice maker  will automatically  check  the  water  volume in  the 

Water Storage Tank. If the water volume is too low, the red light will be on. the ice maker will stop working 

automatically. When  adding  the  appropriate  water  to  the Water  Tank  ,  the  water  low  indicator  light  will 

shut-off and the unit will automatically restart. 


Содержание 21131

Страница 1: ...IJsblokjesmachine Handleiding Art nr 21131 ...

Страница 2: ...g vóór gebruik zorgvuldig door om ervoor te zorgen dat u het product naar wens kunt gebruiken en het correct reinigt en onderhoudt Bewaar de handleiding om deze later te kunnen raadplegen Index 1 Kenmerken 3 2 Attentie 3 3 Principe van ijs maken 4 4 Schets van structuur 4 5 Werkwijze 5 6 Bediening 5 7 Technische Gegevens 8 8 Elektrische circuits 8 9 Problemen oplossen 9 ...

Страница 3: ...achine regelmatig schoon Ontkoppel het apparaat en verwijder de ijsblokjes tijdens het schoonmaken Gebruik een mild schoonmaakmiddel verdund in water met een zachte handdoek of spons om het oppervlak aan de binnenkant en buitenkant van het apparaat schoon te maken Spuit geen vloeistoffen op het apparaat Vermijd het gebruik van sterke schoonmaakmiddelen zoals zuur en benzine Ververs het water regel...

Страница 4: ...u zich van het apparaat wilt ontdoen lever het dan in bij een gekwalificeerd persoon Principe van ijs maken liquid bottle filter reverse solenoid valve compressor tube evaporator condenser M Schets van structuur 12 13 14 11 1 watertank 2 Ijsblokjeslade 3 waterlade 4 verdamper 5 isolatielaag 6 ventilatormotor 7 compressor 8 aansluiting 9 waterpompmotor 10 wateruitlaat 11 handvat 12 Lade van ijsblok...

Страница 5: ...k de ijsmaak tijd aanpassen ong 15 min gemiddelde grootte indicator groen Wanneer dit lampje aan is dan geeft dat aan dat het apparaat gemiddelde ijsblokjes maakt Dit zal ook de ijsmaak tijd aanpassen ong 12 min kleine grootte indicator groen Wanneer dit lampje aan is dan geeft dat aan dat het apparaat kleine ijsblokjes maakt Dit zal ook de ijsmaak tijd aanpassen ong 10 min Ijs vol indicator rood ...

Страница 6: ...ns het verplaatsen van het apparaat zonder het schuim is het beter om het apparaat bij de handvaten vast te pakken zie afbeelding C A B C Plaatsing Wanneer u het apparaat start wordt aangeraden om het op een vlakke tafel te zetten met een ruimte van 150 mm rond het apparaat zie onderstaande afbeelding 150mm 150mm De kabel aansluiten De stekker moet stevig in het stopcontact worden gestoken Haal de...

Страница 7: ...nderstaande afbeelding Water toevoegen Neem de ijsblokjeslade uit en vul de watertank met behulp van een mok of bijgeleverde maatbeker maar zorg ervoor dat u niet over het FULL waterniveau gaat zie in de ondertaande afbeelding dit is ongeveer 2 liter FU LL FU LL Water afvoeren Trek de stop aan de onderkant de machine eruit wanneer het water moet worden afgevoerd ...

Страница 8: ... 15L Nominale spanning Frequentie 220 240V 50Hz 115V 60Hz Ingangsstroom 0 9A 1 8A Ingangsvermogen 140W 140W Schokbescherming rang I Koelmiddel R134a 52g Isolatielaag EPS Afmetingen 260X345X332 mm Netto gewicht 11Kg De bovenstaande gegevens zijn alleen voor referentie afhankelijk van het rating label Elektrische circuits ...

Страница 9: ... 9 ...

Страница 10: ...sensorschroef en herstart De sensor is kapot Raadpleeg een technicus voor reparatie Power lampje is uit wanneer u het apparaat aan zet Apparaat is niet correct aangesloten Controleer en zorg ervoor dat het apparaat correct is aangesloten De zekering op het PCB is doorgebrand Raadpleeg een technicus voor reparatie Het apparaat werkt maar er komt geen ijs uit Koelmiddel uitgelekt Raadpleeg een techn...

Страница 11: ...CORRECTE VERWIJDERING VAN DIT PRODUCT Deze markering geeft aan dat dit product niet vernietigd dient te worden met ander huishoudelijk afval in de EU Om mogelijke schade aan het milieu of de menselijke gezondheid door ongecontroleerde afvalverwijdering te voorkomen dient u het verantwoord te recyclen om een duurzaam hergebruik van materialen te bevorderen Om uw gebruikte apparaat terug te brengen ...

Страница 12: ... 12 Machine à glaçons Manuel d utilisation 21131 ...

Страница 13: ...ce produit et un nettoyage maintenance adaptés veuillez lire attentivement ce manuel avant toute utilisation et conservez ce manuel afin de pouvoir vous y référer ultérieurement Sommaire 1 Fonctionnalités 13 2 Précautions 13 3 Principe de fabrication de glaçons 14 4 Schéma de l unité 14 5 Mode de fonctionnement 15 6 Mode opératoire 15 7 Données techniques 18 8 Circuit électronique 18 9 Guide de dé...

Страница 14: ...us tension avant de la mettre à l endroit Le bac d eau le panier à glaçons le réservoir d eau le pousseur de glace et l évaporateur doivent être nettoyés avant ou après utilisation Veuillez régulièrement nettoyer la machine à glaçons Lors du nettoyage déconnectez le cordon d alimentation puis retirez les glaçons Utilisez une solution de détergent doux diluée dans de l eau et un chiffon doux ou une...

Страница 15: ...s doivent être surveillés afin de s assurer que ceux ci ne jouent pas avec l unité L unité emploie une mousse d isolation contre les flammes lors de la mise au rebut de l unité remettez celle ci à une personne qualifiée Principe de fabrication de glaçons Schéma de l unité 12 13 14 11 1 Réservoir d eau 2 Panier à glaçons 3 Bac à eau 4 Evaporateur 5 Couche d isolation 6 Moteur du ventilateur 7 Compr...

Страница 16: ...taille et ajustera automatiquement la durée de fabrication de glaçons Indicateur Taille moyenne vert lorsque cet indicateur est allumé ceci indique que l unité fabrique des glaçons de taille moyenne et ajustera automatiquement la durée de fabrication de glaçons Indicateur Petite taille vert lorsque cet indicateur est allumé ceci indique que l unité fabrique des glaçons de petite taille et ajustera...

Страница 17: ...as incliner l unité à un angle dépassant 45 degrés lorsque vous déplacez l unité sans son emballage il est préférable d utiliser la poignée voir l image C A B C Emplacement Lorsque vous mettez l appareil en marche installez le sur une table plate et maintenez une distance de 150 mm autour voir l image ci dessus 150mm 150mm Raccordez le cordon Le connecteur d alimentation de l unité et la prise de ...

Страница 18: ...e panier à glaçons à son emplacement d origine après avoir retiré les glaçons voir l image ci dessous Ajout d eau Retirez le panier à glaçons remplissez le réservoir d eau à l aide d un verre ne dépassez pas l indication FULL voir l image ci dessous le réservoir peut contenir 2 litres FU LL FU LL ...

Страница 19: ...e glaçons 700 g Capacité du réservoir d eau 2 15 L Tension nominale fréquence 220 240 V 50 Hz 115 V 60 Hz Intensité 0 9 A 1 8 A Entrée 140 W 140 W Indice de protection contre les chocs I Réfrigérant R134a 52 g Couche d isolation EPS Dimensions 260 X 345 X 332 mm Poids net 11 Kg Les données ci dessus sont fournies à titre de référence seulement celles ci sont sujettes à des modifications sans préav...

Страница 20: ... 20 Circuit électronique ...

Страница 21: ... a pas ou peu d eau dans le réservoir d eau Conductivité d eau trop faible Nettoyez le réservoir d eau la vis du capteur puis redémarrez l unité Le capteur est endommagé Consultez un technicien pour réparation Le témoin de fonctionnement s éteint lors de la mise en marche de l unité L unité est mal raccordée Vérifiez puis assurez vous que l unité est correctement raccordée Le fusible du PCB est gr...

Страница 22: ... non conforme aux instructions du manuel d utilisation L unité a été entièrement ou partiellement démontée CORRECTE DISPOSITION DE CE PRODUIT Ce symbole indique que ce produit ne doit pas être jeté avec les autres déchets ménagers au sein de l UE Afin de prévenir toute nuisance possible à l environnement et la santé humaine par des dispositions de déchets incontrôlées le recyclage permet de promou...

Страница 23: ... 23 Eiswürfel Maschine Bedienungsanleitung 21131 ...

Страница 24: ...inigung und Wartung zu gewährleisten bitten wir Sie diese Bedienungsanleitung vor der Inbetriebnahme sorgfältig durchzulesen und für die spätere Benutzung aufzubewahren Inhalt 1 Eigenschaften und Funktionen 23 2 Sicherheitshinweise 23 3 Eisherstellungsvorgang 24 4 Geräteabbildung 24 5 Arbeitsvorgang 25 6 Bedienung 25 7 Technische Daten 28 8 Schaltkreiszeichnung 28 9 Fehlerbehebung 29 ...

Страница 25: ...s Kühlsystems führen Halten Sie das Gerät in ausreichender Entfernung zu Hitzequellen Stellen Sie es an eine gut belüfteten und flache Stelle auf Achten Sie darauf dass ein Freiraum von mindestens 15 cm um das Gerät herum eingehalten wird um eine adäquate Belüftung zu gewährleisten Es ist sinnvoll das Gerät für eine gewisse Zeit einzuschalten bevor es in die richtige Position gestellt wird Der Was...

Страница 26: ...n immer beaufsichtigt werden um sicher zu gehen dass sie nicht mit dem Gerät spielen Das Gerät verwendet brennbaren Isolationsschaum Wenn Sie das Gerät nicht mehr benutzen und entsorgen wollen achten Sie darauf dass Sie es nur an qualifizierte Personen weitergeben Eisherstellungsvorgang liquid bottle filter reverse solenoid valve compressor tube evaporator condenser M Geräteabbildung 12 13 14 11 1...

Страница 27: ...rün Wenn diese Anzeigelampe an ist stellt das Gerät große Eiswürfel her und stellt die Zubereitungszeit entsprechend ein Größenanzeige mittel grün Wenn diese Anzeigelampe an ist stellt das Gerät mittelgroße Eiswürfel her und stellt die Zubereitungszeit entsprechend ein Größenanzeige klein grün Wenn diese Anzeigelampe an ist stellt das Gerät kleine Eiswürfel her und stellt die Zubereitungszeit ents...

Страница 28: ...zliche Bedienungsweisen Transport Wenn Sie das Gerät transportieren achten Sie darauf dass es nicht mehr als 45 geneigt wird Benutzen Sie zum Transport den Griff siehe Abbildung C A B C Aufstellung Stellen Sie das Gerät auf eine flache Unterlage mit mindestens 15 cm Abstand zu allen Seiten bevor Sie es einschalten siehe unten stehende Abbildung 150mm 150mm Kabelanschluss Achten Sie darauf dass der...

Страница 29: ...e Eiswürfel entnommen haben siehe Abbildung unten Wasser hinzufügen Entfernen Sie den Eisbehälter und benutzen Sie einen mit Wasser gefüllten Becher zum Auffüllen des Wasserbehälters Achten Sie dabei darauf dass Sie die FULL Markierung nicht überschreiten siehe Abbildung unten Der Wasserbehälten hat eine Kapazität von ca 2 Litern FU LL FU LL ...

Страница 30: ...ter 700 g Wassertankkapazität 2 15 l Nennspannung frequenz 220 240 V 50 Hz 115 V 60 Hz Nennstrom 0 9 A 1 8 A Eingangsleistung 140 W 140 W Stramschlagschutzklasse I Kühlmittel R134a 52 g Isolationsschicht EPS Abmessungen 260 x 345 x 332 mm Nettogewicht 11 kg Die oben gemachten Angaben sind lediglich Referenzangaben Für die technischen Daten des eigentlichen Geräts lesen Sie bitte die Angaben auf de...

Страница 31: ...e Eisbehälteranzeige geht an ohne dass genügen Eis im Behälter ist Die Raumtemperatur ist zu niedrig Ziehen Sie den Behälter heraus und setzen Sie ihn wieder zurück bis die Kontrolllampe wieder ausgeht Eingeklemmte Eiswürfel Entleeren Sie den Eisbehälter und schalten Sie das Gerät erneut ein Wenn das Problem bestehen bleibt wenden Sie sich an einen Wartungstechniker Der Sensor ist beschädigt Wende...

Страница 32: ...e Funktionsgarantie von mindestens 2 Jahre zur Verfügung beginnend an dem Tag an dem der Endbenutzer das Produkt erworben hat Die Garantie deckt nur Defekt ab die sich auf Material oder Konstruktionsfehler zurückführen lassen Garantiereparaturen können nur von einem autorisierten Kundendienst durchgeführt werden Im Garantiefall muss der Originalkaufbeleg mit Kaufdatum eingesandt werden Die Garanti...

Страница 33: ... 33 Ice cube Maker Instruction Manual 21131 ...

Страница 34: ...have satisfactory usage and correct cleaning and maintenance please read this manual carefully before use and keep the instruction manual for future reference Index 1 Features 33 2 Attention notice 33 3 Ice making principle 34 4 Structure brief drawing 34 5 Working procedure 35 6 Operation 35 7 Technical Data 38 8 Electrical circuits 38 9 Trouble Shootings 39 ...

Страница 35: ...ng detergent diluted in water with a soft towel or sponge to clean the inside and outside surface of the unit Do not spray any liquids on the unit Avoid using strong cleaning solutions to clean the unit such as acids and gasoline Change the water regularly to ensure the quality of the ice cube When cleaning do not move the sensor or wires inside the unit Must use potable water to make the ice cube...

Страница 36: ...pressor tube evaporator condenser M Structure brief drawing 12 13 14 11 1 water tank 2 ice storage box 3 water tray 4 evaporator 5 insulation layer 6 fan motor 7 compressor 8 socket 9 water pump motor 10 drain outlet 11 handle grip 12 ice basket door 13 front panel 14 shell ...

Страница 37: ... indicating that the unit is making big size ice cubes and it will adjust the ice making time as well medium size indicator green When this light is on indicating that the unit is making medium size ice cubes and it will adjust the ice making time as well small size indicator green When this light is on indicating that the unit is making big small ice cubes and it will adjust the ice making time a...

Страница 38: ...unit When taking out the unit pay attention the unit can not be sloped over 45 degrees when moving the unit without the foam it is better to grasp the handle grip see the C picture A B C Location When starting the machine it is better to put it in a flat table with a gap of 150mm around see the below picture 150mm 150mm Connect the cable The socket and the plug should be connected tightly Please u...

Страница 39: ...e basket back to the normal position after the ice cubes are taken out see the below picture Adding the water Take out the ice basket fill the water with a cup into the water tank but should not fill over the FULL water level see the below picture it s about 2 liters FU LL FU LL ...

Страница 40: ...ce making capacity 12Kg 24h ice storage 700g water tank capacity 2 15L rated voltage Frequency 220 240V 50Hz 115V 60Hz rated current 0 9A 1 8A input power 140W 140W shock protection grade I refrigerant R134a 52g insulation layer EPS measurement 260X345X332 mm net weight 11Kg The above data is only for reference subject to the rating lable ...

Страница 41: ... 41 Electrical circuits ...

Страница 42: ...re the unit is properly plugged the fuse on the PCB was burnt Ask for a technician to repair The unit working but no ice come out Refrigerant leaked out Ask for a technician to repair Electromagnetism valve broken Ask for a technician to repair Warranty Information The manufacturer provides warranty in accordance with the legislation of the customer s own country of residence with a minimum of 2 y...

Страница 43: ...vent possible harm to the environment or human health from uncontrolled waste disposal recycle it responsibly to promote the sustainable reuse of material resources To return your used device please use the return and collection systems or contact the retailer where the product was purchased They can take this product for environmental safe recycling CE ...

Отзывы: