(800) 275-8558 www.irrigationremotes.com
12
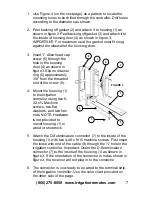
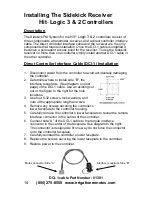
DCI-1 cable Part Number: 01381
Molex Connector Side “A”
Interface receptacle Side “B”
Installing The Sidekick Receiver
Superior
K
Sterling Controllers
Description
The Sidekick FM System for the
Superior
K
Sterling
controllers consist
of three components a transmitter, receiver, and a direct controller
interface cable. The direct controller interface cable and the receiver are
the only components that require installation. Once the DCI-1 cable is
installed, it becomes a permanent access point for the receiver. To use
the Sidekick receiver on more then one controller simply install another
DCI-1 cable in the other controller.
Direct Controller Interface Cable (DCI-1) Installation
1. Disconnect power from the controller to avoid accidentally damaging
the controller.
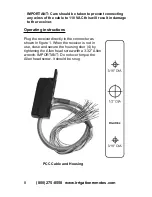
2. Determine where to install side “B”, the
interface receptacle (See diagram on next
page) of the DCI-1 cable. Use an existing cut
out or the figure to the right for the hole
locations.
3. Use four 6-32 screws, lock washers, and
nuts of the appropriate length and size.
4. Remove any screws securing the controller’s
lower faceplate to the controller housing.
5. Carefully remove the controller’s lower faceplate to reveal the remote
interface connector on the right side of the controller.
6. Connect side “A” of the DCI-1 cable to the remote interface
connector on the right side of the faceplate. See diagram on next
page. The connector is designed to fit one way do not force the
connector on to the controller faceplate.
7. Carefully reinstall the controller’s lower faceplate.
8. Replace the screws securing the lower faceplate to the controller.
9. Restore power to the controller.


