Traxxas Spartan 5708 Скачать руководство пользователя страница 11

SPARTAN • 11

TQ 2.4GHz RADIO AND VELINEON POWER SYSTEM

INSTALLING TRANSMITTER BATTERIES

Your TQ transmitter uses 4 AA batteries. The battery compartment 
is located in the base of the transmitter.

1.

 Remove the battery compartment door by pressing the tab  

and lifting the door up.

*

2.

 Install the batteries in the correct orientation as indicated in 

the battery compartment.

3.

 Reinstall the battery door and snap it closed.

4. Turn on the transmitter and check the status indicator for a solid 

green light.

If the status LED flashes red, the transmitter batteries may be weak, 
discharged or possibly installed incorrectly. Replace with new 
or freshly charged batteries. The power indicator light does not 
indicate the charge level of the battery pack installed in the model. 
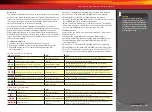
Refer to the Transmitter LED Codes table on page 25 for more 
information on the transmitter Status LED codes.

CHARGING THE BATTERY PACKS

The most convenient type of charger for charging the included 
battery packs is an AC peak-detecting charger that plugs directly 
into an AC wall outlet, such as the TRX EZ-Peak

 (Part #2930).  

It contains special peak-detection circuitry that automatically  
shuts the charger off when the battery is fully charged.
For faster charging, the included batteries may be charged at  
4 amps. The TRX EZ-Peak is a 4 amp charger and will charge one 
included  battery in only 45 minutes!

Caution

: Never use a 15-minute timed charger to recharge your 

model’s battery packs. Overcharging may result, causing damage to 
the battery packs.

The Traxxas High Current Connector

Your model is equipped with the patented 
Traxxas High-Current Connector. Standard 
connectors restrict current flow and are not 
capable of delivering the power needed 
to maximize the output of the Velineon 
Brushless Power system.

The Traxxas connector’s gold-plated terminals with a large contact 

surfaces ensure positive current flow with the least amount of 
resistance. Secure, long-lasting, and easy to grip, the Traxxas 
connector is engineered to extract all the power your battery has  
to give.

Use the Right Batteries

Your transmitter uses 
AA batteries. Use new 
alkaline batteries, or 
rechargeable batteries 
such as NiMH (Nickel Metal 
Hydride) batteries in your 
transmitter. Make sure 
rechargeable batteries are 
fully charged according 
to the manufacturer’s 
instructions.

If you use rechargeable 
batteries in your 
transmitter, be aware
that when they begin 
to lose their charge, they 
lose power more quickly 
than regular alkaline 
batteries. 

Caution: Discontinue 
running your model at the 
first sign of weak batteries 
(flashing red light on the 
transmitter) to avoid losing 
control.

If the power indicator doesn’t 
light green, check the polarity 
of the batteries. Check 
rechargeable batteries for 
a full charge. If you see any 
other flashing signal from the 
LED, refer to the chart on page 
25 to identify the code.

1, 2

*A Quick Reference Guide has been provided for you in the battery compartment of the transmitter. Always store the Quick Reference Guide in your transmitter.

Содержание Spartan 5708

Страница 1: ...MODEL 5708 owner s manual ...

Страница 2: ...any body of water Please respect the water and use extreme caution when launching and retrieving boats We re confident that you will enjoy the power speed and reliability that the Spartan has to offer We know you re excited about getting your new model in the water but it s very important that you take some time to read through the Owners Manual This manual contains all the necessary set up and op...

Страница 3: ...umstances operate your model in any water where people are swimming or wading Your model is fast and could cause injury if allowed to collide with anyone Avoid running in areas reserved for water fowl Because your model is controlled by radio it is subject to radio interference from many sources that are beyond your control Since radio interference can cause momentary loss of radio control always ...

Страница 4: ...act occurs flush with water Store the battery pack in a dry location away from heat sources and direct sunlight Nickel Metal Hydride batteries must be recycled or disposed of properly Recycling Your Traxxas Power Cell NiMH Battery Traxxas strongly encourages you to recycle your Power Cell battery when it has reached the end of its useful life Do not throw your battery in the trash All Power Cell b...

Страница 5: ...a demands on the battery and electrical system connections For best performance your model requires the use of NiMH battery packs that have cells rated for high discharge and use high quality low resistance assembly techniques such as the included Traxxas Power Cell Battery Pack Cheaply made battery packs do not retain their performance characteristics after repeated uses in high powered electric ...

Страница 6: ... Steering Linkage Propeller Propeller Rudder Propeller Nut Propeller Nut Hatch Mount Flex Cable Housing Steering Servo High Current Connector Power Cell Battery Battery Strap Battery Strap Channel Waterproof Receiver Box Collet Water Cooling Jacket Velineon 540XL Motor Velineon VXL 6s Marine Speed Control Hull Rudder Arm Water Cooling Tube ...

Страница 7: ...low this procedure to make sure your radio system works properly at a distance and that there is no interference 3 Install battery packs in the model See page 12 7 Drive your Spartan See page 18 Driving tips and adjustments for your Spartan 4 Turn on the radio system See page 13 8 Maintaining your Spartan See page 21 Make a habit of turning the transmitter on first and off last Follow these critic...

Страница 8: ...ually measured in amps If you think of a wire as a garden hose current is a measure of how much water is flowing through the hose ESC Electronic Speed Control An electronic speed control is the electronic motor control inside the model The VXL 6s Marine electronic speed control uses advanced circuitry to provide precise digital proportional throttle control Electronic speed controls use power more...

Страница 9: ...er Note The Multi Function knob must be programmed to serve as a throttle trim adjustment Thermal Shutdown Protection Temperature sensing electronics used in the VXL 6s Marine electronic speed control detect overloading and overheating of the transistor circuitry If excessive temperature is detected the unit automatically shuts down to prevent damage to the electronics 2 channel radio system The T...

Страница 10: ...ed Control Channel 1 Steering Servo to Motor LEDs Watercooling Input Watercooling Output Watercooling Crossover Watercooling Crossover VXL 6s MARINE ELECTRONIC SPEED CONTROL Traxxas High Current Connectors Male to Batteries Traxxas High Current Connector Male to Battery Receiver Cable RX wire ESC Motor Wiring Diagram CH3 CH4 BATT CH5 and Duplicate CH1 are not used TQ 2 4GHZ TRANSMITTER Antenna Ste...

Страница 11: ... charger to recharge your model s battery packs Overcharging may result causing damage to the battery packs The Traxxas High Current Connector Your model is equipped with the patented Traxxas High Current Connector Standard connectors restrict current flow and are not capable of delivering the power needed to maximize the output of the Velineon Brushless Power system The Traxxas connector s gold p...

Страница 12: ... of the battery trays will give Spartan the greatest stability in all water and wind conditions Whether you are using the included Power Cell 7 cell batteries or aftermarket NiMH or LiPo packs always begin with the batteries in the forward position Battery Packs Centered Smooth water and calm winds may allow you to move the battery packs rearward in the hull to allow the bow to ride higher and inc...

Страница 13: ...sition turn the transmitter off before adjusting the neutral position You will need to reprogram your electronic speed control to recognize the 70 30 setting Turn to ESC Setup Programming on page 16 for instructions Steering Trim The electronic steering trim located on the face of the transmitter adjusts the neutral center point of the steering channel Multi Function Knob The Multi Function knob c...

Страница 14: ...ous section 2 Have a friend watch the model Make sure hands and clothing are clear of the propeller and other moving parts on the model 3 Make sure your transmitter antenna is fully upright and then walk away from the model with the transmitter until you reach the farthest distance you plan to operate the model 4 Operate the controls on the transmitter once again to be sure that the model responds...

Страница 15: ...ensitivity of the model will be decreased Note that a relatively large amount of steering wheel travel results in a smaller amount of servo travel The farther you turn the knob the more pronounced the effect becomes Decreased steering sensitivity may be helpful when driving your model at high speeds or anytime a less aggressive steering feel is desired The ranges are exaggerated for illustrative p...

Страница 16: ...old both MENU and SET 3 Turn transmitter on 4 Release MENU and SET The transmitter LED will blink red 5 Press MENU once The transmitter LED will blink red twice repeatedly 6 Press SET to clear settings The LED will glow green and the transmitter is restored to default Setup Programming Calibrating your ESC and transmitter Read through all of the following programming steps before you begin If you ...

Страница 17: ...It will turn on automatically 4 Continue to hold the transmitter trigger at full throttle After about two seconds the red LED will blink and the ESC will beep once C 5 Continue to hold the transmitter trigger at full throttle After about two more seconds 4 seconds total the red LED will blink twice and the ESC will beep twice D 6 Move the trigger to neutral E The ESC is ready for use and is set to...

Страница 18: ...wly to get your model on plane If you are having trouble with cavitation check the propellers for nicks or tangled debris Your model s propellers are specially designed for their application and are very sensitive to any changes or modifications If a prop is damaged it should be replaced Where to Run Select a body of fresh water which is calm and free of debris tree stumps moss etc Do not drive yo...

Страница 19: ...is setting to offer the best handling in most conditions To adjust the trim tab grip it securely with a pair of pliers as close to the bend as possible Flex the trim tab down to set a new angle Note that the trim tab has some spring back and will need to be flexed slightly farther than the actual position you wish to set This illustration shows 1mm of downward defection This small setting will cau...

Страница 20: ...re remember to retighten the adjustment screws after making your setting Adjusting the Drive Strut Spartan has a surface piercing prop meaning the prop is not fully submerged when the model is at speed Varying the depth that the prop is submerged will alter the model s performance The stock setting is 4mm above the lowest point of the hull To adjust prop depth loosen the drive strut adjustment scr...

Страница 21: ...age 22 and remove the drive cable by pulling the propeller away from the drive strut Thoroughly dry the drive cable and lubricate it with the light oil included with your model While the drive cable is removed from the model dry and lubricate the bushings in the drive strut Apply oil to the exposed bushing faces and also apply a few drops of oil to the oiling hole in the drive strut Reinstall the ...

Страница 22: ...ller away from the drive strut The cable will come out with the propeller There is no need to remove the prop from the cable 3 Remove the steering linkage Use the supplied 2 5mm wrench to unthread the 15mm screw in the servo arm and disengage the steering linkage 4 Unplug the water cooling outlet tube A and inlet tube B 5 Loosen the retaining screws Use the supplied 2 5mm wrench to loosen the scre...

Страница 23: ... with no binding or excess friction 3 Use the best batteries and charger you can afford Low cost low capacity battery packs will limit the performance of your model Likewise a low cost charger may not allow your batteries to achieve their peak power and capacity For best performance use battery packs rated for 3000mAh or higher Traxxas Power Cell NiMH packs are specially constructed for durability...

Страница 24: ...e the servo s maximum travel the Steering Percentage or Braking Percentage functions will not override the End Point settings Setting Lock Once you ve adjusted all of these settings the way you like them you may want to disable the Multi Function knob so none of your settings can be changed This is especially handy if you operate multiple vehicles with a single transmitter via Traxxas Link Multipl...

Страница 25: ...en once repeatedly 5 Press MENU once The status LED will blink green twice repeatedly 6 Press SET The memory is now selected to be deleted Press SET to delete the model Press and hold MENU to return to driving mode Failsafe Your Traxxas radio system is equipped with a built in failsafe function that returns the throttle to its last saved neutral position in the event of a signal loss The LED on th...

Страница 26: ...point and press set to save To reset max throw Let go of controls and press SET The menu tree below shows how to navigate through the TQ 2 4GHz transmitter s various settings and functions Press and hold MENU to enter the menu tree and use the following commands to navigate through the menu and select options MENU When you enter a menu you always start at the top Press MENU to move down the menu t...

Страница 27: ...ks x2 Press SET green LED blinks Press SET red LED blinks x3 Press MENU twice red LED blinks x3 Turn steering wheel to desired max left and right travel x8 Press SET to save each position Turn steering wheel to test settings IF END POINTS ARE OK Press hold MENU returns to driving mode IF END POINTS NEED TO BE CHANGED Press SET and repeat steps 6 8 To reset the END POINTS of STEERING servo to defau...

Страница 28: ...100930 KC1293 R01 1100 Klein Road Plano Texas 75074 1 888 TRAXXAS owner s manual MODEL 5708 ...

Отзывы: