

8
ADJUSTMENTS
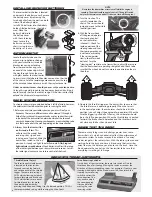
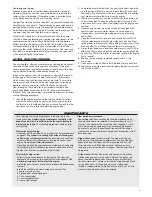
Toe-in
Geometry and alignment specs play an important role in your
truck’s handling, so take the time to set them correctly. Set the
steering trim on your transmitter to neutral. Now, adjust your
tie rods so that both wheels are pointing straight ahead and
are parallel to each other (0 degrees toe-in). This will ensure the
same amount of steering in both directions. If you run out of
adjustment, then the steering servo will have to be re-centered
(see “centering your servos” on page 9).
For increased stability
add 1-2 degrees of toe-in to each front wheel. Use the
turnbuckles to adjust the alignment.
Camber
The camber angle of both the front and rear wheels can be
adjusted with the camber rods (upper turnbuckles). Use a square
or right-angle triangle to set the camber accurately. Adjust the
front wheels to 0 degrees of camber (wheel perpendicular to
the ground). In the rear, adjust the wheels to 1 to 2 degrees of
negative camber. These adjustments should be set with the truck
positioned at its normal ride height.
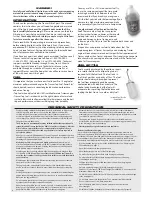
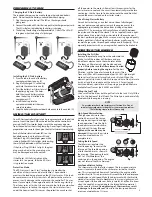
Shocks
The four shocks on Nitro Sport have
the most influence on its handling.
Whenever you rebuild your shocks,
or make any changes to the pistons,
springs or oil, always do it carefully
and in pairs (front or rear). Piston
selection depends on the range of oil
viscosities that you have available. For
example, using a two-hole piston with
a lightweight oil will, at one point, give
you the same damping as a three-hole
piston with heavier oil. We recommend
using the two-hole pistons with a
range of oil viscosities from 10W to
50W (available from your hobby shop).
The thinner viscosity oils (30W or less)
flow more smoothly and are more
consistent, while thicker oils provide
more damping.
Use only 100% pure
silicone shock oil to prolong seal life.
The ride height for Nitro Sport can be adjusted by adding or
removing the clip-on spring pre-load spacers. Instead of adding
spacers to increase stiffness, use stiffer springs. Adjust the ride
height so that the suspension arms are slightly above being parallel
to the ground. Observe how the Nitro Sport handles in turns. If it
is picking up the inside rear wheel in hard turns, then stiffen the
front suspension. If it is picking up the inside front wheel in hard
turns, then stiffen the rear suspension. Proper set-up will add
stability and help prevent roll-overs.
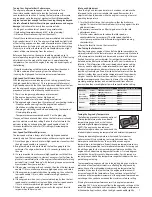
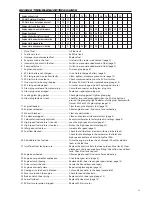
Gear Ratios
A unique Nitro Sport feature is the ability to change the gear
ratios. The final drive ratio of the gearbox is 2.81 to 1. Use the
following formula to calculate the overall ratio:
Nitro Sport comes with a 70-tooth spur gear and a 20-tooth
pinion (clutch bell) gear. This combination will provide the best
overall acceleration and top speed. If you want more acceleration
and less top speed, then use a smaller clutch bell gear (fewer
teeth). For more top speed, use a larger clutch bell gear.
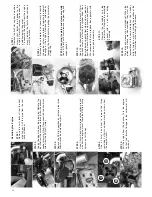
adjusting the Slipper Clutch
The Nitro Sport features an adjustable slipper clutch on the spur
gear to protect the drivetrain from sudden shock loads (such as
landing off of jumps with the engine at full throttle). Under normal
conditions the sipper clutch should not slip. Before adjusting the
slipper clutch, turn the model off. Do not adjust the slipper clutch
while the engine is running.
Use the supplied wrench to tighten the slipper nut (clockwise) until
it stops and then back the nut out 1/4 of a turn. If you notice any
decrease in performance after making changes to the slipper clutch
adjustment, then it may be too loose. The slipper must not be
allowed to slip during normal acceleration or the slipper could
be damaged.
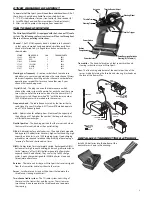
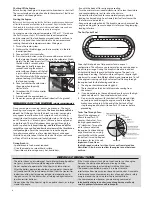
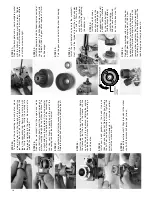
Changing the Clutch Bell and Spur Gears
Remove the rubber exhaust pipe and
the tuned pipe. Remove the electric
starter drive. Loosen the four 3x8mm
cap-head screws which hold the
slotted adjusting plates to the engine
mount.
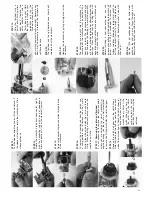
Remove the 4mm nylon locknut and
the spring from the slipper clutch. Try
to remove the slipper clutch as one
assembly by holding the pressure
plates together with your thumb and
index finger.
PRE-lOaD
SPaCERS
Remove the large E-clip on the clutch
shaft and the clutch bell gear. Remove
the ball bearings and install them in
the new clutch bell gear. Reinstall
the clutch bell gear and E-clip. Note:
Smaller clutch bell gears use smaller
ball bearings. Refer to your parts list
for the correct bearings. Reinstall the
spur gear on the top shaft and secure
it with the 4mm locknut.
Slide a strip of thin note paper
between the spur gear and the clutch
bell gear. Push the clutch bell gear
against the spur gear and tighten
the 3x8mm adjusting plate screws.
Remove the paper and the gear mesh
should be correctly adjusted.
Pinion
22
22
22
20
20
18
18
16
16
Spur Gear
66
70
72
70
72
70
72
70
72
Final Drive
8.43:1
8.94:1
9.19:1
9.83:1
10.11:1
10.92:1
11.24:1
12.27:1
12.64:1
aCCElERaTION
TOP SPEED
Number of
Spur
Gear Teeth
Number of
Clutch
Bell Gear Teeth
x 2.81 =
Final Drive Ratio
0
°
0
°
1
°
-2
°
1
°
-2
°
-1
°
-1
°
Toe
0
°
0
°
1
°
-2
°
1
°
-2
°
-1
°
-1
°
Camber
Содержание Nitro Sport 4510
Страница 1: ...OPERATING INSTRUCTIONS COVERS MODEL 4510 KC1149 R01 Rev 090806...
Страница 15: ......


