background image

36

T-MAXX 2.5R

2.5

2

1.5

1

0.5

0

0

10

20

30

40

60

70

80

90

100 

50

W

he

el

Fo

rc

e

(lb

)

Wheel Travel (mm)

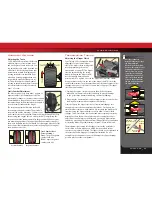
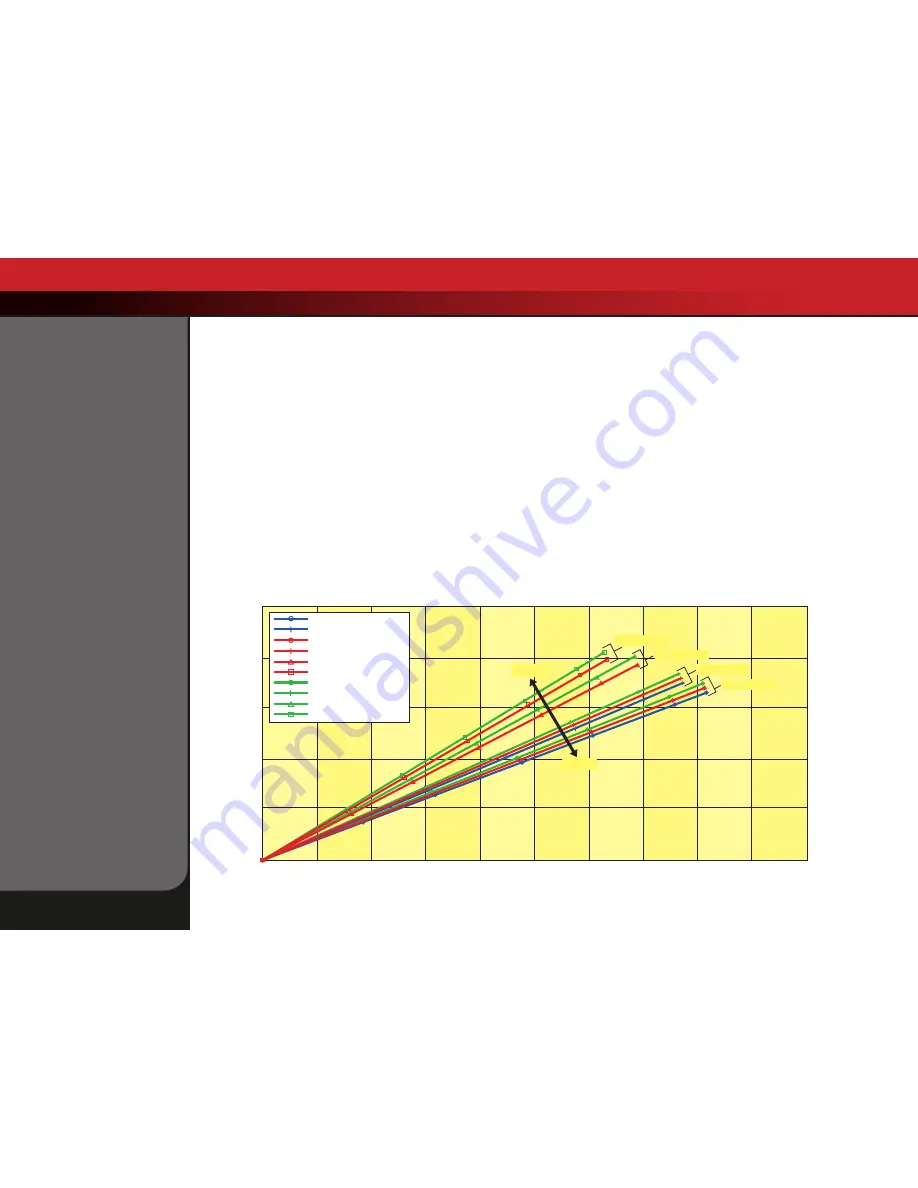
 Wheel Force vs. Wheel Travel

Lower Mount 1, Upper Mount 0
Lower Mount 2, Upper Mount 0
Lower Mount 1, Upper Mount A
Lower Mount 2, Upper Mount A
Lower Mount 3, Upper Mount A
Lower Mount 4, Upper Mount A
Lower Mount 1, Upper Mount B
Lower Mount 2, Upper Mount B
Lower Mount 3, Upper Mount B
Lower Mount 4, Upper Mount B

Less Firm

More Firm

Lower Mount 4

Lower Mount 3

Lower Mount 2

Lower Mount 1

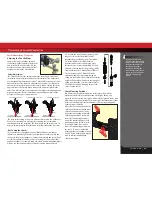
Lower Shock Mounting Positions 

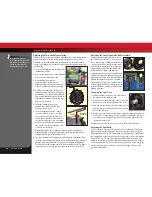
In the out-of-the-box configuration, the shocks are installed in position (A)

on the shock tower and position (2) on the lower suspension arm. This
setting allows for firm suspension and low ride height, increasing the spring
force (at the wheel). This setting improves high-speed cornering on
smoother terrain by lowering the center of gravity. Body roll, brake dive,
and squat are also reduced. 

The inner pair of holes on the lower suspension arm should 

be used to increase the ride height of the T-Maxx 2.5R. The more vertical
position of the shocks will allow for lower shock progression and the soft,
plush feel that’s characteristic of a Traxxas Maxx Truck.

Spring rate

(at the wheel) increases as the lower shock mounting position

is moved from position (1) to position (4). This is equivalent to using stiffer
springs. Use higher spring rate settings for flatter terrain with smaller and
fewer bumps, and lower spring rate settings for bigger bumps.

Ride height

decreases as the lower shock mounting position is moved

from position (1) to position (4). Each pair of lower shock mounting holes

(1,2 and 3,4) has equal ride height. Use lower ride height for high-speed
cornering and flat terrain, and when racing on relatively smooth tracks.
Increase the ride height for rougher terrain and tracks.

Upper Shock Mounting Positions 

The upper shock mounting positions will have suspension effects opposite

from the lower shock mounting positions.

Spring rate 

(at the wheel), increases as the upper shock mounting position

is moved from position (A) to position (B). 

Ride height

is not affected by changes in the upper shock mounting

position.

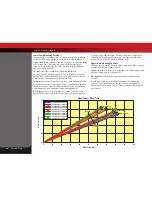
Use the chart below to see the effect of the various shock mounting

positions.  The horizontal length of the lines indicates the amount of
suspension travel.  The angle or slope of the lines indicates the spring rate
(at the wheel

). 

Tuning Adjustments

Содержание 4902

Страница 1: ...MODEL 4902 owners manual ...

Страница 2: ... contains new technologies in the engine suspension and transmission operation that you may not be familiar with Pay particular attention to the fuel and break in requirements for the engine The advanced design of the TRX 2 5R Racing Engine has a special break in procedure that has been developed and proven to produce the best performing engine possible Using traditional or old fashioned procedure...

Страница 3: ... e mail customer support with your question at support Traxxas com Join hundreds of Traxxas R C enthusiasts in our online community at www Traxxas com Traxxas offers a full service on site repair facility to handle any of your Traxxas service needs Maintenance replacement parts and accessories may be purchased directly from Traxxas by phone or online at www BuyTraxxas com You can save time along w...

Страница 4: ...u are driving Model engine fuel is flammable Never allow smoking sparks heat or flame in the presence of fuel or fuel vapors The engine brakes and exhaust system may become extremely hot during use Be careful not to touch the parts especially when refueling or stopping the engine Prolonged exposure to the engine exhaust can be harmful Avoid breathing the engine exhaust Always run your T Maxx 2 5R ...

Страница 5: ...r adapter for TRX Power Charger Traxxas part 3032 TRX Power Charger Traxxas part 3030X 8mm 5mm wrench Antenna nut wrench 2 5mm L wrench T MAXX 2 5R 5 T Maxx 2 5R comes with a set of specialty metric tools You ll need to purchase other items available from your hobby dealer to operate and maintain your model Tools Supplies and Required Equipment For more information on radio system batteries see Us...

Страница 6: ...TRX 2 5R Racing Engine see pg 18 for details Pressure Line Fuel Line EZ Start Motor EZ Start Plug Bulkhead Body Mount Post Spur Gear Chassis Slipper Clutch Driveshaft Half Shaft On Off Switch Shift Rod Antenna Mount Two Speed Access Plug Pipe Hanger Receiver Box OptiDrive Electronic Shift Module Engine Shut off Clamp Pivot Ball Hex Hub Axle Carrier Steering Servo Disc Brake Anatomy of Your T Maxx ...

Страница 7: ... transmitter on first and off last 9 Check servo operation See page 17 Make sure the throttle shifting and steering servos are working correctly 10 Range test the radio system See page 17 Follow this procedure to make sure your radio system works properly at a distance and that there is no interference from outside sources 11 Fill the fuel tank See page 23 Use your fuel dispensing bottle to fill t...

Страница 8: ... instructions show the process with the wheels removed Gluing the Tires and Decorating your T Maxx 2 5R 1 Remove a wheel from T Maxx 2 5R using the larger 8mm end of the glow plug universal wrench 2 Use your thumb to push the side of the tire away from the rim Place one or two drops of CA glue into the opening and release the tire Capillary action will draw the glue around the bead of the tire 3 R...

Страница 9: ...he on board batteries The Function LED will flash red if the battery voltage is too low Antenna Throttle Neutral Adjust Steering Wheel Throttle Trim Steering Trim Reverse Shift Forward Shift Power Switch Power Indicator Battery Compartment Servo Reversing Switch Throttle Trigger T Maxx 2 5R Wiring Diagram Antenna On Off Switch Receiver 4 cell Battery Holder Steering Servo Throttle Brake Servo Shif...

Страница 10: ...al rechargeable hobby pack NiCad batteries have very high current handling high capacity and can last up to 1000 charging cycles Good charging procedures are required to reduce the possibility of developing a memory effect and shortened run times NiMH Abbreviation for nickel metal hydride Rechargeable NiMH batteries offer high current handling and much greater resistance to the memory effect NiMH ...

Страница 11: ...indicator light does not indicate the charge level of the batteries installed in the model The Traxxas TQ 3 Radio System CH 3 CH 2 CH 1 Use the Right Batteries Your transmitter uses AA batteries Use new alkaline batteries or rechargeable batteries such as NiCad or NiMH Nickel Metal Hydride batteries in your transmitter Make sure rechargeable batteries are fully charged according to the manufacture...

Страница 12: ...ed separately to power the radio system in the T Maxx 2 5R Benefits include the economy of a rechargeable 5 cell nickel metal hydride NiMH battery pack that replaces AA alkaline batteries and increased voltage for dramatically improved servo performance The TRX Power Charger Part 3030X is a peak detecting unit that will charge the RX Power Pack Part 3036 flat pack or 3037 hump pack in about one ho...

Страница 13: ...he top of the antenna wire over the top of the antenna tube Slide the antenna sleeve over the tube to retain the antenna wire Now slide the antenna tip onto the top of the antenna tube Never cut or shorten the antenna wire 6 On the transmitter always fully extend the telescoping antenna when running your T Maxx 2 5R Make a habit of holding the transmitter so the antenna points straight up The Trax...

Страница 14: ...n and braking 70 30 Allows more throttle travel 70 and less brake travel 30 50 50 is the required setting for T Maxx 2 5R with the TRX 2 5R Racing Engine Electronic Throttle Trim The electronic throttle trim located on the face of the transmitter adjusts the neutral center point of the throttle servo when the servo is at rest This control has been preset for you at the factory If necessary adjust ...

Страница 15: ...the button immediately You are now in programming mode 4 Pull the transmitter throttle trigger to the full throttle position Hold it there until the Function LED flashes green three times Note The throttle servo will not move during programming even though it is connected to the controller 5 Release the transmitter throttle trigger allowing it to return to neutral The Function LED will turn solid ...

Страница 16: ...ystem off while the engine is running The on off switch in the model only turns the receiver on and off It does not turn off the engine Always use new or freshly charged batteries for the transmitter and make sure the receiver batteries are fresh The function light on the OptiDrive will flash red if the receiver batteries become weak Weak batteries will limit the radio signal between the receiver ...

Страница 17: ...e the shift button on the transmitter and check for rapid operation of the shifting servo Push the shift button down for forward The servo will operate the spring loaded shift mechanism and you will hear the transmission click into forward Push the shift button up for reverse and you will again hear the transmission click and shift into gear 8 Once adjustments are made turn off the receiver on you...

Страница 18: ...wo hours Old style break in procedures such as idling the engine on the bench for several tanks of fuel or simply running the engine with a very rich fuel mixture for the first 4 tanks of fuel will not achieve the best results Follow the easy steps in this manual Air Filter Maintenance A clean air filter is critical for long engine life Due to the high performance nature of the TRX 2 5R Racing Eng...

Страница 19: ...Needle Throttle Arm Crankshaft Flywheel Carburetor Air Intake Fuel Intake High Speed Needle Idle Speed Screw EZ Start Plug Positive Wire Negative Wire Fuel Line Fuel Tank Tuned Pipe Exhaust Tip Pressure Line Ground Wire Glow Plug Wire EZ Start Controller Clutch Bell Crankcase Engine Shut off Clamp Air Filter Housing Glow Plug The TRX 2 5R Racing Engine ...

Страница 20: ...shaft of the engine that holds the reciprocating assembly Cooling fins The cooling fins are milled into the cylinder head and crankcase and cause heat to be drawn away from the engine Heat is removed when it dissipates into the air passing across the cooling fins It is important to keep the fins clean of dirt and debris for maximum cooling efficiency Cylinder head head The finned aluminum part on ...

Страница 21: ...ows the engine to have the required compression for combustion Port Ports are openings in the sleeve that allow atomized fuel to enter the combustion chamber and burned exhaust gases to exit The shape and location of the ports are a large factor in controlling the engine timing and power output Priming Manually causing fuel to move from the fuel tank up to the carburetor This is sometimes necessar...

Страница 22: ...actical limitations Engines are designed to run best within a range of nitro percentages How the engine is ported the size of the combustion chamber and other factors determine how much nitro can be efficiently used in the engine The TRX 2 5R Racing Engine responds exceptionally well to a maximum of 33 nitro returning cooler temps more power and a smoother throttle response For those who want to r...

Страница 23: ... see and dirt constantly move through the filter anytime the engine is running Even if you can t see dirt on the filter it is present inside the foam after any amount of run time If you exceed the recommended cleaning intervals your engine will be damaged Engine damage or wear due to dirt ingestion is easy to detect and one of the top causes of premature engine failure Air Filter Cleaning Instruct...

Страница 24: ...lecules and therefore needs less fuel to maintain the correct air fuel ratio The tuning needles are there to adjust how much fuel is made available for the carburetor to mix with the available air atomization The Fuel Mixture Needles The amount of fuel metered and atomized by the carburetor is controlled by the two mixture needles the high speed needle and the low speed needle The low speed needle...

Страница 25: ...tarted and running and you have been able to observe the engine running to assess what minor adjustments may be required to compensate for fuel temperature and altitude Adjustments are usually made in 1 8 or 1 16 turn increments If the engine sticks at TDC see page 43 for instructions on freeing the engine The Idle Speed Adjustment The idle speed screw controls the closed position of the throttle ...

Страница 26: ...ed automatically by the EZ Start system eliminating the need to keep up with a separate glow plug igniter The voltage to the glow plug is kept constant regardless of the load placed on the starter by the starter motor The Glow Plug LED light emitting diode on the control unit indicates glow plug continuity The Motor LED indicates the status of the EZ Start electric starter motor The Cush Drive mec...

Страница 27: ...over at the appropriate rpm to keep the piston from sticking at top dead center TDC A new engine will typically have a tight fit between the piston and the top of the sleeve This is a tapered fit and a tight piston sleeve fit on initial startup is desirable for those who want the best performing engine Make sure you are using a good quality battery pack that is fully charged new batteries usually ...

Страница 28: ... 5R is very fast and by tanks 4 and 5 you will need plenty of room for the truck to run in Apply all throttle and braking actions gently Abrupt acceleration or braking could cause the engine to stall unnecessarily Special break in fuels are not recommended Use the same fuel you plan to use everyday If possible avoid breaking in the engine on extremely hot or cold days see page 30 Pay careful atten...

Страница 29: ...ake to stop Count the two seconds out while accelerating one thousand one one thousand two and then stop Repeat this starting and stopping procedure until the second tank of fuel is nearly empty 3 When the fuel tank is nearly empty shut off the engine and let it cool for 15 minutes Tank 3 1 Driving procedure Gently pull the throttle trigger to 1 2 throttle over a 3 second count Then gently apply t...

Страница 30: ...eve to wear prematurely Wrap the cooling head with a paper towel clean rag or sock to help keep the engine running around the recommended 200 to 215 break in temp If too much heat is contained the engine can actually run too hot Make sure that you monitor the engine s temp closely for the first couple of tanks until you get the right amount of cover for the cooling head This will of course depend ...

Страница 31: ...dually lean the high speed fuel mixture in 1 16 turn increments Make several high speed passes after each adjustment to clear out the engine and note any change in performance The TRX 2 5R is extremely powerful Remember to apply the throttle gradually to prevent wheelies or loss of control Continue this procedure until there is no longer any performance improvement If any one of the following cond...

Страница 32: ...t speeding up then richen the low speed needle 1 8 turn make several more high speed runs and retest When the low speed needle is set correctly the engine s throttle response should be very quick even to the point of making it difficult to keep T Maxx 2 5R from doing a wheelie when you accelerate Idle Speed Adjustment Once the high and low speed mixtures have been set reduce the idle speed to the ...

Страница 33: ... reason we cannot give you a definitive temperature range that indicates the best possible engine tuning There is NO optimal temperature that can be used as a target to deliver the best engine tuning Do not rely on a temp gauge alone to tune your engine Tune the engine by paying very close attention to how it responds to changes in fuel mixture more smoke less smoke fast sluggish reliable stalling...

Страница 34: ...riving immediately Move the vehicle and then continue driving Never turn off the radio system while the engine is running The truck could run out of control Forward and Reverse Operation Forward and reverse gears are selected with the shift button located in the transmitter handle grip The switch is normally in the down or forward position To shift into reverse bring your T Maxx 2 5R to a complete...

Страница 35: ... hole pistons with a range of oil viscosities from 10W to 40W available from your hobby shop The thinner viscosity oils 30W or less flow with less resistance and provide less damping while thicker oils provide more dampening Use only 100 pure silicone shock oil to prolong seal life From the factory the T Maxx 2 5R uses 30W oil The ride height for the T Maxx 2 5R can be adjusted by adding or removi...

Страница 36: ... progression and the soft plush feel that s characteristic of a Traxxas Maxx Truck Spring rate at the wheel increases as the lower shock mounting position is moved from position 1 to position 4 This is equivalent to using stiffer springs Use higher spring rate settings for flatter terrain with smaller and fewer bumps and lower spring rate settings for bigger bumps Ride height decreases as the lowe...

Страница 37: ...ipper nut insert the 2 0mm hex wrench into the hole in the end of the slipper shaft This locks the shaft for adjustments Turn the adjustment nut clockwise to tighten less slippage and counter clockwise to loosen more slippage The slipper clutch has two functions 1 Limiting the engine s torque output to the wheels to prevent wheelspin on low traction surfaces and help to prevent damage to the gears...

Страница 38: ...h bell gear mesh for T Maxx 2 5R is 0 1mm To set the gear mesh place a strip of standard letter A4 size copy or printer paper about 0 1mm thick between the mating teeth Loosen the four engine mount screws from the bottom side of the chassis see image and slide the engine mount up to push the clutch bell gear against the spur gear so the paper is not too tight to pull out or too loose that it will ...

Страница 39: ... of the following ways 1 Use a 50mm feeler gauge between the brake pad insert and brake disc 2 Push the outer brake pad firmly against the inner pad with your finger sandwiching the brake disc between the brake calipers Tighten the brake shoulder bolts until they just barely touch the brake pads Do not over tighten these fasteners or you could damage the brake calipers Loosen each of the shoulder ...

Страница 40: ...ine s usage and the quality and frequency of the engine maintenance Inspect the connecting rod after 3 gallons of fuel have been used Slipper clutch pads friction material Under normal use the friction material in the slipper clutch should wear very slowly If the thickness of any one of the slipper clutch pads is 1 8mm or less the friction disc should be replaced Measure the pad thickness using ca...

Страница 41: ...osed This allows most of the excess fuel to be consumed by the engine Be sure the throttle is in the idle position You may have to pinch the fuel line closed for several seconds before the engine stops 2 Completely empty the fuel tank Use your fuel dispensing bottle to suck out the old fuel Do not mix the old fuel with your fresh fuel supply If you leave fuel in the tank transporting or handling y...

Страница 42: ...low the procedure on page 44 for clearing a flooded engine Check for binding at the engine flywheel If you are not able to turn the engine by hand the engine could be flooded there could be binding in the clutch system or there could be internal engine damage Note It is normal for the engine to be extremely tight and hard to turn when the piston reaches the top of the compression stroke Engine ext...

Страница 43: ...ton Use the following procedure to clear a flooded engine 1 Remove the blue glow plug wire 2 Remove the glow plug and gasket with the glow plug wrench supplied with your model A 5 16 or 8mm nut driver will also work 3 Turn the model upside down and plug in the EZ Start controller 4 Push the EZ Start button for several seconds to clear the engine of excess fuel Do not look into the glow plug hole w...

Страница 44: ...3 Cylinder sealing 28 Decals 8 Differential 6 Driveshaft 6 Driving 34 tips 34 Dyno 20 e mail 3 Engine TRX 2 5R 6 break in 20 28 tank 1 29 tank 2 29 tank 3 29 tank 4 29 tank 5 29 tank 6 29 winter break in 30 clearing a flood 43 combustion chamber 20 connecting rod 20 40 crankcase 19 20 crankshaft 19 20 cylinder head 19 20 cooling fins 20 fit 20 head protector 19 header 21 mount 19 piston 21 40 port...

Страница 45: ...7 Receiver 9 10 box 6 Rich 21 25 rpm 21 Safety 4 Servos 10 shifting 6 9 steering 6 9 throttle brake 6 9 Shift Rod 6 Shock Damper 6 fine tuning 35 mounting positions 35 36 tower 6 Skid Plate 6 Slipper clutch 6 40 adjusting 37 Spur gear 6 changing 38 mesh 38 Stall 21 Storage 40 Suspension Arm 6 Suspension tuning 35 caster adjustment 35 pivot ball caps 35 TDC 21 43 Tire gluing 8 Toe in 37 Tools and e...

Страница 46: ......

Страница 47: ......

Страница 48: ...1 100 Klein Road Plano Texas 75074 1 888 TRAXXAS MODEL 4902 owners manual 060215 Part 5197 ...

Отзывы: