background image

User Manual | Travelux Tiempo

It is very important that you teach yourself the correct user instructions. Therefore, you need to know 

all the components of the scooter as described in this user manual. Always check with an expert about 

developing safe methods regarding your physical abilities to use your scooter.

4.1 Before Driving

Please ensure you have familiarised yourself with how to operate this scooter safely before driving. 

This scooter may only be driven on pavement in pedestrian areas up to a max speed of up to 4mph   

(6.4 kph). 

Before using the scooter in busy or hazardous environments, familiarise yourself with the operation of 

the scooter. Practice operating the scooter in a safe open environment.

Practice operating your scooter up to 4 mph until you are confident that you can easily operate and 

control the scooter at the higher speed (up to 8 mph).

4.2 Getting On The Scooter

• 

Before getting on the scooter make sure it is on a flat surface.

• 

The scooter should always be in the drive gear before getting on the scooter.

• 

Always check if the scooter is turned off before getting on.

• 

You can do this by checking the LED lights on the dashboard, these should be off (no light).

• 

If the scooter is off, you eliminate the chance of accidentally touching the levers, possibly causing 

injury to yourself or others. The tiller should always be upright. 

• 

You can rotate the chair 90 degrees with the lever on the bottom right side of the chair. This way 

you can easily get on and turn the chair back into driving position. You can also do this with the 

armrests raised up. 

• 

Put your foot in the middle of the footrest when getting in the scooter to ensure stability.

• 

If there is a seatbelt present, attach this before driving. For assuming the correct driving posture 

you can adjust the tiller to a desired angle. 

• 

Put the key into the ignition and turn one quarter to the right. The LEDs on the dashboard will 

now light up and you will be ready to go.

4. User Instructions

7

© 2019 Travelux, part of Van Os Medical Ltd. | Excel House | Ashbrooke Park | Lincoln Way | Sherburn-in-Elmet | North Yorkshire | LS25 6PJ

 T: +44 (0) 1977 681 400 | E: [email protected] | W: 

www.vanosmedical.co.uk

© 20

19 Travelux, part of Van Os Medical Ltd. | Excel House | Ashbrooke Park | Lincoln Way | Sherburn-in-Elmet | North Yorkshire | LS25 6PJ

 T: +44 (0) 1977 681 400 | E: [email protected] | W: 

www.vanosmedical.co.uk

Содержание Tiempo

Страница 1: ...Travelux Tiempo User Manual...

Страница 2: ...EMI RFI 4 6 1 EMI RFI Recommendations 5 Scooter Specifications 6 Scooter Components 6 1 Dashboard Specifications 6 2 Tiller 6 3 Armrests 6 3 1 Armrest Width Adjustment Page 1 Page 2 Page 3 Page 4 Page...

Страница 3: ...Codes 10 Warranty Application 10 1 Warranty Conditions Conformity Declaration Certificate Page 16 Page 16 Page 17 Page 17 Page 18 Page 18 Page 18 Page 19 Page 19 Page 19 Page 20 Page 20 Page 20 Page 2...

Страница 4: ...user manual safe because it is also your proof of warranty The safety instructions within this user manual are general guidelines which must be seen as overall guidelines It is possible that you deve...

Страница 5: ...ess 1 1 Enter Your Authorised Dealer Information 2 2019 Travelux part of Van Os Medical Ltd Excel House Ashbrooke Park Lincoln Way Sherburn in Elmet North Yorkshire LS25 6PJ T 44 0 1977 681 400 E sale...

Страница 6: ...model name of the scooter You need the model name if you have any technical questions or if you want to order any parts for the scooter in this case the Travelux Tiempo 6 Description The intended use...

Страница 7: ...The Travelux Tiempo is also available in 4 striking metallic colours Suitable for users up to 17 Stone in weight The Travelux Tiempo is a scooter that comes standard with PU tyres Small storage baske...

Страница 8: ...sed modification and or use of parts not supplied by Travelux will invalidate the scooter warranty which may lead to user injury or and damage to the scooter Do not let children play with or on your s...

Страница 9: ...ter Also check with your physician concerning your physical ability to operate a scooter Do not tow any type of load with the scooter When driving outside use pavements or bicycle lanes Never drive in...

Страница 10: ...ys be in the drive gear before getting on the scooter Always check if the scooter is turned off before getting on You can do this by checking the LED lights on the dashboard these should be off no lig...

Страница 11: ...p any incline always do so by going in a forwards direction and perpendicular to the ramp or slope Ensure you keep control when going up the incline by driving at a controlled average speed Always kee...

Страница 12: ...lease the gas lever By feeding less power the scooter will automatically brake and cause the scooter to slow 4 5 Steering Tip The most important action on a scooter is steering For driving comfort alw...

Страница 13: ...nst EMI RFI is This is measured in volts per meter V m The minimum resistance level against EMI RFI should be 20 V m This product has been tested and found to have a resistance level of 20 V m 4 6 EMI...

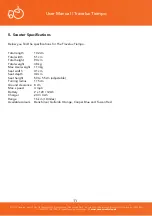
Страница 14: ...ry 2 x 12V 12Ah Charger 24V 4Ah Range 16 km 10 miles Available colours Benz Silver Gallardo Orange Cooper Blue and Tuscan Red User Manual Travelux Tiempo Below you find the specifications for The Trav...

Страница 15: ...sts or different components that all have a different function Below several components are explained further 2019 Travelux part of Van Os Medical Ltd Excel House Ashbrooke Park Lincoln Way Sherburn i...

Страница 16: ...means the battery is fully charged and red means the power is running low and it is time to charge the battery 5 Horn By pressing this button you can sound the horn When used you will hear a beeping...

Страница 17: ...gle To set the adjusted tiller angle you re tighten the star knob You should always put the tiller back in an upright position before getting off the scooter 6 2 Tiller Photo 2 Upright tiller position...

Страница 18: ...using the knob located underneath each armrest see photo 7 To adjust the armrest width you need to loosen this knob and slowly pull out the armrest to extend the width To set this adjustment re tighte...

Страница 19: ...When the scooter is put in freewheel mode it can be pushed without the motor giving resistance Please ensure the power is off when changing from drive to freewheel If you turn the power on in freewhee...

Страница 20: ...to 8 hours to extend the battery life Never turn the charger on before all plugs are plugged in Warning Tip If you do not use the scooter for longer than a week you should always disconnect the batte...

Страница 21: ...tyres These are increasingly being used on scooters as standard An advantage of PU tyres is that they do not need not be pumped up and can not be punctured 6 6 1 PU Tyres The Travelux Tiempo is fitted...

Страница 22: ...6 Lift the front frame upwards to separate the scooter see photo 17 User Manual Travelux Tiempo 7 1 2 Assembly To assemble your Travelux Tiempo scooter follow the instructions below Lift the front fra...

Страница 23: ...xtend the lifetime of your scooter and increase the ease of use In the following paragraphs these steps maintenance are further described 8 Maintenance Although PU tyres can not be punctured wear and...

Страница 24: ...ance of your product especially if you use your product regularly as this is more likely to cause wear and tear which is not covered under warranty 9 Service Checklist Tip Maintenance is not covered u...

Страница 25: ...echarge Point Batteries Levels Connections Discharge Test Wheels and Tyres Wear Pressure Bearings Wheel Nuts Motors Wiring Noise Connections Brake Brushes Chassis Condition Steering Electrics Connecti...

Страница 26: ...n to stop the flash code Set the freewheel lever to the engaged position Turn the key back to the on position If the above remedies do not solve the problem contact your authorised dealer 6 Throttle I...

Страница 27: ...service agent To qualify for the warranty your scooter must have an up to date service schedule Furthermore if a problem occurs you need to inform the Van Os Medical service agent immediately When pa...

Страница 28: ...ings measures and capacities showed in this manual are approximations and may be slightly different to your scooters specifications For warranty service contact your authorised dealer from where you b...

Страница 29: ...ddress Koperslagerij 3 4651 SK Steenbergen Country The Netherlands Means of Conformity The product is in conformity with Directive 93 42 EEC based on the use of a Technical construction file in accord...

Страница 30: ...Van Os Medical UK Ltd Excel House Ashbrooke Park Sherburn In Elmet North Yorkshire LS25 6PJ T 01977 681 400 E sales vanosmedical com www vanosmedical co uk...

Отзывы: