background image

14

 RRU-SVX01F-EN

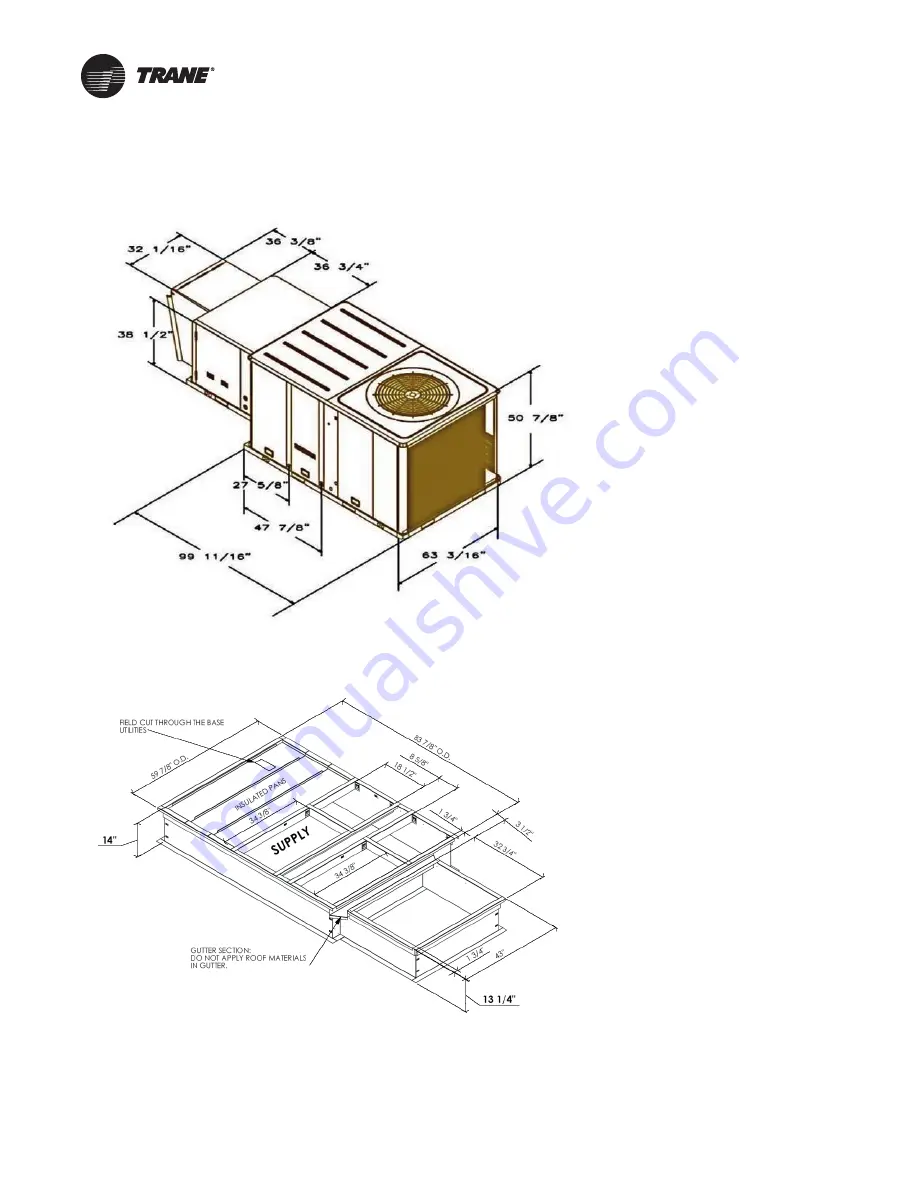
Unit/Curb Dimensions

Figure 2.

Unit dimensional data 10-ton high efficiency

Figure 3.

Roof curb dimensional data 10-ton high efficiency

Содержание RRU120 D B Series

Страница 1: ... service the equipment The installation starting up and servicing of heating ventilating and air conditioning equipment can be hazardous and requires specific knowledge and training Improperly installed adjusted or altered equipment by an unqualified person could result in death or serious injury When working on the equipment observe all precautions in the literature and on the tags stickers and l...

Страница 2: ...in the vicinity of this appliance is hazardous POUR VOTRE SÉCURITÉ Si vous sentez une odeur de gaz 1 Ouvrez les fenêtres 2 Ne touches à aucun interrupteur 3 Éteignez toute flamme nue 4 Avertissez immédiatement votre fournisseur de gaz AVERTISSEMENT Une installation un réglage une modification une réparation ou un entretien incorrect peut entraîner des dommages matériels des blessures ou la mort Li...

Страница 3: ... that is used in these service procedures In addition some states or municipalities may have additional requirements that must also be adhered to for responsible management of refrigerants Know the applicable laws and follow them The three types of advisories are defined as follows WARNING Indicates a potentially hazardous situation which if not avoided could result in death or serious injury CAUT...

Страница 4: ...s risques mécaniques et chimiques DOIT suivre des précautions dans ce manuel et sur les étiquettes les autocollants et les étiquettes ainsi que les instructions ci dessous Avant d installer entretenir cet appareil les techniciens DOIT mettre tous les EPI requis pour le travail entrepris exemples gants manches résistant à la coupe gants de butyle lunettes de sécurité casquette bonnet automne protec...

Страница 5: ...rious injury The state of California has determined that these substances may cause cancer birth defects or other reproductive harm Improper installation adjustment alteration service or use of this product could cause flammable mixtures or lead to excessive carbon monoxide To avoid hazardous gases and flammable vapors follow proper installation and setup of this product and all warnings as provid...

Страница 6: ...the heater Recirculation of room air to the unit is not permitted when the unit it operating in a heating mode If in doubt regarding the application consult the manufacturer Copyright This document and the information in it are the property of Trane and may not be used or reproduced in whole or in part without written permission Trane reserves the right to revise this publication at any time and t...

Страница 7: ...te Drain Configuration 24 Filter Installation 24 Field Installed Power Wiring 24 Main Unit Power 24 Compressor Crankcase Heaters 29 RRUCM and ReliaTel Controls 29 System Configuration and Pre Start 30 Standard Unit Controller Model UC600 30 Startup 34 Compressor Startup 34 Scroll Compressors 34 Direct Gas Fired Heating Startup 35 Final System Setup 42 Maintenance 43 Fan Belt Adjustment Belt Drive ...

Страница 8: ...trols A Non DDC Controls B 4 8aL MP581 with Display G 4 9 1L MP581 with Display H 4 8aL UC600 with Display J 4 8aL MP581 without Display P 4 9 1L MP581 without Display Q 4 9 1L UC600 with Display R 4 8aL UC600 without Display S 5 3L MP581 with Display T 5 3 UC600 with Display U 5 3L MP581 without Display V 5 3L UC600 without Display W Custom Controller DIGIT 20 DP SWITCH 0 None 1 DP Switch DIGIT 2...

Страница 9: ...extensively throughout this document when referring to the control system network The RRUCM is mounted in the Direct Fired Burner Control Panel and the RTRM is mounted in the Main Control Panel The RRUCM and RTRM receive information from sensors and customer binary contacts to satisfy the applicable request for ventilation cooling dehumidification and heating Supply Fan Failure Input The fan failu...

Страница 10: ...Air Temperature and Relative Humidity Sensor This factory installed combination outdoor air sensor located in the outdoor air hood is designed to sense both outdoor air temperature and relative humidity for use by the microprocessor controller to make required ventilation cooling dehumidification and heating decisions Refer to Sequence of Operation p 19 for detailed unit control and operational mo...

Страница 11: ...dling Storage Take precautions to prevent condensate from forming inside the unit s electrical compartments and motors if 1 the unit is stored before it is installed or 2 the unit is set on the roof curb and temporary heat is provided in the building Isolate all side panel service entrances and base pan openings e g conduit holes S A and R A openings and flue openings from the ambient air until th...

Страница 12: ...ure adequate serviceability cataloged unit capacity and peak operating efficiency Providing less than the recommended clearances may result in condenser coil starvation short circuiting of exhaust or recirculation of hot condenser air WARNING Combustible Materials Failure to maintain proper clearance between the unit and combustible materials could cause a fire which could result in death serious ...

Страница 13: ...RRU SVX01F EN 13 Unit Clearances Figure 1 Typical installation clearances for single and multiple unit applications ...

Страница 14: ...14 RRU SVX01F EN Unit Curb Dimensions Figure 2 Unit dimensional data 10 ton high efficiency Figure 3 Roof curb dimensional data 10 ton high efficiency ...

Страница 15: ...Unit Curb Dimensions RRU SVX01F EN 15 Figure 4 Unit dimensional data 12 5 and 15 ton high efficiency Figure 5 Roof curb dimensional data 12 5 and 15 ton high efficiency ...

Страница 16: ...Unit Curb Dimensions 16 RRU SVX01F EN Figure 6 Unit dimensional data 20 and 25 ton high efficiency Figure 7 Roof curb dimensional data 20 and 25 ton high efficiency ...

Страница 17: ...RRU SVX01F EN 17 Unit Service Clearances Figure 8 Unit dimensional data 12 5 15 and 20 ton high efficiency ...

Страница 18: ...ft unit could result in unit dropping and possibly crushing operator technician which could result in death or serious injury and equipment or property only damage Ensure that all the lifting equipment used is properly rated for the weight of the unit being lifted Each of the cables chains or slings hooks and shackles used to lift the unit must be capable of supporting the entire weight of the uni...

Страница 19: ...TC RTRM RHV SSP ODA RDA R G Y1 Y2 LTB RRUTS RRU Main Control Module Remote Operator Display Outdoor Damper End Switch Air Proving Switch Fan Failure Switch Refrigeration Capacity Controller Modulating Gas Actuator Gas Valve Ignition Control Module Gas Ignitor Gas Ignitor Power Transformer High Temperature Cutout ReliaTel Refrigeration Module Reheat Valve Space Temperature Set Point Dial Outdoor Ai...

Страница 20: ...is de energized when the SAT rises above HSP plus HGRHD Occupied Heating Mode Call for heat is based on Outdoor Air Temperature OAT sensed by the Outdoor Air Temperature Sensor OTS When the Supply Air Temperature SAT sensed by the Supply Air Temperature Sensor STS drops below the O Air Heating Enable Set Point HESP a call for HEAT is initiated by the RRUCM through the R6 HEAT Relay R6 energizes th...

Страница 21: ...o maintain the space humidity The Occupied Space Humidity Set Point OSRS can be adjusted between the OSRS low and high limit set points as defined by the operator at the ROD When the space humidity rises above the OSRS the RRUCM will reset OES1 and or OES2 set points These reset set points can be viewed at the ROD as Y1 Y2 Active O Air Dehumid Set Points DEHUMID 1 and DEHUMID 2 will operate as des...

Страница 22: ... Air Damper RRUCM Energizes the O Air Damper Actuator ODA through ODR RDR Relay R1 O Air Damper OPENS R Air Damper Optional CLOSES through ODR RDR Relay R1 O Air Damper makes the Outdoor Damper End Switch DES RRUCM Energizes the Indoor Fan Motor IDM through IDM Relay R2 R2 Energizes RTRM Terminal G and IDM STARTS Fan Failure Switch FFS Proves Airflow UNOCCUPIED HEATING MODE Established RRU operate...

Страница 23: ... capacitors before servicing could result in death or serious injury Disconnect all electric power including remote disconnects and discharge all motor start run capacitors before servicing Follow proper lockout tagout procedures to ensure the power cannot be inadvertently energized Verify with an appropriate voltmeter that all capacitors have discharged WARNING Harmful Ultraviolet UV Lights Failu...

Страница 24: ...th 2 inch permanent filters installed The quantity of filters is determined by unit size Access to the filters is obtained lifting the access panel on the outdoor air intake hood Note Do not operate the unit without filters Field Installed Power Wiring An overall dimensional layout for the standard field installed wiring entrance into the unit is illustrated in Figure 2 to Figure 7 To insure that ...

Страница 25: ...h control device is illustrated in Figure 11 and Figure 12 Note All field wiring must conform to NEC guidelines as well as state and local codes Control Power Transformer The 24 volt control power transformers are to be used only with the accessories called out in this manual Transformers rated greater than 50 VA are equipped with internal circuit breakers If a circuit breaker trips turn Off all p...

Страница 26: ...nsporting DC signals in or around conduit housing high voltage wires DC Conductors Table 2 24V AC conductors Distance from Unit to Control Recommended Wire Size 000 460 feet 18 gauge 000 140 m 0 75 mm2 461 732 feet 16 gauge WARNING Hazardous Voltage w Capacitors Failure to disconnect power and discharge capacitors before servicing could result in death or serious injury Disconnect all electric pow...

Страница 27: ...er lockout tagout procedures to ensure the power cannot be inadvertently energized Verify with an appropriate voltmeter that all capacitors have discharged Check all electrical connections for tightness and point of termination accuracy Verify that the condenser airflow will be unobstructed Verify that the condenser fan and indoor blower turn freely without rubbing and are properly tightened on th...

Страница 28: ... the correct size and number of filters are in place Inspect the interior of the unit for tools and debris and install all panels in preparation for starting the unit WARNING Live Electrical Components Failure to follow all electrical safety precautions when exposed to live electrical components could result in death or serious injury When it is necessary to work with live electrical components ha...

Страница 29: ...disconnect to the On position and allow the crankcase heaters to operate a minimum of 8 hours Before closing the main power disconnect switch insure that the Control Input input is in the Unoccupied or connection on RRUTS 7 an 8 is Open Close the main power disconnect switch and the unit mounted disconnect switch if applicable RRUCM and ReliaTel Controls Upon power initialization the controls perf...

Страница 30: ...S TP systems Additional expansion modules including the XM30 XM32 and or XM70 may be factory installed and wired as supplied options require ROD The TD7 display is supplied when the ROD option is selected with UC600 controls The color screen is touch sensitive Figure 13 TD7 and Tracer UC600 Figure 14 Tracer UC600 System Status Figure 15 Tracer UC600 System Setup Figure 16 Tracer UC600 System Setpo...

Страница 31: ...P 72 F Default 72 AV 13 Space Cooling SP 68 F 9 ModeandSetpointsDFandIFV48aPart1BacNet 70 AV 14 Active Space Heating SP 64 F 9 ModeandSetpointsDFandIFV48aPart1BacNet 72 AV 15 Y1 O A Dehumid Enable 28 BTU lb Default 28 AV 16 Y2 O A Dehumid Enable 36 BTU lb 9 9 ModeandSetpointsDFandIFV48aPart1BacNet 13 User Low 34 AV 17 Unocc Space Heating SP 50 F Default 50 AV 18 Unocc Space Cooling SP 85 F Default...

Страница 32: ...dIFV48aPart1BacNet 0 BV 13 System Lock Out Alarm 0 9 AlarmsDFandIFV48aBacNet 0 BV 14 S Air Low Temp Cutout 0 9 AlarmsDFandIFV48aBacNet 0 BV 15 O Air Cooling Mode 0 9 ModeandSetpointsDFandIFV48aPart1BacNet 0 BV 16 O Air Heating Mode 0 9 ModeandSetpointsDFandIFV48aPart1BacNet 0 BV 17 O Air Ventilation Mode 0 Default 0 BV 18 Space Temp Sensor 1 Default 1 BV 19 Space RH Sensor 1 Default 1 BV 20 Info A...

Страница 33: ...DFV48aBacNet 0 BV 43 HGRH Required 1 9 BurnerControlIFV48aBacNet 0 BV 44 Space Pressure Used 0 Default 0 BV 45 OA Damper Enable 0 9 FanControlIFV48aBacNet 0 BV 46 Y1 Space Lockout 1 9 DXCoolingControlDFV48aBacNet 0 BV 47 Ignition 0 9 BurnerControlIFV48aBacNet 0 BV 48 HGRH ON 0 9 BurnerControlIFV48aBacNet 0 BV 49 Control Input w Min time 1 9 FanControlIFV48aBacNet 0 MI a 1 tov_S Air Temperature Idl...

Страница 34: ... extended period 15 to 30 minutes the motor winding can overheat and cause the motor winding thermostat to open WARNING Hazardous Service Procedures Failure to follow all precautions in this manual and on the tags stickers and labels could result in death or serious injury Technicians in order to protect themselves from potential electrical mechanical and chemical hazards MUST follow precautions i...

Страница 35: ... gauge Tachometer Temperature probe Anemometer Service mirror Small refrigeration screwdriver 5 16 in Nut driver 1 2 in Open end wrench 1 Confirm Unit Airflow Important Accurate airflow readings require clean inlet filters If required clean or replace filters before proceeding All Horizon direct gas fired heaters are factory adjusted to achieve design airflow pressure drop P of 0 625 in wc across ...

Страница 36: ...ve MGV before proceeding Refer to Figure 18 Figure 17 Air proving switch location Table 6 Acceptable measured pressures OAT F Burner Pressure Drop in wc 0 0 720 5 0 712 10 0 705 15 0 697 20 0 690 25 0 683 30 0 676 35 0 669 40 0 663 45 0 656 50 0 650 55 0 643 60 0 637 65 0 631 70 0 625 a a 0 625 in design pressure drop at standard air conditions Allowable pressure range at 70 F is 0 55 to 0 75 in w...

Страница 37: ...and repeat the call for heat until the internal gas piping system is bled R1 ON OA damper OPEN R2 ON Indoor Fan ON R6 ON Call for Heating ON R7 ON Ignition Process begins and requires proof of flame at burner to continue R8 ON Ignition Process Proven 5 Test Operating Heating Modes Note Heating default control signal is 25 percent for 90 seconds following successful ignition Important This test is ...

Страница 38: ...l is released at end of each 90 second warm up period 6 Burner Gas Train Ignition Controls and Starting Sequence for Gas Input Rating 400 MBh Refer to Figure 20 a Pilot Gas Train i Manual Shut Off Valve PSO ii Pilot Gas Regulator PGR iii Pilot On Off Valve PGV b Burner Gas Train i Manual Shut off Valves 2 MSO1 and MSO2 ii Main Gas Regulator 1 GR iii Main Gas Valves Automatic Safety On Off Control ...

Страница 39: ...me must be proven by the end of the 15 second PFEP 4 seconds if configuration jumper JR1 is clipped to allow the sequence to continue If a flame is not proven by the end of PFEP a safety shut down occurs With flame proven the ignition terminal 10 is energized This main flame establishing period MFEP begins when After ignition trials and with the presence of flame the main fuel valve terminal 9 is ...

Страница 40: ...ut ignition the control shuts off all outputs and enters lockout Reset is accomplished by cycling the power off for a minimum of 5 seconds If flame is lost once it has been established the control will shut off the gas valve within 0 8 seconds and locks out If flame is sensed during a purge period when no flame should be present the control will remain in a purge with the gas valve off until the f...

Страница 41: ...ta Plate Allow a minimum of 5 minutes of operation at 0 percent heating signal At ROD read and record Outdoor Air Temperature Discharge Air Temperature Burner P Record Gas Pressures PG1 PG2 Ignition Cycle Test Release Heating Control Signal Override Complete at least 5 calls for heat At each call for heat default heating startup signal is 25 percent Following each ignition test and before attempti...

Страница 42: ...figure optional accessories in the System Setup screen via the ROD Return the unit to normal operation by releasing all overrides Set Date and Time via the Setup Home Screen via the ROD Inspect the unit for misplaced tools hardware and debris Verify that all exterior panels including the control panel doors and condenser grilles are secured in place Close the main disconnect switch or circuit prot...

Страница 43: ...represents the force in pounds required to give the needed deflection 6 Compare the force scale reading Step 5 with the appropriate force value listed in Table 8 If the force reading is outside the range readjust the belt tension Note Actual belt deflection force must not exceed the maximum force value shown in Table 8 7 Recheck the belt tension at least twice during the first two to three days of...

Страница 44: ...ructions described in Coil Cleaning p 46 Manually rotate the condenser fan s to ensure free movement and check motor bearings for wear Verify that all of the fan mounting hardware is tight Inspectthe Outdoor and Return Dampers optional to ensure that all moving parts are securely mounted Keep the blades clean as necessary Verify that all damper linkages move freely lubricate with white grease if n...

Страница 45: ...ove any debris from the manifold Debris left in the manifold will prematurely clog the orifices in the future Important Do NOT enlarge burner ports doing so could adversely affect equipment performance 3 If any mixing plates are loose or missing fasteners tighten replace as necessary Always use zinc plated or stainless fasteners Note The missing plates on the burner may display hairline cracks The...

Страница 46: ...m both sides of the coil 6 The coil is now ready for the cleaning application The wash solution is best applied first in reverse direction of the airflow by back flushing in a downward direction and then in the direction of the airflow in a downflow direction 7 Washing the coil in a downward fashion through the outdoor coil access panel opening located over the separated coil fins will flush any d...

Страница 47: ...r personal protection equipment such as a face shield gloves and waterproof clothing 3 Remove enough panels from the unit to gain safe access to the microchannel coil 4 Use a soft brush or vacuum to remove base debris or surface loaded fibers from both sides of the coil 5 Using a sprayer and water ONLY clean the coil following the guidelines below Note It is better to clean the coil from the oppos...

Страница 48: ...passing enough hot gas discharged from the compressor to keep the system capacity in balance with the system load and the system energy draw consistent with the system capacity Final Process For future reference you may find it helpful to record the unit data requested below in the blanks provided 1 Complete Unit Model Number _____________________________________________________ 2 Unit Serial Numb...

Страница 49: ...Super heat F C Sub cool F C Compr Oil Level Suct Press psig kPa Disch Press psig kPa Disch Press psig kPa Liquid Press psig kPa Super heat F C Sub cool F C ok low ok low ok low ok low ok low ok low ok low ok low ok low ok low ok low ok low ok low ok low ok low ok low ok low ok low ok low ok low ok low ok low Note Check and record the data requested above each month during the cooling season with t...

Страница 50: ...ssed later in the section or through Tracer TU programming on connected computer Sensor failures may be viewed through the Alarms icon If an alarm is present the main indicator light on the UC600 will blink red If the optional unit display is installed the Alarm icon on the display will register ALARM illuminate red and flash Important The space temperature sensor SPTC and space relative humidity ...

Страница 51: ...cupied mode Discharge air sensor failed or not installed and connected to unit No Heat No gas supply to unit Unit manual gas valve s closed Heater high limit tripped Heat relay not energized Conditions do not warrant call for heat Heater control module malfunction Roll out switch trip Main gas on off switch OFF Inducer fan failure Heater air proving switch not making or failed Table 11 UC600 alarm...

Страница 52: ... 3500 21 17 1 2 15 1 2 3750 22 18 1 4 16 1 4 4000 23 1 4 19 1 4 17 4250 24 1 2 20 17 1 2 4500 25 3 4 21 18 1 4 4750 27 21 3 4 18 3 4 5000 22 1 2 19 1 2 5250 23 1 2 20 1 4 5500 24 1 4 20 3 4 5750 25 21 1 2 6000 26 22 6250 26 3 4 22 3 4 6500 27 3 4 23 1 2 6750 28 1 2 24 7000 29 1 4 24 3 4 7250 30 1 4 25 1 4 7500 31 26 WARNING Hazardous Service Procedures Failure to follow all precautions in this man...

Страница 53: ...ormal operation 1 hour after error is corrected Check for pilot flame Replace gas valve if pilot flame present If no pilot flame cycle Call for Heat If error repeats replace control 6 Control Internal Error Control remains in wait mode When the fault corrects control resumes normal operation Cycle Call for Heat If error repeats replace control 7 Flame rod shorted to ground Control remains in wait ...

Страница 54: ... is energized RM7895C D EC7895C RM7896C D Internal system fault occurred Purge card is removed Purge card is bad Prepurge Period Airflow lockout feature is enabled and the airflow switch opens Ignition pilot valve terminal is not energized No flame present at end of PFEP Main valve terminal is energized Delayed main valve terminal is energized RM7895C D Internal system fault occurred Purge card is...

Страница 55: ...essor Warrantor s obligations and liabilities under this warranty are limited to furnishing F O B Warrantor factory or warehouse replacement parts for Warrantor s products covered under this warranty Warrantor shall not be obligated to pay for the cost of lost refrigerant No liability shall attach to Warrantor until products have been paid for and then liability shall be limited solely to the purc...

Страница 56: ...e are committed to using environmentally conscious print practices Trane by Trane Technologies NYSE TT a global climate innovator creates comfortable energy efficient indoor environments for commercial and residential applications For more information please visit trane com or tranetechnologies com RRU SVX01F EN 01 Nov 2021 Supersedes RRU SVX01E EN Apr 2020 ...

Отзывы: