15
temperature rise falls outside the specified range, it may be
necessary to change the blower speed. Lowering the blower
speed increases the temperature rise and a higher speed
decreases the temperature rise.
Verifying & Adjusting Firing Rate
CAUTION:
Do not re-drill the burner orifices. If the orifice size
must be changed, use only new orifices.
The firing rate must be verified for each installation to prevent
over-firing of the unit.
The firing rate must not exceed the
rate shown on the unit data label.
To determine the firing
rate, follow the steps below:
1. Obtain the gas heating value (HHV) from the gas supplier.
2. Shut off all other gas fired appliances.
3. Start the unit in heating mode and allow it to run for at least
3 minutes.
4. Measure the time (in seconds) required for the gas meter
to complete one revolution.
5. Convert the time per revolution to cubic feet of gas per hour
using
.
6. Multiply the gas flow rate in cubic feet per hour by the
heating value of the gas in Btu per cubic foot to obtain the
firing rate in Btu per hour. See Example.
Example
:
• Time for 1 revolution of a gas meter with a 1 cubic foot
dial = 40 seconds.
• From
, read 90 cubic feet gas per hour.
• Local heating value of the gas (obtained from gas supplier)
= 1,040 Btu per cubic foot.
• Input rate = 1,040 x 90 = 93,600 Btuh.
7. Adjust the manifold pressure if necessary. See Manifold
Pressure Adjustment below. For additional information
about elevations above 2,000 feet, see
Manifold Pressure Adjustment
The manifold pressure must be set to the appropriate value
for your installation. To adjust the manifold pressure:
1. Obtain the required manifold pressure setting
NOTE:
The values listed in the tables are based on sea
level values. At higher altitudes, the heating value of gas
is lower than the sea level heating value.
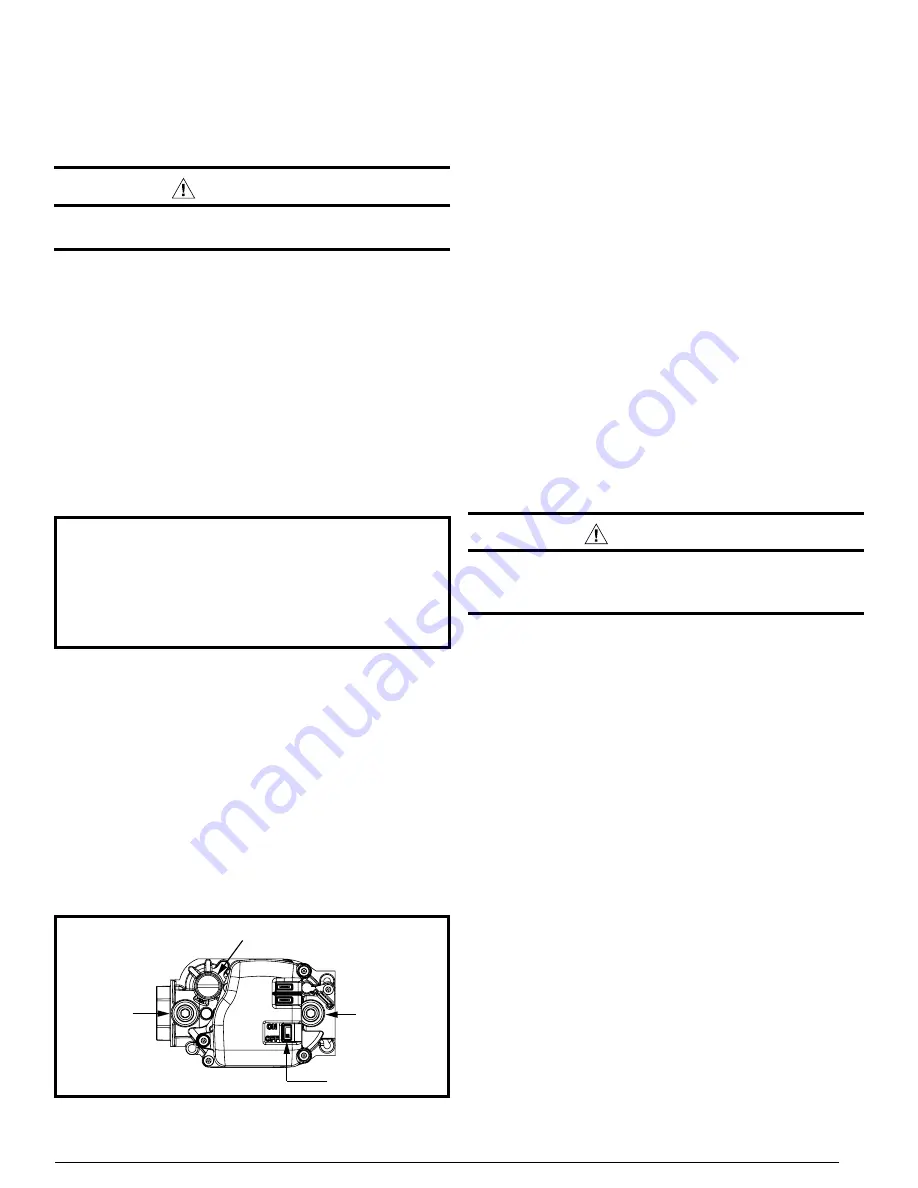
2. Remove the regulator capscrew (
) from the INLET
side of the regulator.
3. Slowly turn the adjustment screw inside the regulator to
obtain the appropriate manifold pressure.
NOTE:
Turning the screw clockwise increases the pressure
and turning the screw counter-clockwise decreases the
pressure. To prevent backing the screw all the way out
from the valve, turn the screw slowly.
4. Replace and tighten the regulator capscrew over the
adjustment screw.
Verifying Over-Temperature Limit Control Operation
1. Verify the louvered control access panel is in place and that
there is power to the unit.
2. Block the return airflow to the unit by installing a close-off
plate in place of or upstream of the filter.
3. Set the thermostat above room temperature and verify the
.
NOTE:
The over-temperature limit control should turn off
the gas valve within approximately four minutes (exact time
depends on the efficiency of the close-off when blocking the
return air). The circulating air and combustion blowers should
continue to run when the over-temperature limit control switch
opens.
4. Remove the close-off plate immediately after the over-
temperature limit control opens. If the unit operates for more
than four minutes with no return air, set the thermostat below
room temperature, shut off power to the unit, and replace
the over-temperature limit control.
Verifying Burner Operation
CAUTION:
The door over the burners may only be open for
inspection purposes only. The door must be installed
during unattended operation.
1. Remove the burner compartment door and note the location
of the sightglass on burner head.
2. Set the thermostat above room temperature and observe
the ignition sequence.
NOTE:
The burner flame should be
present by seeing a glow through the sightglass.
3. After validating the flame, change the thermostat setting to
below room temperature.
4. Verify the burner flame is completely extinguished.
5. Replace the burner compartment door.
Verify Operation of the Supply Air Limit Switch
A properly functioning limit switch should turn off the gas
valve when the return is blocked (time depends on how well
the return air is blocked). The circulating air and combustion
blowers should continue to run when the limit switch opens.
1. Verify the blower door is securely mounted in place and
that there is power to the furnace.
2. Block the return airflow to the furnace by installing a close-
off plate in place of or upstream of the filter(s).
3. Set the thermostat above room temperature and observe
the Operating Sequence.
4. Remove the close-off immediately after the limit switch
opens. If the furnace continues to operate with no return
air, set the thermostat below room temperature, shut off
power to the furnace, and replace the limit switch.
Capscrew
Inlet
Pressure
Tap
Manifold
Pressure
Tap
ON/OFF Switch
Figure 8. Regulator Capscrew & Tap Locations


