background image

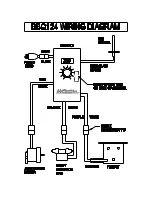
       b)  Reconnect the Draft Induction Fan to the Red/White wire pair and the Auger 
            Drive Motor to the Orange/White pair. 
       c)  Plug Power Cord into an appropriate, grounded electrical outlet and turn the 
            Switch/Dial ON. 
       d)  If the Auger Drive Motor 

is

 operating (check the small fan blade on the back of 

            the motor), the problem is in the Three Speed or Digital Control, which will need 
            to be replaced. Contact your Traeger Dealer or the Traeger Parts 
            Department 

(SECTION SEVEN) 

to place an order. 

4)  If the Auger Drive Motor 

is not 

operating but the Draft Induction Fan 

is

 operating, 

the problem is in the Auger system, which will need to be checked. 

       a)  With the Switch/Dial OFF, locate the small fan blade on the back of the Auger 
             Drive Motor. 
       b)  While watching the fan blade, turn the Switch/Dial to ON. If the fan blade 

does 

            not 

turn, turn the Switch/Dial to OFF. This indicates a defective Auger Drive 

            Motor and it will need to be replaced. Contact your Traeger Dealer or the 
            Traeger Parts Department 

(SECTION SEVEN) 

to place an order. 

       c)  If the fan blade turns a bit and then stops, continue watching and turn the 
            Switch/Dial to OFF. If the fan blade UNWINDS slightly, this indicates a jam in 
            the Auger system which will need to be cleared. 
       d)  Disconnect Power Cord from electrical outlet and remove Pellets from the Pellet 
            Hopper. Check for foreign objects and wet/decomposed Pellets, both of which 
            can cause a jam in the Auger system. The Auger will need to be removed to 
            clear a jam in the Auger system. See “HOW DO I REMOVE THE AUGER IF IT 
            JAMS?” section below. 

HOW DO I REMOVE THE AUGER IF IT JAMS? 


For models with a fixed Auger Drive Motor: 
1)  Remove any covers necessary to access the Auger Drive Motor. 
2)  Remove the screw connecting the Auger Drive Motor shaft to the Auger shaft, using 

a 7/64 hex wrench and a 5/16 wrench or driver. 

3)   Remove two bolts mounting the Auger Drive Motor/Bracket assembly to the Burner 

Box with a 7/16 wrench. 

4)  With a small pipe wrench or locking pliers on the Auger shaft, turn the Auger counter 

clockwise. It will turn hard until it breaks free, then the Auger will turn freely. 

5)  Remove the Auger and clean all Pellets, ash or foreign objects from the Auger, 

Auger Tube and Firepot.  A shop-vac is ideal tor this task. 

6)  Sand the outside surfaces of the auger with medium grit sandpaper. Check the 

inside of the Auger Tube and sand it if needed. Vacuum sanding grit from the Auger 
Tube and Firepot when finished. 

7)  Reinstall the Auger into the Auger Tube, making sure that it rotates freely. 
8)  Re-attach the Auger Drive Motor/Bracket assembly, ensuring that the Auger shaft 

rotates freely on the Auger Drive Motor Shaft. Re-attach the Auger shaft to the 
Auger Drive Motor shaft. 


For models with a floating Auger Drive Motor: 
(Note: some units with the floating Auger Drive Motor will require metric tools.) 


1)  Remove any covers necessary to access the Auger Drive Motor. 
2)  Remove the screw connecting the Auger Drive Motor shaft to the Auger shaft and 

the screw retaining the Auger Bushing into the Auger Tube. 

3)  With a small pipe wrench or locking pliers on the Auger shaft, turn the Auger counter 

clockwise. It will turn hard until it breaks free, then the Auger will turn freely. 

Содержание BBQ124

Страница 1: ...IAL PELLET GRILL This Grill Protected Under Patent Number 4 823 684 FOR OUTDOOR USE ONLY WARNING DO NOT STORE OR USE COMBUSTABLE MATERIALS NEAR THIS APPLIANCE USE ONLY TRAEGER BRAND HARDWOOD BBQ PELLETS IN THE OPERATION OF THIS UNIT ...

Страница 2: ......

Страница 3: ......

Страница 4: ... Leg Brace 187 1 Leg Frame 180 with Rear Leg Brace 199 1 Flue Trim 169 1 Chimney Cap Assembly 172 1 Grease Bucket 208 4 Casters 2 Non Locking 211 2 Locking 212 1 Hardware Kit 203 with 4 Bolts 6 Screws and 10 Washers 1 Porcelain Grill 221 1 Grease Drain Pan 217 1 Heat Baffle 214 You will need to complete the assembly which includes 1 Mounting the Leg Frames 180 to the Grill 2 Attaching the Front 18...

Страница 5: ...he Grill Door side 3 Using the 7 16 Wrench attach the Leg Frames 180 to the Grill 2 Hex Head Bolts and 2 Washers are needed for each Leg Frame 180 Do not over tighten 4 Attach the Front Leg Brace 187 to the Front Legs The Front Leg Brace 187 has one hole on each end Use 2 Phillips head Screws and 2 Washers Do not over tighten 5 Install the Casters 211 212 The Locking Casters 212 are to be located ...

Страница 6: ...e Drain located inside the Grill on the right POSITIONING THE PORCELAIN GRILL Position the Porcelain Grill 221 on the Grill Supports that run the length of the cooking area HANGING THE GREASE BUCKET Locate the Grease Drain Tube extending below the Grill on the right end Hang the Grease Bucket 208 on the Bucket Hook INSTALLING THE CHIMNEY CAP ASSEMBLY After making sure that the Flue Trim 169 is in ...

Страница 7: ......

Страница 8: ...n the Switch Dial OFF 5 Turn the Switch Dial ON set the Temperature Dial to SMOKE Let the Pellets come to full flame Once you see flames come out of the Firepot turn the Switch Dial OFF and let the Grill cool down RECOMMENDATION for ease of clean up Line the Grease Drain Pan with heavy duty aluminum foil Be sure the edges and ends of the foil are tight against the bottom of the Grease Drain Pan Po...

Страница 9: ...STRUCTIONS If the Hot Rod only is not operating the Grill can still be used to cook and smoke using the MANUAL LIGHTING PROCEDURE below 1 Making sure the Switch Dial is set to OFF and the Hot Rod connector Purple White wire pair is disconnected plug the Power Cord into an appropriate grounded electrical outlet 2 Open the Pellet Hopper and fill with TRAEGER BBQ PELLETS WARNING USE ONLY TRAEGER BRAN...

Страница 10: ...longer 7 Grease fires are caused by not properly maintaining the Grill by failing to clean your Grease Drain Pan V shaped Grease Drain and Grease Drain Tube on a consistent basis In the unlikely event of a grease fire while cooking TURN THE SWITCH DIAL OFF and KEEP THE DOOR CLOSED until the fire is completely out Never keep the Door open during a grease fire If it does not go out lightly sprinkle ...

Страница 11: ...d check the fuse on back Replace the fuse if blown Reinstall the Control b Unplug Hot Rod connector Purple White wire pair plug Power Cord into an appropriate grounded electrical outlet and turn the Switch Dial ON NOTE At this point the Grill will not ignite c Check the Draft Inducer Fan and the Auger Drive Motor for operation If both are operating the Hot Rod needs to be replaced If one or both a...

Страница 12: ...W DO I REMOVE THE AUGER IF IT JAMS section below HOW DO I REMOVE THE AUGER IF IT JAMS For models with a fixed Auger Drive Motor 1 Remove any covers necessary to access the Auger Drive Motor 2 Remove the screw connecting the Auger Drive Motor shaft to the Auger shaft using a 7 64 hex wrench and a 5 16 wrench or driver 3 Remove two bolts mounting the Auger Drive Motor Bracket assembly to the Burner ...

Страница 13: ...CED A DROP IN THE GRILL TEMPERATURE WHAT CAN I DO TO CORRECT THIS In Grill models with a fixed Auger Drive Motor you will need to TRUE the Auger 1 Remove all Pellets from the Pellet Hopper and run Pellets out of the Auger Tube 2 Remove the screw connecting the Auger Drive Motor shaft to the Auger shaft using a 7 64 hex wrench and a 5 16 wrench or driver 3 Spin the Auger shaft over the Auger Drive ...

Страница 14: ...vide your name phone number address Model and Serial Number of the Grill located on a label inside the Hopper Lid along with the part identification SECTION SEVEN TRAEGER SUPPORT Parts are identified in the front of this manual on the COMPONENT DIAGRAM PAGE To order parts Call E mail or write to your Traeger Dealer or Traeger Pellet Grills Please provide your name phone number address Model and Se...

Отзывы: