Page 7
7.
When the reading has stabilised, adjust the
Calibrate
control until the
display shows the value of the buffer at the current temperature. For TPS
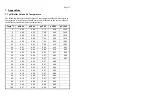
buffers, this is shown on the bottle. Refer also to the table in section 7.1.
8.
Rinse the pH and Temperature sensors in distilled water and blot them dry.
9.
Place both sensors into a small sample of secondary buffer (eg. pH4.00,
pH9.23 or pH10.00) so that the bulb and reference junction are both
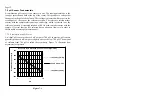
covered, as per the diagram in step 6 above.
DO NOT
place the sensor directly into the buffer bottle.
NOTE: pH9.23 and pH10.00 buffers are highly unstable. Avoid using
these buffers if possible. Discard immediately after use
.
When the reading has stabilised, adjust the
Slope
control until the display
shows the value of the buffer at the current temperature. For TPS buffers,
this is shown on the bottle. Refer also to the table in section 7.1.
10.
The
pH Cube
is now calibrated and is ready for use.
Discard the used samples of buffer.
3.2 Calibration Notes
1.
A 1-point calibration using the
Calibrate
control in a pH6.88 or pH7.00
buffer should be performed at least weekly. In applications where the sensor
junction can become blocked (eg. wines, dairy products, mining slurries etc) a
1-point calibration may have to be done daily.
2.
A full 2-point calibration should be performed at least monthly. Of course,
more frequent calibration will result in greater confidence in results.
4. mV Calibration
The mV section is factory calibrated. There is no user-calibration facility for this
mode.


