background image

TL-WR642G 

 108M Wireless Router User Guide 


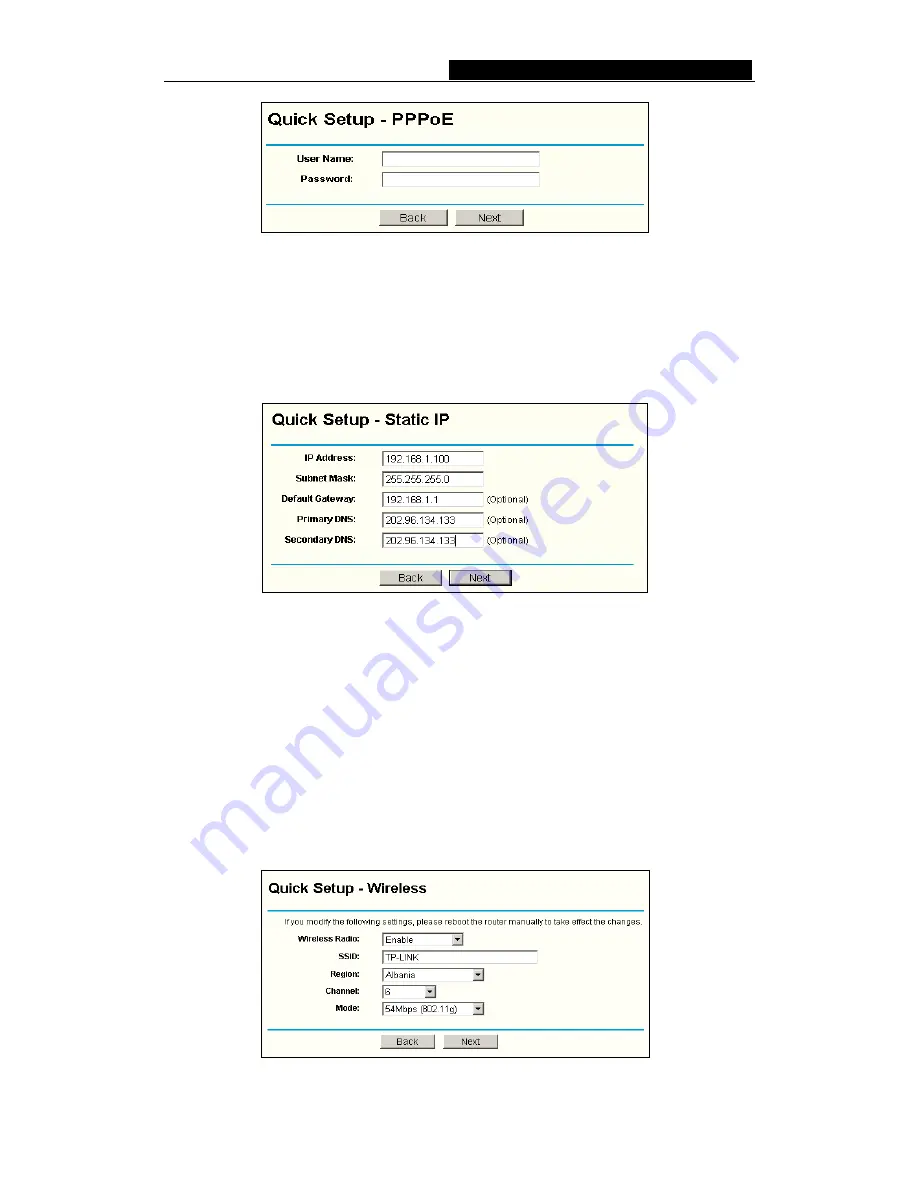
Figure 4-7    Quick Setup - PPPoE 


User Name and Password - 

Enter the 

User Name

 and 

Password

 provided by your 

ISP. These fields are case sensitive. If you have difficulty with this process, please 
contact your ISP. 

If you choose "

 Dynamic IP

", the router will automatically receive the IP parameters from 

your ISP without needing to enter any parameters. 
If you Choose "

Static IP

", the Static IP settings page will appear, shown in figure 4-8:   


Figure 4-8    Quick Setup - Static IP 


Note: 

The IP parameters should have been provided by your ISP. 


IP Address - 

This is the WAN IP address as seen by external users on the Internet 

(including your ISP). Enter the IP address into the field. 


Subnet Mask - 

The Subnet Mask is used for the WAN IP address, it is usually 

255.255.255.0 


Default Gateway - 

Enter the gateway into the box if required. 


Primary


DNS - 

Enter the DNS Server IP address into the boxes if required. 


Secondary DNS - 

If your ISP provides another DNS server, enter it into this field.


After you complete the above, click 

Next

, the Wireless settings page will appear, shown 

in figure 4-9. 


Figure 4-9    Quick Setup - Wireless settings 

 - 

11

 - 

Содержание TL-WR642G - Wireless Router

Страница 1: ......

Страница 2: ...duct names are trademarks or registered trademarks of their respective holders No part of the specifications may be reproduced in any form or by any means or used to make any derivative such as transl...

Страница 3: ...tion Guide 8 4 1 TCP IP configuration 8 4 2 Quick Installation Guide 9 Chapter 5 Configuring the Router 13 5 1 login 13 5 2 Status 13 5 3 Quick Setup 14 5 4 Network 14 5 4 1 LAN 15 5 4 2 WAN 15 5 4 3...

Страница 4: ...10 2 Comexe cn DDNS 45 5 11 System Tools 45 5 11 1 Time 46 5 11 2 Firmware 46 5 11 3 Factory Defaults 47 5 11 4 Reboot 48 5 11 5 Password 48 5 11 6 Log 49 5 11 7 Statistics 49 Appendix A FAQ 51 Appen...

Страница 5: ...r Adapter for TL WR642G 108Mbps Wireless Router Quick Installation Guide One Resource CD for TL WR642G 108Mbps Wireless Router including This Guide Other Helpful Information Wall mounting screws Note...

Страница 6: ...technology so that transmission distance is 2 3 times of traditional IEEE 802 11g b solutions up to 855 36m tested in China Transmission range is extended to 4 9 times It is an easy web based setup f...

Страница 7: ...02 11g b solutions up to a distance of 855 36m tested in China Transmission range is extended to 4 9 times It is compatible with all IEEE 802 11g and IEEE 802 11b products The TL WR642G 108Mbps Wirele...

Страница 8: ...e Supports Remote and Web management Detachable reverse SMA connector antenna 2 3 Panel Layout 2 3 1 The Front Panel The front panel of the TL WR642G consists of several LED indicators which is design...

Страница 9: ...s power Second press and hold the default reset button then turn on the router s power until the system LED lights up about 3 seconds Last release the reset button and wait for the router to reboot N...

Страница 10: ...g the Router Before you install the router you should connect your PC to the Internet through your broadband service successfully If there is any problem please contact your ISP After that please inst...

Страница 11: ...TL WR642G 108M Wireless Router User Guide To LAN Switch Hub 4 3 2 1 WAN To WAN RESET XDSL Cable Ethernet Figure 3 1 Hardware Installation of the TL WR642G 108Mbps Wireless Router 7...

Страница 12: ...our PCs Configure the IP address manually 1 Set up the TCP IP Protocol for your PC s If you need instructions as to how to do this please refer to Appendix B Configuring the PCs 2 Configure the networ...

Страница 13: ...tion for your PC correct Note If the router s IP address is 192 168 1 1 your PC s IP address must be within the range of 192 168 1 2 192 168 1 254 the gateway must be 192 168 1 1 4 2 Quick Installatio...

Страница 14: ...ord are correct you can configure the router using the web browser Please click the Quick Setup link on the left of the main menu and the Quick Setup screen will appear Figure 4 5 Quick Setup Click Ne...

Страница 15: ...gure 4 8 Quick Setup Static IP Note The IP parameters should have been provided by your ISP IP Address This is the WAN IP address as seen by external users on the Internet including your ISP Enter the...

Страница 16: ...y be illegal to use the wireless function of the router in a region other than one of those specified in this filed Channel the current channel in use This field determines which operating frequency w...

Страница 17: ...s current status and configuration All information is read only 1 LAN This field displays the current settings or information for the LAN including the MAC address IP address and Subnet Mask 2 Wirele...

Страница 18: ...n 4 2 Quick Installation Guide 5 4 Network Figure 5 2 the Network menu There are three submenus under the Network menu shown in figure 5 2 LAN WAN and MAC Clone Click any of them and you will be able...

Страница 19: ...til they are re configured c If the new LAN IP Address you set is not in the same subnet the Virtual Server and DMZ Host will change accordingly at the same time 5 4 2 WAN You can configure the WAN po...

Страница 20: ...you one or two DNS addresses select Use These DNS Servers and enter the primary and secondary addresses into the correct fields Otherwise the DNS servers will be assigned dynamically from ISP Note If...

Страница 21: ...provided IP Address Enter the IP address in dotted decimal notation provided by your ISP Subnet Mask Enter the subnet Mask in dotted decimal notation provided by your ISP usually is 255 255 255 0 Defa...

Страница 22: ...ollowing parameters figure 5 6 Figure 5 6 WAN PPPoE User Name Password Enter the User Name and Password provided by your ISP These fields are case sensitive Connect on Demand You can configure the rou...

Страница 23: ...e the router will disconnect your Internet connection and not be able to re establish your connection automatically as soon as you attempt to access the Internet again To use this option click the rad...

Страница 24: ...ter it as well Click the Save button to save your settings 5 4 3 MAC Clone You can configure the MAC address of the WAN port on this page figure 5 8 Figure 5 8 MAC Address Clone Some ISPs require that...

Страница 25: ...settings for the wireless network are set on this page figure 5 10 Figure 5 10 Wireless Settings SSID Enter a value of up to 32 characters The same name SSID must be assigned to all wireless devices...

Страница 26: ...enabled or disabled to allow wireless stations access If enabled wireless stations will be able to access the router otherwise wireless stations will not be able to access the router Enable SSID Broa...

Страница 27: ...s any combination of 0 9 a f A F zero key is not permitted or 16 ASCII characters Encryption When you select WPA PSK or WPA for Authentication Type you can select either Automatic or TKIP or AES as En...

Страница 28: ...uter Status The status of this entry either Enabled or Disabled To disable the Wireless MAC Address Filters feature keep the default setting Disable To set up an entry click Enable and follow these in...

Страница 29: ...ake all the entries ineffective click the Delete All button to delete all the entries Click the Next button to go to the next page and click the Previous button to return to the previous page For exam...

Страница 30: ...tations that are not in the list will be able to access the router b If you enable the function and select the Deny the stations not specified by any enabled entries in the list to access for Filterin...

Страница 31: ...server which provides the TCP IP configuration for all the PCs that are connected to the router on the LAN The DHCP Server can be configured on the page shown in figure 5 15 Figure 5 15 DHCP Settings...

Страница 32: ...lient Name MAC Address Assigned IP and Lease Time for each DHCP Client attached to the router figure 5 16 Figure 5 16 DHCP Clients List Index The index of the DHCP Client Client Name The name of the D...

Страница 33: ...ed decimal notation of the computer you wish to add 2 Click the Save button when finished To modify A Reserved IP address 1 Select the reserved address entry as you desire and modify it If you wish to...

Страница 34: ...ervice port and all requests from Internet to this service port will be redirected to the computer specified by the server IP Any PC that was used for a virtual server must have a static or reserved I...

Страница 35: ...computer or server To modify a virtual server entry 1 Select the entry you want to modify 2 Modify the information from the Service Port the IP Address boxes and the Protocol pull down list 3 Click th...

Страница 36: ...s Range The port or port range used by the remote system when it responds to the outgoing request A response using one of these ports will be forwarded to the PC that triggered this rule You can input...

Страница 37: ...ld and the Enable checkbox 2 Click the Save button To delete all rules 1 Click the Clear All button 2 Click the Save button Note 1 When the trigger connection is released the according opening ports w...

Страница 38: ...wn in figure 5 22 Figure 5 22 UPnP Settings Enable UPnP UPnP can be enabled or disabled by clicking the Enable or Disable button As allowing this may present a risk to security this feature is disable...

Страница 39: ...he Firewall page shown in figure 5 24 you can turn the general firewall switch on or off The default setting for the switch is off If the general firewall switch is off even if IP Address Filtering DN...

Страница 40: ...t setting Disabled To set up an IP Address Filtering entry click Enable Firewall and Enable IP Address Filtering on the Firewall page and click the Add New button The page Add or Modify an IP Address...

Страница 41: ...When finished click the Return button to return to IP Address Filtering page To modify or delete an existing entry 1 Find the desired entry in the table 2 Click Modify or Delete as desired on the Modi...

Страница 42: ...ffect For example 0803 1705 the entry will take effect from 08 03 to 17 05 2 Domain Name Type the domain or key word as desired in the field A blank in the domain field means all websites on the Inter...

Страница 43: ...MAC Filtering Like the IP Address Filtering page the MAC Address Filtering page shown in figure 5 29 allows you to control access to the Internet by users on your local network based on their MAC Addr...

Страница 44: ...esired on the Edit column Click the Enable All button to make all entries enabled Click the Disabled All button to make all entries disabled Click the Delete All button to delete all entries Click the...

Страница 45: ...is function change the default IP Address to another IP Address as desired To access the router you will type your router s WAN IP Address into your browser s Address in IE or Location in Navigator bo...

Страница 46: ...D FLOOD Packets numbers is beyond the set value the router will start up the blocking function immediately Enable TCP SYN FLOOD Attack Filtering Enable or Disable the TCP SYN FLOOD Attack Filtering TC...

Страница 47: ...ic Routing page shown in figure 5 34 Figure 5 34 Static Routing To add static routing entries 1 Enter the following data Destination IP Address The Destination IP Address is the address of the network...

Страница 48: ...you need to sign up for DDNS service providers such as www oray net or www comexe cn The Dynamic DNS client service provider will give you a password or key To set up for DDNS follow these instruction...

Страница 49: ...6 Figure 5 36 Comexe cn DDNS Settings To set up for DDNS follow these instructions 1 Type the domain names your dynamic DNS service provider gave 2 Type the User Name for your DDNS account 3 Type the...

Страница 50: ...he right blanks Time Enter your local time in HH MM SS into the right blanks Time setting follows these steps below 1 Select your local time zone 2 Enter date and time in the right blanks 3 Click Save...

Страница 51: ...K website www tp link com 2 Run a TFTP Server on a PC on your LAN and take the file in the TFTP server s path 3 Type the downloaded file name into the File Name box 4 Type the IP Address of the PC tha...

Страница 52: ...boot the router Click the Reboot button to reboot the router Some settings of the router will take effect only after rebooting which include Change LAN IP Address System will reboot automatically MAC...

Страница 53: ...when finished Click the Clear All button to clear all 5 11 6 Log This page shown in figure 5 43 allows you to query the Logs of the router Figure 5 43 System Log The router can keep logs of all traffi...

Страница 54: ...bytes received and transmitted by the router Packets The total amount of packets received and transmitted in the last Packets Statistic interval seconds Bytes The total amount of bytes received and t...

Страница 55: ...or connect Manually for Internet connection mode Type an appropriate number for Max Idle Time to avoid wasting paid time Otherwise you can select Auto connecting for Internet connection mode Figure A...

Страница 56: ...need to do anything with the router 2 If you start as a responsor you need configure Virtual Server or DMZ Host 3 How to configure Virtual Server Login to the router click the Forwarding menu on the l...

Страница 57: ...e Management page type a port number except 80 such as 88 into the Web Management Port field Click Save and reboot the router Figure A 6 Remote Management Note If the above configuration takes effect...

Страница 58: ...sure the Wireless Router Radio is enabled 2 Make sure that the wireless stations SSID accord with the router s SSID 3 Make sure the wireless stations have right KEY for encryption when the router is e...

Страница 59: ...nfiguration tab in the appearing Network window 3 Click on the Add button Select Protocol and then click Add Figure B 1 Add Network Protocol 4 Under Manufacturers on Select Network Protocol page highl...

Страница 60: ...ow will display and the IP Address tab is open on this window by default 4 Now you have two ways to configure the TCP IP protocol below Assigned by DHCP Sever a Select Obtain an IP address automatical...

Страница 61: ...tab as shown in the following figure Figure B 6 DNS Configuration tab Setting IP address manually a Select Specify an IP address on IP Address tab as shown in the following figure If the router s LAN...

Страница 62: ...Gateway tab and click on the Add button as shown in the figure Figure B 8 Gateway tab c On the DNS Configuration tab click Enable DNS radio and type your computer name in to the Host field and a Doma...

Страница 63: ...TL WR642G 108M Wireless Router User Guide click Add button Shown below Figure B 9 DNS Configuration tab Now all the configurations are finished it will take effect after reboot 59...

Страница 64: ...orting Auto MDI MDIX Cabling Type 10BASE T UTP category 3 4 5 cable maximum 100m EIA TIA 568 100 STP maximum 100m 100BASE TX UTP category 5 5e cable maximum 100m EIA TIA 568 100 STP maximum 100m Radio...

Страница 65: ...f traditional 802 11b and 802 11g products for a coverage area that is up to nine times greater A traditional 802 11b and 802 11g product transmission distance is about 300m A 2x to 3x eXtended RangeT...

Страница 66: ...ction by simulating a dial up connection SSID A Service Set Identification is a thirty two character maximum alphanumeric key identifying a wireless local area network For the wireless devices in a ne...

Страница 67: ...ss Router User Guide Appendix E Contact Information For help with the installation or operation of the TP LINK TL WR642G 108Mbps Wireless Router please contact us E mail support tp link com Website ht...

Отзывы: