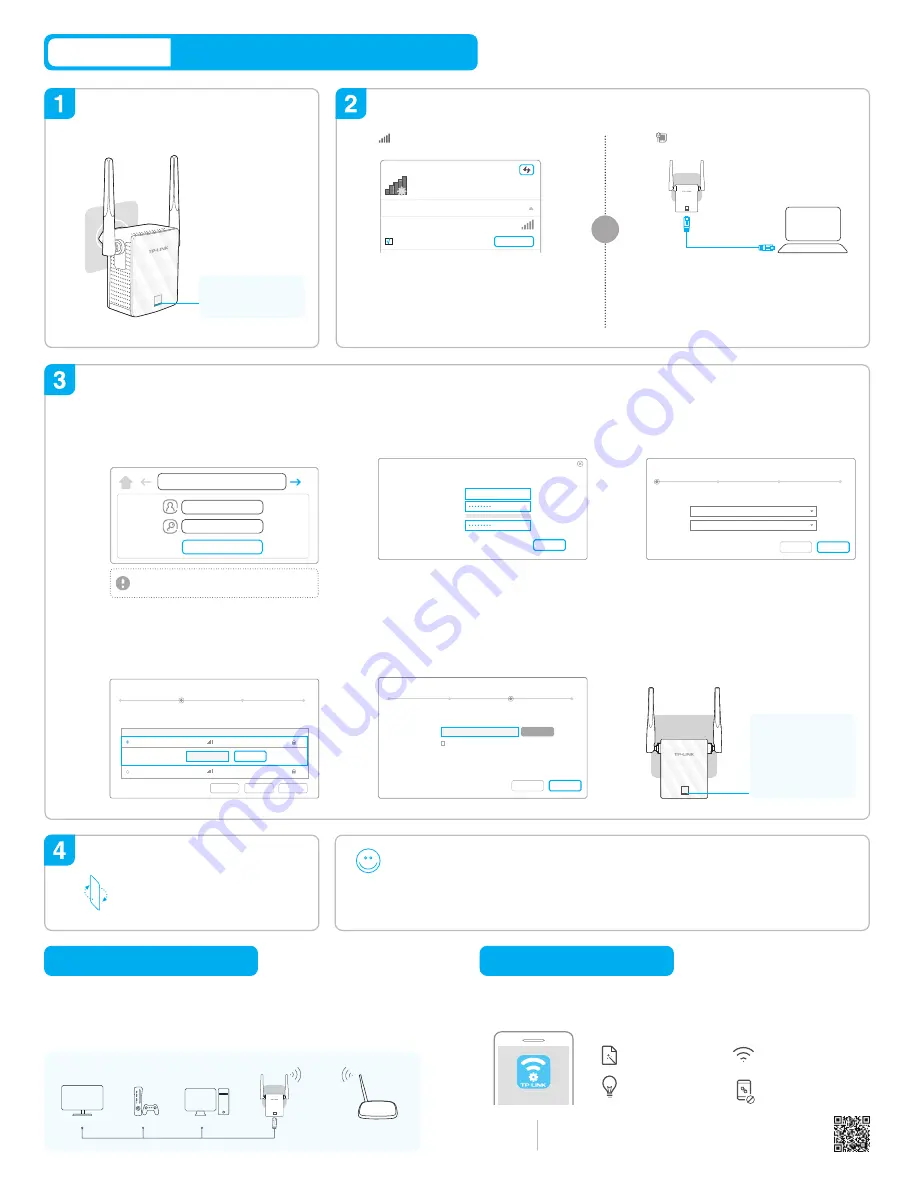
Quick Setup using Web Browser
Option TWO
Tether app provides a simple, intuitive way to access, manage your extender using your iOS or
Android devices.
1. Scan the QR code to download the app from the App Store or Play Store.
2. Ensure your smart device is wirelessly connected to the extender.
3. Launch the app and start managing your extended network.
Block network access
from specific devices
Turn off the LED
at the specific time
Change the basic
extended network settings
Do initial configuration
of your extender
The extender can be used as a wireless adapter to connect any Ethernet-only device such
as a Blu-ray player, game console, DVR, or smart TV to your Wi-Fi network.
First, connect the extender to your router using Option ONE or Option TWO, then connect
the extender to your Ethernet-only device via an Ethernet cable.
Entertainment Adapter
TP-LINK Tether App
Smart TV
Game Console
Ethernet Connection
Desktop
Router
Plug in next to your router.
Power on
Connect to the extender
Wait about 30 seconds
until the LED changes
to solid red.
via Wireless
Disconnect your Ethernet (wired) connection
to your computer. Click the Wi-Fi icon on the
taskbar and connect to the extender’s
network (e.g. TP-LINK_Extender_XXXXXX).
Connection are available
Not connected
Wireless Network Connection
Connect automatically
Connect
TP-LINK_Extender_XXXXXX
√
via Ethernet Cable
Disable the Wi-Fi on your computer. Connect
the extender to your computer via an Ethernet
cable.
or
Relocate
Enjoy!
The extended network
shares
the
same
Wi-Fi password
as your host network, but may have
different
network name
if you customize the name during the configuration.
Flip this piece of paper, and refer to
Step 3
of
Option ONE
.
Configure
Verify your wireless settings and click
Save
.
Then check the LED.
Launch a web browser and type
http://tplinkrepeater.net
into the URL field,
and use
admin
(all lowercase) for both
Username and Password to log in.
Create a new username and password to log
in the web management page, then click
Confirm
.
Either copy the host's SSID or customize it for
extended 2.4GHz network, then click
Next
.
Select your region and time zone, then click
Next
.
Select your router's
2.4GHz host
network and
enter the password, then click
Next
.
http://tplinkrepeater.net
admin
Login
admin
If the login window does not pop up, please refer
to the
FAQ > Q2
.
Create a new username and password.
New Username:
New Password:
Confirm Password:
Low
Middle
High
Confirm
2.4GHz Host Network
Please select your country/region.
(GMT) Greenwich Mean Time, Dublin, London
Region
Region:
Time Zone:
Wireless Settings
Summary
Exit
Next
2.4GHz Host Network
Host 2.4GHz password:
Please select 2.4GHz host network.
Region
Wireless Settings
Summary
Other...
Back
Rescan
Next
ID
1
3
SSID
TP-LINK_Router
TP-LINK_1
MAC Address
00:0A:EB:13
:
09
:
19
C0
:
4A:00
:
D1
:
0F:22
Signal
Security
12345678
2.4GHz Host Network
Your network name
Region
Extended 2.4GHz SSID:
Hide SSID broadcast
Note: The extended 2.4GHz password is the same as your host password.
Wireless Settings
Summary
Back
Next
Copy Host SSID
The LED should turn
solid green (or orange),
indicating successful
connection.
If not, please refer to
FAQ -> Q3.
Tether
How to
begin?
Note: AP mode of the extender is not supported by the Tether.
1
2
3
4
5
6
Username
All manuals and user guides at all-guides.com


