background image

14

Chapter 3


Set Up Internet Connection Via Quick Setup Wizard

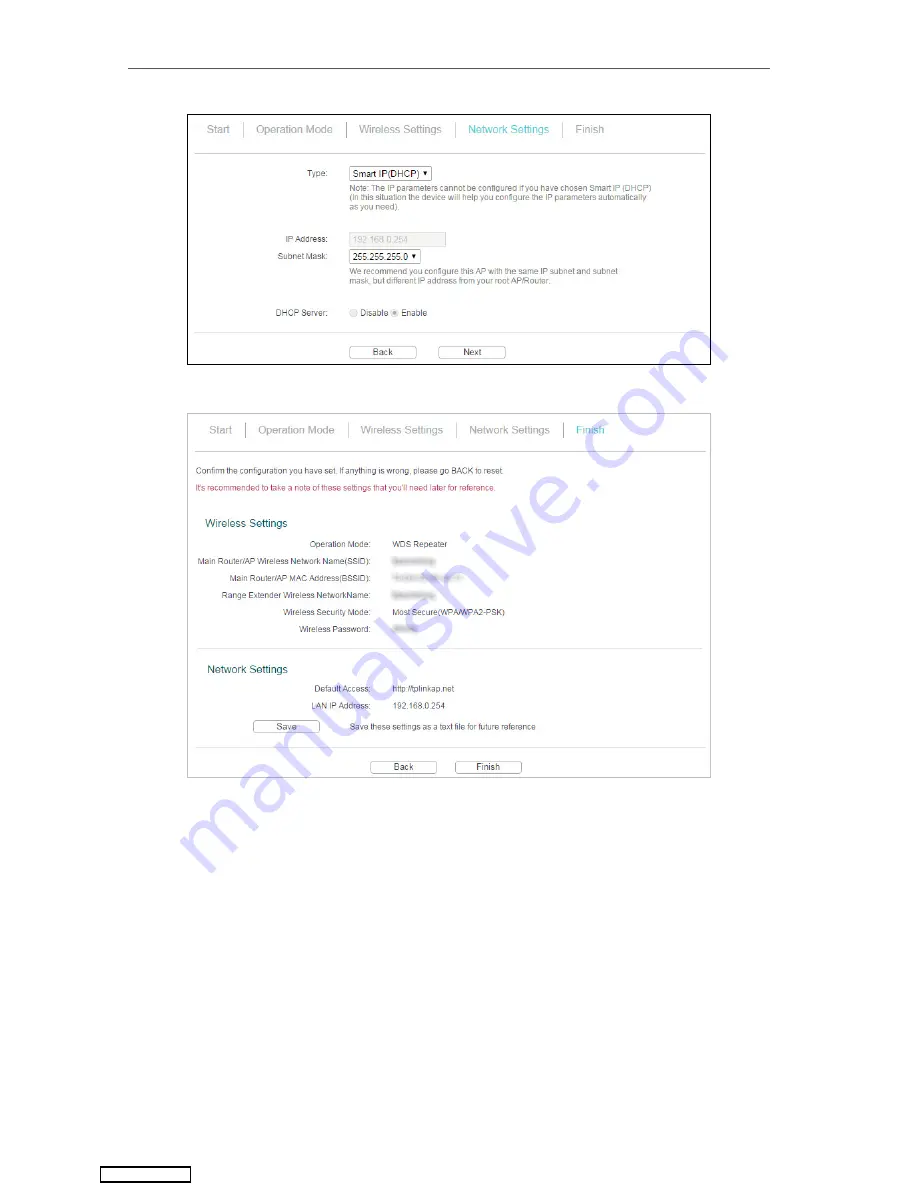
4. Click 

Finish

 to complete the configuration.

5. Relocate the access point about 

halfway

 between your host AP and the Wi-Fi dead zone. The 

extended network 

shares

 the 

same network name

 and 

password

 as your host network.

3. 2. 3.  Bridge with AP Mode

1. Click 

Survey

 to find your host network, enter the host network’s password in the 

Wireless 

Password

 field. In the 

Local Wireless Setting

 section, either customize your 

Local Wireless 

Name

 and 

Wireless Password

 or keep the default ones, and then click 

Next

.

Downloaded from 

ManualsNet.com

 search engine

Содержание TL-WA801ND

Страница 1: ...REV4 0 1 1910012290 User Guide 450Mbps 300Mbps Wireless N Access Point TL WA901ND TL WA801ND Downloaded from ManualsNet com search engine...

Страница 2: ...2 2 4 Client Mode 8 2 2 5 Multi SSID Mode 9 Chapter 3 Set Up Internet Connection Via Quick Setup Wizard 10 3 1 Log In to the Access Point 11 3 2 Configure the Access Point 11 3 2 1 Access Point Mode...

Страница 3: ...ics 46 4 4 6 Throughput Monitor 46 4 5 System Tools 47 4 5 1 SNMP 47 4 5 2 Diagnostic 48 4 5 3 Ping Watch Dog 50 4 5 4 Firmware Upgrade 51 4 5 5 Factory Defaults 51 4 5 6 Backup Restore 51 4 5 7 Reboo...

Страница 4: ...are in teal including the menus items buttons and so on The menu structures to show the path to load the corresponding page For example Advanced Wireless MAC Filtering means the MAC Filtering functio...

Страница 5: ...Know About Your Access Point This chapter introduces what the access point can do and shows its appearance It contains the following sections Product Overview Panel Layout Downloaded from ManualsNet c...

Страница 6: ...evice to a wireless network The AP supports a host of different functions that make your wireless networking experience more fexible than ever before Now you can enjoy a better internet experience whe...

Страница 7: ...onnected to a powered on device Off The ETHERNET port is not connected to a powered on device WPS On Off This light remains on for 2 minutes when a WPS connection is established then turns off Flashin...

Страница 8: ...ort Wi Fi Protected Setup then you can press this button to quickly establish a connection between the access point and the client devices and automatically configure wireless security for your wirele...

Страница 9: ...Chapter 2 Connect the Hardware This chapter contains the following sections Position Your Access Point Connect Your Access Point Downloaded from ManualsNet com search engine...

Страница 10: ...ater Bridge with AP Client and Multi SSID Please determine which operation mode you need and carry out the corresponding steps 2 2 1 Access Point Mode In access point mode the access point transforms...

Страница 11: ...Bridge with AP mode the access point combines two local networks via wireless connection This mode is suitable when you want to link multiple local networks to the same network using wireless connect...

Страница 12: ...i Fi network 2 2 5 Multi SSID Mode In Multi SSID mode the access point creates multiple wireless networks to provide different security and VLAN groups This mode is suitable when you want your devices...

Страница 13: ...Wizard This chapter introduces how to connect your access point to the internet via the web based Quick Setup Wizard It contains the following sections Log In to the Access Point Configure the Access...

Страница 14: ...nusingadmin alllowercase forbothusernameandpassword Note If the login window does not appear please refer to the FAQ Section 3 2 Configure the Access Point The Quick Setup Wizard will guide you throug...

Страница 15: ...Wireless Password or keep the default ones and then click Next 2 Select the LAN IP type of the access point or leave the default setting Smart IP for most cases and then click Next 3 Click Finish to...

Страница 16: ...Repeater if you are not sure whether your host AP supports WDS 2 Click Survey to find your host network and click Connect Enter the host network s password in the Wireless Password field and then cli...

Страница 17: ...ed network shares the same network name and password as your host network 3 2 3 Bridge with AP Mode 1 Click Survey to find your host network enter the host network s password in the Wireless Password...

Страница 18: ...tionViaQuickSetupWizard 2 Select the LAN IP type of the access point or leave the default setting Smart IP for most cases and then click Next 3 Click Finish to complete the configuration Downloaded fr...

Страница 19: ...e access point s SSID and password 3 2 4 Client Mode 1 Click Survey to find your host network and click Connect Enter the host network s password in the Wireless Password field and then click Next 2 S...

Страница 20: ...e configuration Now your wired connected devices can enjoy the Internet surfing 3 2 5 Multi SSID Mode 1 Enable the VLAN function and check SSIDs you want to enable Customize the SSIDs and the password...

Страница 21: ...tionViaQuickSetupWizard 2 Select the LAN IP type of the access point or leave the default setting Smart IP for most cases and then click Next 3 Click Finish to complete the configuration Downloaded fr...

Страница 22: ...19 Chapter 3 SetUpInternetConnectionViaQuickSetupWizard 4 Connect your wireless devices to the different Wi Fi networks to be isolated by VLANs Downloaded from ManualsNet com search engine...

Страница 23: ...Access Point This chapter presents how to configure the various features of your access point It contains the following sections Status WPS Network Wireless System Tools Logout Downloaded from Manual...

Страница 24: ...The physical address of the access point IP address The LAN IP address of the access point Subnet Mask The subnet mask associated with the LAN IP address Wireless This field displays the basic inform...

Страница 25: ...securely connect to a network This section will guide you to add a new wireless device to your access point s network quickly via WPS Note The WPS function cannot be configured if the wireless functio...

Страница 26: ...PIN 1 Keep the WPS Status as Enabled and click Add Device 2 Select Enter the new device s PIN enter your client device s current PIN in the PIN filed and click Connect 3 A success message will appear...

Страница 27: ...ts The value can not be changed Type Either select Smart IP DHCP to get IP address from DHCP server or Static IP to configure IP address manually IP Address Enter the IP address in dotted decimal nota...

Страница 28: ...ifyanIPaddressfortheDHCPServertoendwithwhenassigning IP addresses 192 168 0 199 is the default end address Address Lease Time The Address Lease Time is the amount of time a network user will be allowe...

Страница 29: ...AC Address The MAC address of the DHCP client Assigned IP The IP address that the access point has allocated to the DHCP client Lease Time The time of the DHCP client leased After the dynamic IP addre...

Страница 30: ...ed wireless mode The options are 11b only Only 802 11b wireless stations can connect to the device 11g only Only 802 11g wireless stations can connect to the device 11n only Only 802 11n wireless stat...

Страница 31: ...AN is checked the wireless stations connecting to SSID of different VLANID can not communicate with each other VLAN ID 1 4 Provide a number between 1 and 4095 for VLAN This will cause the device to se...

Страница 32: ...on the page please click the Save button and then you will be reminded to reboot the device Client Mode Enable WDS The AP client can connect to AP with WDS enabled or disabled If WDS is enabled all t...

Страница 33: ...ss stations can connect to the device 11bg mixed Both 802 11b and 802 11g wireless stations can connect to the device 11bgn mixed All 802 11b 802 11g and 802 11n wireless stations can connect to the d...

Страница 34: ...eless stations can connect to the device 11bg mixed Both 802 11b and 802 11g wireless stations can connect to the device 11bgn mixed All 802 11b 802 11g and 802 11n wireless stations can connect to th...

Страница 35: ...as your AP s security type Password If the Remote AP that your device is going to connect needs password you need to fill the password in this blank Local Wireless AP Setting Local Wireless Name Name...

Страница 36: ...device Note To apply any settings you have altered on the page please click the Save button and then you will be reminded to reboot the device 4 4 2 Wireless Security 1 Visithttp tplinkap net andlogin...

Страница 37: ...on 2 Encryption You can select either Automatic TKIP or AES Radius Server IP Enter the IP address of the Radius Server Radius Port Enter the port used by radius service Radius password Enter the passw...

Страница 38: ...r 16 ASCII characters Note If you do not set the key the wireless security function is still disabled even if you have selected Shared Key as Authentication Type You will be reminded to reboot the dev...

Страница 39: ...or at least 30 Enter 0 to disable the update WPA WPA2 Enterprise Select WPA WPA2 based on Radius Server Version You can select one of following versions Automatic Select WPA or WPA2 automatically base...

Страница 40: ...Pre shared key of WPA2 Encryption You can select either Automatic Recommended TKIP or AES Wireless password You can enter ASCII or Hexadecimal characters For Hexadecimal the length should be between...

Страница 41: ...digits any combination of 0 9 a f A F zero key is not permitted or 5 ASCII characters For 128 bit encryption You can enter 26 hexadecimal digits any combination of 0 9 a f A F zero key is not permitt...

Страница 42: ...Key Format You can select ASCII or Hexadecimal format ASCII format stands for any combination of keyboard characters in the specified length Hexadecimal format stands for any combination of hexadecima...

Страница 43: ...A2 PSK Pre shared key of WPA2 Encryption You can select either Automatic Recommended TKIP or AES Wireless password You can enter ASCII or Hexadecimal characters For Hexadecimal the length should be be...

Страница 44: ...digits any combination of 0 9 a f A F zero key is not permitted or 5 ASCII characters For 128 bit encryption You can enter 26 hexadecimal digits any combination of 0 9 a f A F zero key is not permitte...

Страница 45: ...on 2 Encryption You can select either Automatic TKIP or AES Radius Server IP Enter the IP address of the Radius Server Radius Port Enter the port used by radius service Radius password Enter the passw...

Страница 46: ...used to deny or allow specific wireless client devices to access your network by their MAC addresses This function is not available when the operation is set to Client As the configuration is the same...

Страница 47: ...our network 4 4 4 Wireless Advanced The configuration for each operation mode is almost the same we take Access Point mode for example here 1 Visithttp tplinkap net andloginusingadmin alllowercase for...

Страница 48: ...se of excessive packets 2346 is the default setting and is recommended DTIM Interval This value determines the interval of the Delivery Traffic Indication Message DTIM A DTIM field is a countdown fiel...

Страница 49: ...he connected wireless client Received Packets Packets received by the wireless client Sent Packets Packets sent by the wireless client Configure The button is used for loading the item to the Wireless...

Страница 50: ...e Network Management Protocol SNMP is a popular network monitoring and management protocol 1 Visithttp tplinkap net andloginusingadmin alllowercase forbothusernameandpassword 2 Go to System Tools SNMP...

Страница 51: ...hat can read information from this get community device Set Community Enter the community name that allows Read Write access to the Device s SNMP information The community name can be considered a gro...

Страница 52: ...cifying can be resolved by using Domain Name System DNS queries IP Address Domain Name Enter the destination IP address such as 192 168 0 254 or Domain name such as www tp link com Pings Count The num...

Страница 53: ...constraints the access point will automatically reboot 1 Visithttp tplinkap net andloginusingadmin alllowercase forbothusernameandpassword 2 Go to System Tools Ping Watch Dog Configure the settings a...

Страница 54: ...ocate the downloaded firmware file and click Upgrade 4 5 5 Factory Defaults 1 Visithttp tplinkap net andloginusingadmin alllowercase forbothusernameandpassword 2 Go to System Tools Factory Defaults Cl...

Страница 55: ...ord 2 Go to System Tools Reboot and you can restart your access point Some settings of the access point will take effect only after rebooting including Change the LAN IP Address system will reboot aut...

Страница 56: ...d must not exceed 15 characters and not include any spacing 3 Click Save 4 5 9 System Log 1 Visithttp tplinkap net andloginusingadmin alllowercase forbothusernameandpassword 2 Go to System Tools Syste...

Страница 57: ...n the following fields User Name Your mail account name filled in the From field The part behind is included password Your mail account password Confirm The password Enter the password again to confir...

Страница 58: ...ion information set in Mail Settings Clear Log All the logs will be deleted from the access point permanently not just from the page Click Next to go to the next page or click Previous to return to th...

Страница 59: ...owercase If you have altered the username and password but Password Recovery is disabled 1 Reset the access point to its factory default settings use a pin to press and hold the Reset button until the...

Страница 60: ...hin the range of the host router If that is not possible place it closer to your wireless router to ensure stable performance Less Obstacles Ensure Better Performance Choose a location with less obsta...

Страница 61: ...arks or registered trademarks of their respective holders No part of the specifications may be reproduced in any form or by any means or used to make any derivative such as translation transformation...

Страница 62: ...for help This device complies with part 15 of the FCC Rules Operation is subject to the following two conditions 1 This device may not cause harmful interference 2 This device must accept any interfer...

Страница 63: ...device may not cause interference and 2 This device must accept any interference including interference that may cause undesired operation of the device Le pr sent appareil est conforme aux CNR d Indu...

Страница 64: ...an uncontrolled environment This equipment should be installed and operated with minimum distance 20cm between the radiator your body D claration d exposition aux radiations Cet quipement est conform...

Страница 65: ...installed near the equipment and shall be easily accessible Use only power supplies which are provided by manufacturer and in the original packing of this product If you have any questions please don...

Страница 66: ...this product must be handled pursuant to European directive 2012 19 EU in order to be recycled or dismantled to minimize its impact on the environment User has the choice to give his product to a comp...

Отзывы: