background image

A  Before you start, you should prepare the following items: 

¾

  One Windows-based PC with print server setup CD 

¾

 One 

printer 

¾

  One printer cable 

¾

 One 

HUB 

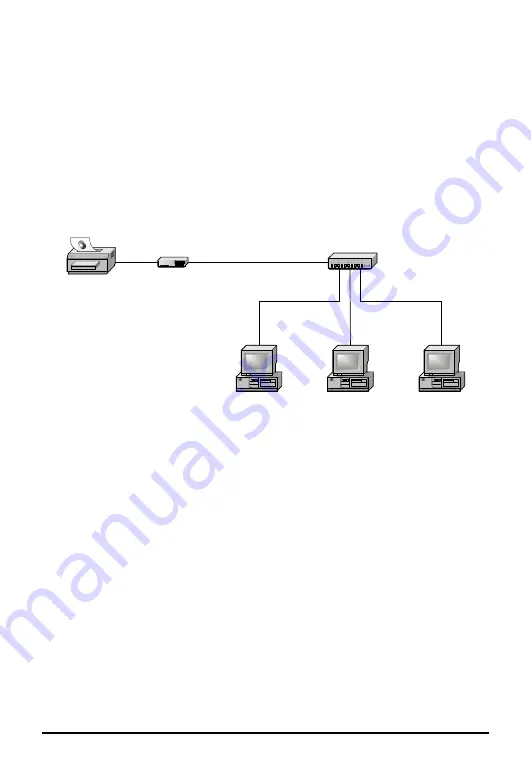
B  Wired Network with Print Server: 

Printer

Print Server

Computer

Computer

Computer

HUB


C  Hardware Installation: 

1  Turn off the printer’s power. 

2  Connect the print server to your printer with the supplied printer cable. 

3  Turn the printer’s power on. 

4  Plug the AC power adapter into the power connector on the print server. 

5  Wait 10 seconds as part of the print server’s Power On Self Test (POST). 

D  Software Installation: 

1  To enable network communication with print server, your computer must have a 

proper IP address, e.g. 192.168.0.100. If you need an instruction to configure the 
IP address of your computer, please refer to the Appendix of this Quick 
Installation Guide. 

Содержание TL-PS110P

Страница 1: ...Quick Installation Guide TL PS110U Single USB2 0 Port Fast Ethernet Print Server TL PS110P Single Parellel Port Fast Ethernet Print Server Rev 1 0 2 7106500729 ...

Страница 2: ...int server to your printer with the supplied printer cable 3 Turn the printer s power on 4 Plug the AC power adapter into the power connector on the print server 5 Wait 10 seconds as part of the print server s Power On Self Test POST D Software Installation 1 To enable network communication with print server your computer must have a proper IP address e g 192 168 0 100 If you need an instruction t...

Страница 3: ...uto run program will be started 3 Select the model of your print sever to begin the setup For example if your print sever model is TL PS110P please select TL PS110P 4 Choose Setup Wizard to install the print server and configure the connected printer ...

Страница 4: ...xt the wizard will automatically discover the print server 6 From the Select A Print Server screen select the print server that you want to configure and click Next 7 On the Change Settings screen select No or Yes ...

Страница 5: ...ress to the print server and then click Next Note The IP address of print server must be within the same subnet as your network adapter 8 On the Select A Printer screen select an already configured printer from the list click Next and then Finish to complete the installation or Select Add New Printer if the print server is connected to a printer that hasn t been installed before and does not appea...

Страница 6: ...ick Add New Printer to launch Windows Add Printer Wizard 10 Click Next and select Local Printer make sure the Automatically detect and install my Plug and Play printer check box is NOT checked Then click Next ...

Страница 7: ...the Use the following port radio button is clicked and select LPT1 Recommended Printer Port from the pull down list Then click Next 12 Select Manufacturer and Printer from the lists of printer s driver Then click Next ...

Страница 8: ...you want to make it your default printer Then click Next 14 Then choose whether you want to share the printer with other network users print a test page please select No etc Select the appropriate radio button and click Next and Finish 15 In the setup wizard finish the installation by highlighting the installed printer in the Select a Printer list and click Next Finish ...

Страница 9: ...8 16 From Windows system go to start Printers and Faxes and highlight your newly installed printer 17 Right click select Properties Ports and verify that the print server s port appears ...

Страница 10: ...nt Test Page to verify the configuration 19 Done Note If you wish to install more print servers start setup wizard from your Windows Start menu start All Programs Network Print Server PSWizard and repeat the installation procedure ...

Страница 11: ...configure the TCP IP correctly in Windows 2000 XP and Vista 1 For Windows 2000 XP Users 1 Right click MY Network Places and choose Properties 2 Right click the icon that showed below select Properties on the prompt page 3 In the prompt page showed below double click on the ...

Страница 12: ...IP Properties window will display Select Use the following IP address radio button And the following items are available 5 Type IP address is 192 168 0 x x is from 2 to 254 Subnet mask is 255 255 255 0 and Default gateway is 192 168 0 1 Then click OK ...

Страница 13: ...12 2 For Windows Vista Users 1 On the Windows taskbar click the Start then select Control Panel 2 Select Classic View on the left side then double click Networking and Sharing center ...

Страница 14: ...Manage network connections on the left side 4 Right click the icon that showed below select Properties on the prompt page 5 In the prompt page showed below double click on the Internet Protocol Version 4 TCP IPv4 ...

Страница 15: ...s window will display Select Use the following IP address radio button And the following items are available 7 Type IP address is 192 168 0 x x is from 2 to 254 Subnet mask is 255 255 255 0 and Default gateway is 192 168 0 1 Then click OK ...

Страница 16: ...without permission from TP LINK TECHNOLOGIES CO LTD Copyright 2008 TP LINK TECHNOLOGIES CO LTD All rights reserved http www tp link com This equipment may be operated in all EU countries and other countries following the EU directive 1999 5 EC Usage in the following countries might be subject to restrictions FR IT NO See detail information in product s document of resource CD or www tp link com Al...

Отзывы: