TP-Link TD-W300KIT Скачать руководство пользователя страница 68

TD-W8961ND 

300Mbps Wireless N ADSL2+ Modem Router User Guide


62

Step 2: 

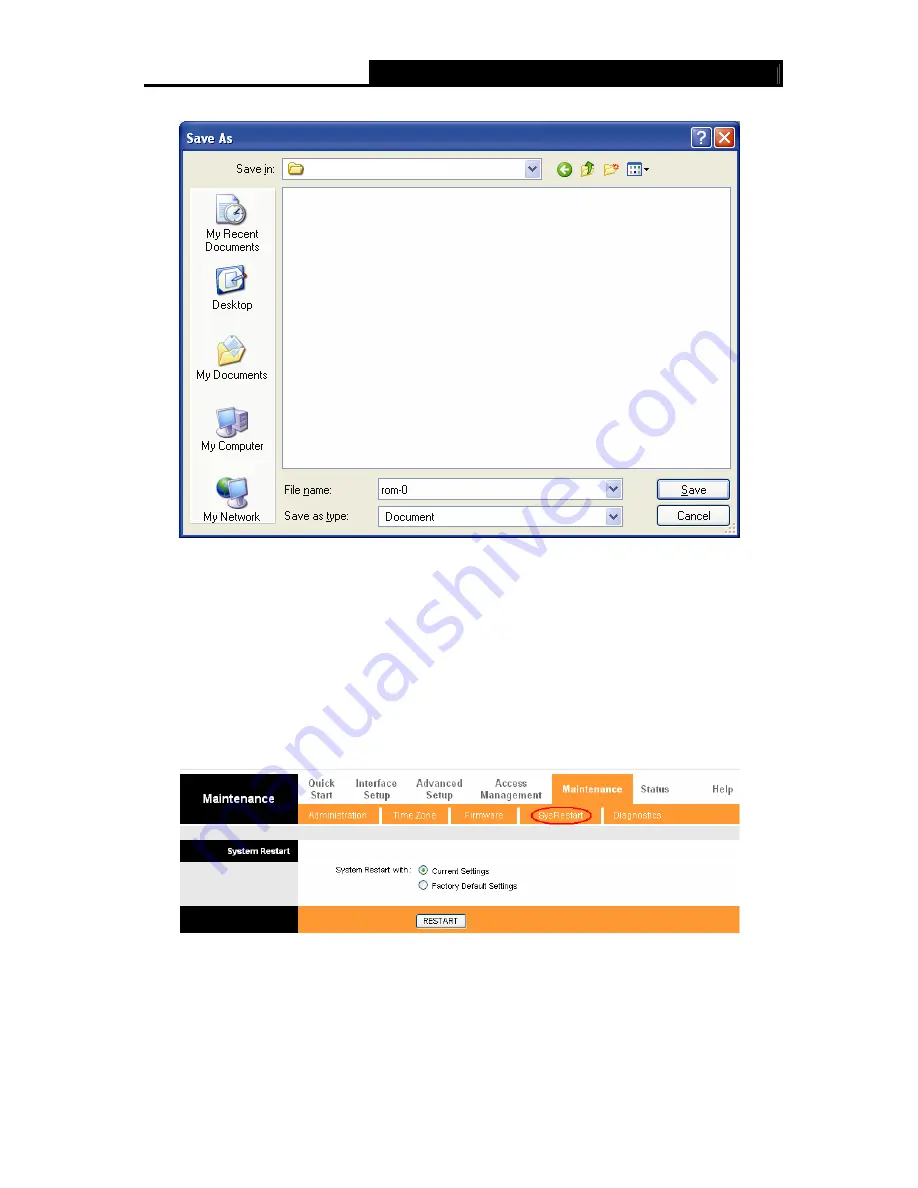
Save the file as the appointed file (shown in Figure 4-54). 


TD-W8961ND 

Figure 4-54 

To restore the Router’s settings: 
Step 1: 

Click the 

Browse

 button to locate the update file for the device, or enter the exact path 

in “New Romfile Location” field. 

Step 2: 

Click the 

UPGRADE

 button to complete. 

4.6.4  System Restart 

Choose “

Maintenance

SysRestart

”, you can select to restart the device with current settings 

or restore to factory default settings in the screen (shown in Figure 4-55). 


Figure 4-55 

4.6.5  Diagnostic 

Choose “

Maintenance

Diagnostic

”, you can view the test results for the connectivity of the 

physical layer and protocol layer for both LAN and WAN sides in the screen (shown in Figure 4-56). 

Содержание TD-W300KIT

Страница 1: ...TD W8961ND 300Mbps Wireless N ADSL2 Modem Router Rev 1 0 3 1910010448...

Страница 2: ...rantee that interference will not occur in a particular installation If this equipment does cause harmful interference to radio or television reception which can be determined by turning the equipment...

Страница 3: ...onal Restrictions This device is intended for home and office use in all EU countries and other countries following the EU directive 1999 5 EC without any limitation except for the countries mentioned...

Страница 4: ...06 Recommendation 1999 519 EC EN62311 2008 Directives 2004 108 EC The above product is in conformity with the following standards or other normative documents EN 55022 2006 A1 2007 EN 55024 1998 A1 20...

Страница 5: ...uter 6 Chapter 3 Quick Installation Guide 8 3 1 Configure PC 8 3 2 Login 11 Chapter 4 Software Configuration 14 4 1 Status 14 4 1 1 Device Info 14 4 1 2 System Log 15 4 1 3 Statistics 16 4 2 Quick Sta...

Страница 6: ...56 4 5 4 UPnP 56 4 5 5 DDNS 57 4 5 6 CWMP 57 4 6 Maintenance 58 4 6 1 Administration 58 4 6 2 Time Zone 59 4 6 3 Firmware 60 4 6 4 System Restart 62 4 6 5 Diagnostic 62 4 7 Help 63 Appendix A Specifi...

Страница 7: ...e Power Adapter for TD W8961ND 300Mbps Wireless N ADSL2 Modem Router Quick Installation Guide One RJ45 cable Two RJ11 cables One ADSL splitter One Resource CD which includes this User Guide Note Make...

Страница 8: ...be accessed through local Ethernet using any web browser ADSL The TD W8961ND supports full rate ADSL2 connectivity conforming to the ITU and ANSI specifications In addition to the basic DMT physical l...

Страница 9: ...C Permanent Virtual Circuit Built in DHCP server Built in firewall supporting IP MAC filter Application filter and URL filter Supports Virtual Server DMZ host and IP Address Mapping Supports Dynamic D...

Страница 10: ...n built Internet Flash Data is being transferred over the Internet On The wireless function is enabled but no data is being transmitted Flash There is wireless data being transmitted WLAN Off The wire...

Страница 11: ...the Router powered on use a pin to press and hold the Reset button for at least 5 seconds And the Router will reboot to its factory default settings Method two Restore the default setting from Mainten...

Страница 12: ...el of TD W8961ND and insert the other end into the wall socket Method two You can use a separate splitter External splitter can divide the data and voice and then you can access the Internet and make...

Страница 13: ...TD W8961ND 300Mbps Wireless N ADSL2 Modem Router User Guide 7 Figure 2 3...

Страница 14: ...1ND or connect your adapter to a Hub Switch which has connected to the Router you need to configure your PC s IP address Follow the steps below to configure it Step 1 Click the Start menu on your desk...

Страница 15: ...TD W8961ND 300Mbps Wireless N ADSL2 Modem Router User Guide 9 Figure 3 2 Step 3 Select General tab highlight Internet Protocol TCP IP and then click the Properties button Figure 3 3...

Страница 16: ...nd Obtain DNS server address automatically in the screen above Now you can run the Ping command in the command prompt to verify the network connection Please click the Start menu on your desktop selec...

Страница 17: ...CP IP configuration for your PC correct If the Router s IP address is 192 168 1 1 your PC s IP address must be within the range of 192 168 1 2 192 168 1 254 3 2 Login Once your host PC is properly con...

Страница 18: ...button Figure 3 8 Step 2 Configure the time for the Router and then click the NEXT button Figure 3 9 Step 3 Select the connection type to connect to the ISP We select PPPoE PPPoA mode for example her...

Страница 19: ...nd click NEXT Figure 3 12 Note If the Access Point is activated the wireless function will be available even without the external antenna because of an additional printed antenna To adopt the wireless...

Страница 20: ...will be available after you click one of the main menus On the center of the Web based Utility there are the detailed configurations or status information To apply any settings you have altered on the...

Страница 21: ...Figure 4 2 Note Click the other submenus System Log or Statistics in Figure 4 2 and you will be able to view the system log and traffic statistics about the Router 4 1 2 System Log Choose Status Syste...

Страница 22: ...of all traffic You can query the logs to find what happened to the Router Click the CLEAR LOG button to clear the logs Click the SAVE LOG button to save the logs 4 1 3 Statistics Choose Status Statis...

Страница 23: ...rt Transmit Collision The collision occurred over the Ethernet port when data is being transmitted Transmit Statistics Transmit Error Frames The error frames over the Ethernet port when data is being...

Страница 24: ...ount The frames transmitted over the WLAN when wireless data is being transmitted Tx Errors Count The errors occurred over the WLAN when wireless data is being transmitted Transmit Statistics Tx Drops...

Страница 25: ...er Guide 19 Figure 4 5 Click any of them and you will be able to configure the corresponding function 4 3 1 Internet Choose Interface Setup Internet menu you can configure the parameters for WAN ports...

Страница 26: ...M network The valid range is from 32 to 65535 1 to 31 is reserved for well known protocols Please input the value provided by your ISP PVCs Summary Click the button and you can view the summary inform...

Страница 27: ...IP2 M using Multicast while RIP2 B using Broadcast format Direction Select this option to specify the RIP direction None is for disabling the RIP function Both means the ADSL Router will periodically...

Страница 28: ...92 168 1 100 The Router will not accept the IP address if it is not in this format 3 PPPoA PPPoE Select this option if your ISP requires you to use a PPPoE connection This option is typically used for...

Страница 29: ...you can select Always on or Connect on Demand or Connect Manually Connect on demand is dependent on the traffic If there is no traffic or Idle for a pre specified period of time the connection will t...

Страница 30: ...he modem can be configured to act as a bridging device between your LAN and your ISP Bridges are devices that enable two or more networks to communicate as if they are two segments of the same physica...

Страница 31: ...fference is that RIP2 M using Multicast while RIP2 B using Broadcast format Direction Select this option to specify the RIP direction None is for disabling the RIP function Both means the ADSL Router...

Страница 32: ...omatically assigned a new dynamic IP address The default is 259200 seconds Physical Ports Specify the Physical Ports of the DHCP client DNS Relay If you want to disable this feature you just need to s...

Страница 33: ...ard to the DHCP server runs on WAN side To have this function working properly please run on router mode only disable the DHCP server on the LAN port and make sure the routing table has the correct ro...

Страница 34: ...s of the access point You can configure the rules to allow wireless equipped computers and other devices to communicate with a wireless network Access point Select Activated to allow wireless station...

Страница 35: ...e of 2346 DTIM This value between 1 and 255 indicates the interval of the Delivery Traffic Indication Message DTIM A DTIM field is a countdown field informing clients of the next window for listening...

Страница 36: ...the wireless network It is case sensitive and must not exceed 32 characters use any of the characters on the keyboard Make sure this setting is the same for all stations in your wireless network Type...

Страница 37: ...e server for authentication PSK keys can be ASCII or Hex type Figure 4 18 Encryption Select the encryption you want to use TKIP AES TKIP or AES AES is an encryption method stronger than TKIP TKIP Temp...

Страница 38: ...II or Hex type WPA PSK WPA2 PSK is more flexible than WPA PSK or WPA2 PSK Figure 4 20 QSS Settings QSS can help you to add a new wireless device to an existing network quickly This section will guide...

Страница 39: ...button in Figure 4 21 Step 2 Press and hold the QSS button of the adapter directly for 2 or 3 seconds Step 3 Wait for a while until the next screen appears Click Finish to complete the QSS configurat...

Страница 40: ...r please choose Push the button on my access point in the configuration utility of the QSS as below and click Next The QSS Configuration Screen of Wireless Adapter Step 3 Wait for a while until the ne...

Страница 41: ...e 4 22 Method One Enter the PIN into my Router Step 1 For the configuration of the wireless adapter please choose Enter a PIN into my access point or a registrar in the configuration utility of the QS...

Страница 42: ...oose Enter a PIN from my access point in the configuration utility of the QSS as below and enter the PIN code of the Router into the field after Access Point PIN Then click Next The QSS Configuration...

Страница 43: ...e MAC addresses of the wireless devices transmitting within your network s RADIUS Active If you wish to filter users by MAC Address select Activated and Deactived for don t Action To filter wireless u...

Страница 44: ...you will see the routing information in the next screen shown in Figure 4 26 Figure 4 26 Click ADD ROUTE button to add a new route in the next screen shown in Figure 4 27 Figure 4 27 Destination IP A...

Страница 45: ...rtual Circuit Enter Virtual Circuit Index that you plan to setup for the NAT function NAT Status This field shows the current status of the NAT function for the current VC You can go to the previous s...

Страница 46: ...ndex for this VC You can specify 10 rules in maximum All the VCs with single IP will use the same Virtual Server rules Application The Virtual servers can be used for setting up public services on you...

Страница 47: ...ess Mapping Select Multiple for numbers of IPs in Figure 4 28 and choose Advanced Setup NAT IP Address Mapping for Multiple IP Service You can configure the Address Mapping Rule in the next screen The...

Страница 48: ...he entries as shown in Figure 4 31 Select the index of assigned entry and click the DELETE button to delete the entry Click the BACK button to return to the previous screen Click the CANCEL button to...

Страница 49: ...he rule you want to configure Active Activate the rule The rule can take effect only when it is activated Application Select the application that the rule aimed at Physical Ports Select the port whose...

Страница 50: ...ield Select the type for the action IP Precedence Remarking Select the number to remark the priority for IP precedence Type of Service Remarking Select the type to remark the service DSCP Remarking En...

Страница 51: ...sign the PVID for each interface in the next screen shown in Figure 4 34 Figure 4 34 PVID Each physical port has a default VID called PVID Port VID PVID is assigned to untagged frames or priority tagg...

Страница 52: ...C Ethernet Select the Ethernet port as a member of VLAN Wireless LAN Select the wireless LAN port as a member of VLAN and if you leave the Tagged blank the tag in frames will be deleted when transmitt...

Страница 53: ...DSL connection uses 4 5 Access Management Choose Access Management you can see the next submenus Figure 4 37 Click any of them and you will be able to configure the corresponding function 4 5 1 ACL Ch...

Страница 54: ...d then you can access the Router through it Interface Select the interface for access LAN WAN or Both Access Control of Listing This displays the information about the ACL Rules 4 5 2 Filter Choose Ac...

Страница 55: ...an interface the filter will match the IP traffic of WAN port with specified IPs Source IP Address and Destination IP Address If select LAN as an interface the filter will match the IP traffic of LAN...

Страница 56: ...tocol Select the protocol TCP UDP or ICMP for the filter rule Rule Unmatched If the current rule can not match and you select Forward the router will skip the rule and transmit directly If you select...

Страница 57: ...E mail received by the IP address 192 168 1 7 on your local network Make the PC with IP address 192 168 1 8 unable to visit the website of IP address 202 96 134 12 Note After you complete the IP filt...

Страница 58: ...u select Forward the router will skip the rule and transmit directly If you select Next the router will find the next filter rule show in Filter list to match IP MAC Filter Listing This displays the i...

Страница 59: ...e the next rule Block the PC with MAC address 00 0A EB 00 07 5F to access the Internet Note After you complete the MAC filter rules for the example the Filter list will show as follows You can enter t...

Страница 60: ...ilter Activate or deactivate the function ICQ MSN YMSG Real Audio Video Select Allow or Deny for these applications If you select Allow the Router will accept the application if you select Deny the Ro...

Страница 61: ...xample If you want to forbid the user to access the website www yahoo com Presume the rule is aimed at the interface PVC0 and its index is 1 Step 1 Select the URL Filter as the Filer Type Selection sh...

Страница 62: ...Play is a distributed open networking standard that uses TCP IP for simple peer to peer network connectivity between devices An UPnP device can dynamically join a network obtain an IP address convey i...

Страница 63: ...dcard or not Figure 4 45 Dynamic DNS Activate the DDNS function or not Service Provider This field displays the service provider of DDNS My Host Name Enter your host name here E mail Address Enter you...

Страница 64: ...ver User Name Password Enter the User Name and Password that provided the ACS server to login the router Periodic Inform Activate or deactivate the function If Activated the information will be inform...

Страница 65: ...e in the screen shown in Figure 4 49 The system time is the time used by the device for scheduling services There are three methods to configure the time You can manually set the time or connect to a...

Страница 66: ...onize time you don t need to set any items Figure 4 50 3 Manually Select Manually as the Synchronize time you need to set the date and time corresponding to the current time Figure 4 51 4 6 3 Firmware...

Страница 67: ...button Note 1 When you upgrade the router s firmware you may lose its current configurations so please back up the router s current settings before you upgrade its firmware 2 Do not turn off the rout...

Страница 68: ...ath in New Romfile Location field Step 2 Click the UPGRADE button to complete 4 6 4 System Restart Choose Maintenance SysRestart you can select to restart the device with current settings or restore t...

Страница 69: ...TD W8961ND 300Mbps Wireless N ADSL2 Modem Router User Guide 63 Figure 4 56 4 7 Help Choose Help you can view the help information for configuration of any function...

Страница 70: ...TD W8961ND 300Mbps Wireless N ADSL2 Modem Router User Guide 64 Figure 4 57 Note Click the tab and you will be able to get the corresponding information...

Страница 71: ...ation RJ45 ports Auto MDI MDIX One RJ11 port LEDs Power ADSL Internet WLAN 1 2 3 4 LAN QSS Network Medium 10Base T UTP category 3 4 5 cable 100Base TX UTP category 5 Max line length 6 5Km Data Rates D...

Отзывы: