background image

M5350 

3G Mobile Wi-Fi User Guide 


-8- 


Note: 

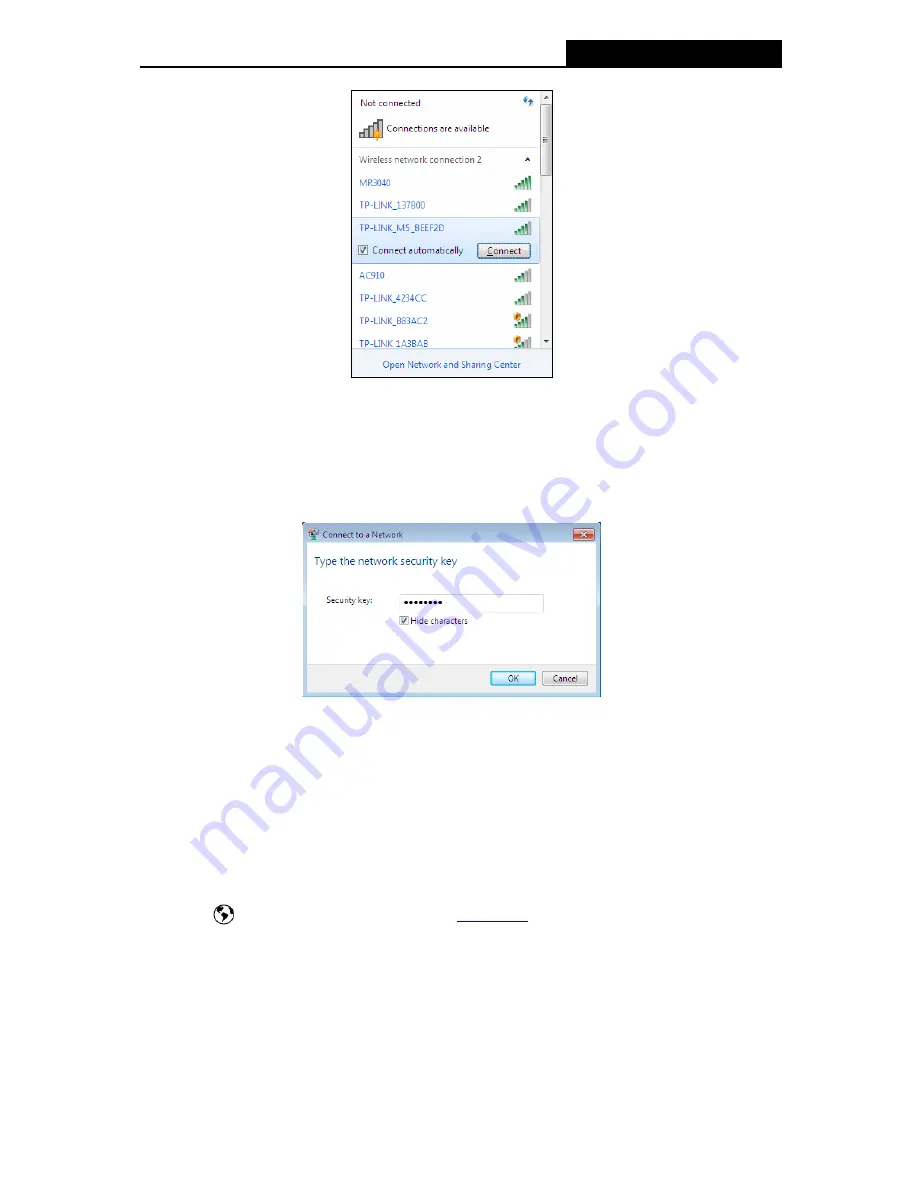
The default SSID (also called Wireless Network Name) of the device is 

TP-LINK_M5_XXXXXX


(XXXXXX is the last 6 characters of the device

‟s MAC address).   

3. 

Enter the wireless password you‟ve noted down in the Security Key field, and then click 

OK


Note: 

You  can  refer  to  the  label  on  the  rear  cover  for  the  default  SSID  and  wireless  password  of 
M5350. 


4.  When 

Connected

 appears behind the SSID of M5350, y

ou‟ve successfully connected to 

its wireless network.


Note: 

You  can  enjoy  the  3G  mobile  connection  instantaneously,  after  the  device  has  successfully 
connected to M5350 (with a SIM card inserted) and M5350

‟s OLED screen displays the network 

status icon

. Otherwise, please continue with 

3.4 Wizard

 to further configure your device. 

3.4  Wizard 

1.  Open a web-browser, enter the default address 

192.168.0.1

 in the address field and then 

press 

Enter

. When the login window appears, enter 

admin

 (in lower case letters) for the 

Password, and then click the 

Log in

 button or press the 

Enter

Содержание M5250

Страница 1: ...M5350 3G Mobile Wi Fi REV 1 1 0 1910100018 ...

Страница 2: ...s are trademarks or registered trademarks of their respective holders No part of the specifications may be reproduced in any form or by any means or used to make any derivative such as translation transformation or adaptation without permission from TP LINK TECHNOLOGIES CO LTD Copyright 2013 TP LINK TECHNOLOGIES CO LTD All rights reserved http www tp link com ...

Страница 3: ...ced radio TV technician for help This device complies with part 15 of the FCC Rules Operation is subject to the following two conditions This device may not cause harmful interference This device must accept any interference received including interference that may cause undesired operation Any changes or modifications not expressly approved by the party responsible for compliance could void the u...

Страница 4: ... This device may not cause interference and 2 This device must accept any interference including interference that may cause undesired operation of the device Cet appareil est conforme aux norms CNR exemptes de licence d Industrie Canada Le fonctionnement est soumis aux deux conditions suivantes 1 cet appareil ne doit pas provoquer d interférences et 2 cet appareil doit accepter toute interférence...

Страница 5: ...вимогам нормативних документів та вимогам що передбачені чинними законодавчими актами України Safety Information When product has power button the power button is one of the way to shut off the product When there is no power button the only way to completely shut off power is to disconnect the product or the power adapter from the power source Don t disassemble the product or make repairs yourself...

Страница 6: ...within the scope of Council Directives Directives 1999 5 EC Directives 2004 108 EC Directives 2006 95 EC Directives 1999 519 EC Directives 2011 65 EU The above product is in conformity with the following standards or other normative documents ETSI EN 300 328 V1 7 1 2006 ETSI EN 301 489 1 V1 9 2 2011 ETSI EN 301 489 17 V2 1 1 2009 EN 55022 2010 EN 55024 2010 EN 61000 3 2 2006 A1 2009 A2 2009 EN 610...

Страница 7: ... 7 3 1 System Requirements 7 3 2 TCP IP Configuration 7 3 3 Wireless Connection 7 3 4 Wizard 8 Chapter 4 Device Configuration 12 4 1 Status 12 4 2 Wizard 13 4 3 SMS 13 4 3 1 New Message 13 4 3 2 Inbox 14 4 3 3 Outbox 15 4 3 4 Drafts 15 4 3 5 SMS Settings 17 4 4 Advanced 18 4 4 1 Dial up 18 4 4 2 Wireless 24 4 4 3 DHCP Server 27 4 4 4 System Tools 29 Appendix A FAQ 34 Appendix B Configuring the PC ...

Страница 8: ...0 One power adapter One USB cable One battery Quick Installation Guide Note Make sure that the package contains the above items If any of the listed items is damaged or missing please contact with your distributor Conventions The Device or M5350 mentioned in this guide stands for 3G Mobile Wi Fi M5350 without any explanation ...

Страница 9: ...iew of the device s working status such as network type 3G 1x R and signal strength network status dial up type Wi Fi status message battery meter data statistics download and upload speed 1 2 Main Features Equipped with a built in 3G modem No other bulky devices required HSPA supported with up to 21 6Mbps download and 5 76Mbps upload speeds Supports up to 10 users simultaneously 2000mAh internal ...

Страница 10: ...ts factory default settings OLED Screen Figure 1 3 OLED Screen The OLED Indication Item Description Indication Network type Signal strength Indicates the current network option 2G or 3G and signal strength of current network Network status Indicates the successful network connection Dial up type Means the automatic mode of Internet connection Means the manual mode of Internet connection Wi Fi conn...

Страница 11: ...ensing 2 2 Hardware Installation STEP 1 Install SIM card and memory card 1 Open the cover upwards as the arrow shows 2 Make sure to have the SIM card s metal chip downwards and the triangle notch outwards and then slide the card into its slot in the direction as the arrow shows Note If you have a Micro SIM or Nano SIM please use an adapter to convert it to a standard SIM card 3 First push and then...

Страница 12: ... 1 Touch the metal contacts of the battery to the metal points of the Device and then press to fit the battery body into the slot 2 Before closing the cover please note down the SSID and the wireless password on the label for later use SSID The wireless network name of M5350 Wireless Password The pre encryption of M5350 3 Close the cover by pressing it ...

Страница 13: ...econds to turn on M5350 Tips You are supported to charge the battery in two ways Method 1 1 Connect one end of the USB cable to the micro USB port 2 Connect the other end of the USB cable to the USB port of the power adapter 3 Plug the power adapter to a standard wall socket Method 2 1 Connect one end of the USB cable to the micro USB port 2 Connect the other end of the USB cable to the USB port o...

Страница 14: ...NS server address automatically so you can just skip this step and continue with the 3 3 Wireless Connection Note Before configuration please make sure your computer has been equipped with a wireless network adapter Obtain an IP address automatically 1 Set up the TCP IP Protocol in Obtain an IP address automatically mode on your PC Please refer to Appendix B Configuring the PC for the detailed ins...

Страница 15: ...ppears behind the SSID of M5350 you ve successfully connected to its wireless network Note You can enjoy the 3G mobile connection instantaneously after the device has successfully connected to M5350 with a SIM card inserted and M5350 s OLED screen displays the network status icon Otherwise please continue with 3 4 Wizard to further configure your device 3 4 Wizard 1 Open a web browser enter the de...

Страница 16: ...rs cancel the Using Proxy checkbox and click OK to finish it 2 After successful login there will appear the Status page Click Wizard to configure the basic network settings for accessing network Click Next to continue Figure 3 2 Wizard Start 3 On the Dial up Settings page shows the ISP information of the SIM card inserted Click Next to continue if you are sure the information is correct You can al...

Страница 17: ...ember wireless network name SSID as well as Wireless Password or you can keep it default Then click Next to continue Figure 3 4 Wizard Wireless Settings 5 On the Finish page please double check your settings If all the parameters are verified click Finish to complete the Wizard if there is anything wrong you can click Back to re configure it ...

Страница 18: ...M5350 3G Mobile Wi Fi User Guide 11 Figure 3 5 Wizard Finish ...

Страница 19: ...ice s current connection status including the connection and SIM card status Dial up and network type IP address primary and secondary DNS server Statistic Displays the device s statistics including current received and sent data online time and total data used WiFi Status Displays the device s current wireless settings including SSID channel encryption type and current Wireless clients Click Data...

Страница 20: ...izard Please refer to 3 4 Wizard 4 3 SMS Figure 4 3 SMS Menu There are five submenus under the SMS tab as shown in Figure 4 3 New Message Inbox Outbox Drafts and SMS Settings Click any of them and you will be able to configure the corresponding functions 4 3 1 New Message Figure 4 4 New Message ...

Страница 21: ...Status means the message has been read means the message hasn t been read yet Received Shows the date and time when the message was received Phone Number Shows the cellphone number that sent this message Content Click to unfold and read the detailed content of the message Select Select the message s for deletion Click Select All to select all of the messages Click Refresh to refresh the inbox and ...

Страница 22: ...hows the cellphone number that the message was planned to be sent to Content Click to unfold and read the detailed content of the message Select Select the message s for deletion Click Select All to select all of the messages Click Refresh to refresh the inbox Click Delete to delete the message s selected 4 3 4 Drafts You can review the unsent saved message s on this page ...

Страница 23: ...anned to be sent to Content Click to unfold and read the detailed content of the message s or for further edition and delivery as shown in Figure 4 8 Select Select the message s for deletion Click Select All to select all of the messages Click Refresh to refresh the drafts Click Delete to delete the message s selected Figure 4 8 Edit Message Drafts ...

Страница 24: ... you can enter the Message Center Number of the local ISP If you enter a wrong number the SMS would be affected and not properly used Save the Delivered Messages Enable it to automatically save the delivered messages in the Outbox Auto Replace Old Messages If enabled it will automatically delete the oldest message and save the new one when the Outbox or Drafts box is full If disabled you need to m...

Страница 25: ...e 4 10 Advanced Menu There are four submenus under the Advanced tab as shown in Figure 4 10 Dial up Wireless DHCP Server and System Tools Click any of them and you will be able to configure the corresponding functions 4 4 1 Dial up Figure 4 11 Dial up Menu ...

Страница 26: ...the device would automatically attempt connection until it s successful This option is suggested if you have the network service paid by month Manual When you start the device and your computer or when the connection is terminated during the process you need to manually dial up for connection in here When you select Manual as your dial up type you need to specify a MAX Idle Time 5 minutes by defau...

Страница 27: ... you specify your APN manually APN Displays the Access Point Name provided by your ISP Username Password Displays the User Name and Password provided by your ISP Authentication Type Displays the specific authentication type your ISP required None Means no authentication is required CHAP Means your ISP required Challenge Handshake Authentication Protocol which allows the device to establish authent...

Страница 28: ...cted at present Network Mode The device supports three modes of network connection Auto 2G only and 3G only You can choose the appropriate mode after disconnecting the network If your SIM card supports GSM please select 2G only if your SIM card supports WCDMA please select 3G only if you are not very sure about it please select Auto and then the device will detect it automatically ...

Страница 29: ...de which requires 4 8 digits Remaining Attempts Shows how many attempts there are left for you to try entering the PIN code after you failed to enter the right one You have 3 attempts at most If you accidentally fail in three attempts the PIN will be locked and you will be required to enter the PUK code that is written on your SIM card as shown in Figure 4 17 If the current status of PIN is disabl...

Страница 30: ... that has been lost or forgotten The PUK is a SIM specific code assigned by the service provider If a user does not know his or her PUK and is prompted for it it should be obtained from the service provider On the page as shown in Figure 4 17 first enter the PUK code and then set a new PIN code to unlock your SIM card as well as any device with it inserted 4 4 1 5 Auto unlock PIN Figure 4 18 PIN C...

Страница 31: ...settings 4 4 2 Wireless Figure 4 19 Wireless Menu Wireless Settings can prevent any intruders from connecting your wireless network occupying your network resources hacker overhearing and hacker attacking and thus enhance the security of your wireless network 4 4 2 1 Basic Settings Wireless basic settings enable you to configure your wireless parameters Figure 4 20 Wireless Basic Settings Wireless...

Страница 32: ...annel automatically It is not necessary to change the wireless channel unless you notice interference problems with another nearby access point Wireless Mode You are provided with five wireless modes here 11b Only 11g Only 11n Only 11bg Mixed and 11bgn Mixed The default wireless mode is 11bgn Mixed If your wireless network card didn t work well in 11bgn Mixed mode try 11bg Mixed mode Wireless Secu...

Страница 33: ...ct only when you select Enable MAC Address List A List of MAC addresses will be allowed to access the device Your MAC Address Displays the MAC address of your client s currently wirelessly connected to the device Click Save to save your settings 4 4 2 3 Wireless Status The Wireless Status page displays the basic information about the Wireless client s that are currently connected to the device ...

Страница 34: ... Wireless client Click Refresh to update the amount of the Wireless clients and their information 4 4 3 DHCP Server Figure 4 23 DHCP menu The Device is set up by default as a DHCP Dynamic Host Configuration Protocol server which provides the TCP IP configuration for all the wireless clients that are connected to the device in the LAN ...

Страница 35: ...This field specifies the last address in the IP Address pool 192 168 0 199 is the default end IP address Lease Time It is the length of time a network user will be allowed to keep connecting to the device with the current IP address that is assigned by the DHCP server Enter the amount of time in minutes that the IP address will be leased The time range is 1 2880 minutes The default value is 120 mi...

Страница 36: ...ess The IP address the device has assigned to the DHCP client Lease Residual Time The rest lease time for the IP address assigned to the DHCP client The DHCP client will automatically apply to lengthen the lease time before the dynamic IP address expires 4 4 4 System Tools Figure 4 26 System Tools menu Under System Tools menu you can do such configurations as backing up or uploading a configuratio...

Страница 37: ...the configuration file in your computer for later necessary use It s strongly recommended to back up the old configuration file before firmware upgrade or new configuration file upload in case that during those process it might get the original configuration lost Upload Configuration File Click Browse to locate the config bin file or directly enter its location file and then click Upload to upload...

Страница 38: ... The default login Password admin The default IP Address 192 168 0 1 The default Subnet Mask 255 255 255 0 The default SSID TP LINK_M5_XXXXXX XXXXXX is the last 6 characters of the device s MAC address Please refer to the label on the rear cover of the device for the default SSID The default Wireless Password Please refer to the label on the rear cover of the device for the default wireless passwo...

Страница 39: ... you want to set for the login of the device Confirm New Password Enter the new password again for confirmation Click Save when you finish the setting Click Clear to clear all the values you have already set and then you can reset it Note The new password must not exceed 14 characters in length and not include any spaces 4 4 4 4 Reboot Figure 4 30 Reboot the Device ...

Страница 40: ...mware Version Hardware Version MAC Address and IMEI Figure 4 31 Device Information Model The Model of the device Firmware Version The current firmware version Hardware Version The current hardware version MAC Address The physical address of the device The value is read only thus could not be changed IMEI International Mobile Equipment Identity Composed of 15 digits it is unique and thus used to id...

Страница 41: ...o Advanced Dial up Profile Management and configure the correct parameters 4 Please check if the dial up type is auto or manual If it is manual dial up please go to Advanced Dial up Dial up and click Connect to manually get connected to the Internet 5 If the above steps failed please feel free to contact our technical support T3 What if I forget my login password 1 Restore M5350 to its factory def...

Страница 42: ...0 1 3 Double click Computer icon on your desktop The inserted micro SD card is displayed as removable disk in file explorer Here we take Removable Disk F for example Double click to access the micro SD card just as access a hard disk Figure A 0 2 ...

Страница 43: ...l if needed 1 Install TCP IP component 1 On the Windows taskbar click the Start button point to Settings and then click Control Panel 2 Click the Network and Internet Connections icon and then click on the Network Connections tab in the appearing window 3 Right click the icon that showed below select Properties on the prompt page Figure B 0 1 4 In the prompt page that showed below double click on ...

Страница 44: ...shown in the Figure below Figure B 0 3 Setting IP address manually a Select Use the following IP address radio button And the following items available b If the Device s LAN IP address is 192 168 0 1 type IP address is 192 168 0 x x is from 2 to 254 and Subnet mask is 255 255 255 0 c Type the Device s LAN IP address the default IP is 192 168 0 1 into the Default gateway field d Select Use the foll...

Страница 45: ...M5350 3G Mobile Wi Fi User Guide 38 Figure B 0 4 6 Now click OK to keep your settings ...

Страница 46: ...on OLED Display Network type Signal strength Network status Dial up type Wi Fi connection SMS Battery Download speed Upload speed Data statistics Power Supply 2000m Internal Ah Rechargeable Battery 5VDC 1 0A External Power Adapter Wireless Band WCDMA 2100 900Mhz GSM 850 900 1800 1900Mhz Data Rate Download 21 6Mbps Upload 5 76Mbps Frequency 2 4 2 4835GHz EIRP 20dBm Security WPA PSK WPA2 PSK Antenna...

Страница 47: ...GHz and backward compatibility with IEEE 802 11b devices and WEP encryption for security DHCP Dynamic Host Configuration Protocol A protocol that automatically configure the TCP IP parameters for the all the PC s that are connected to a DHCP server ISP Internet Service Provider A company that provides access to the Internet SSID A Service Set Identification is a thirty two character maximum alphan...

Отзывы: