background image

JetStream L2/L2+ Managed Switch

17

Connection

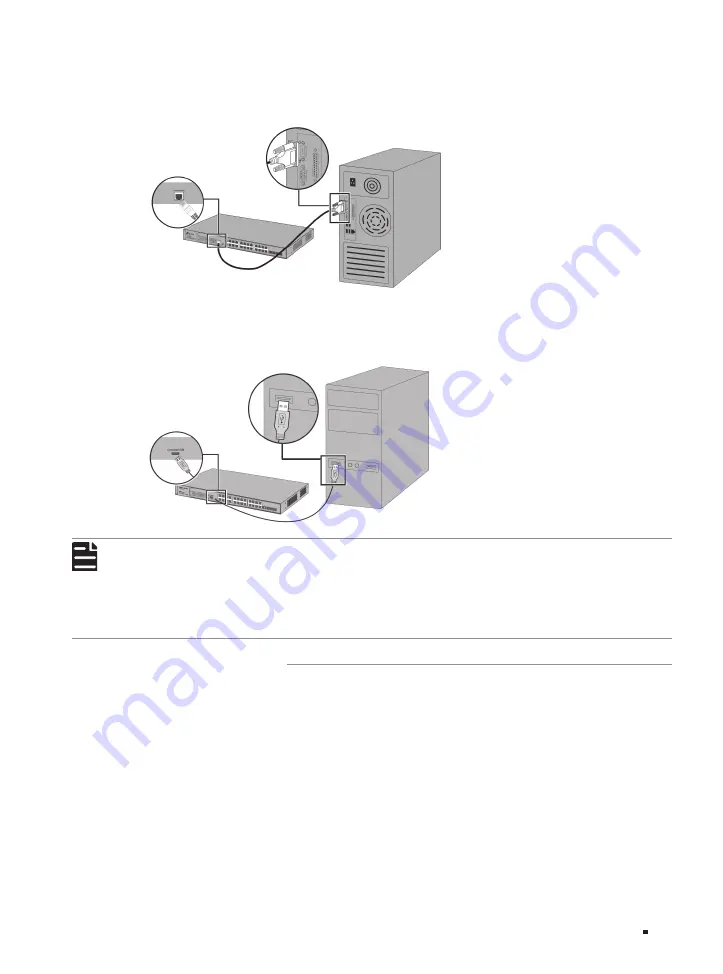
Connect the console (RJ45) port of the device with your computer by the console cable as the 

following figure shows.

Figure 3-3 

Connecting the Console (RJ45) Port

Connect the console (USB) port of the device with your computer by the USB cable (not provided) as 

the following figure shows.

Figure 3-4 

Connecting the Console (USB) Port

Note: 


Console (RJ45) port and console (USB) port cannot be used concurrently. Console (USB) port 

takes priority over the Console (RJ45) port.


The console (USB) port is hot-pluggable while the console (RJ45) port is not. Keep the device 

power off when plugging the console cable into the console (RJ45) port.


Do not connect the console port with other ports by RJ45 cable.

3.4  Verify Installation

After completing the installation, verify the following items:


There should be 5 to 10 cm of clearance around the device for ventilation and make sure the air flow 

is adequate.


The voltage of the power supply meets the requirement of the input voltage of the device.


The power socket, device and rack are well grounded.


The device is correctly connected to other network devices.

Содержание JetStream L2 Lite TL-SG3210

Страница 1: ...Business Networking Solution Installation Guide JetStream L2 L2 Managed Switch...

Страница 2: ......

Страница 3: ...uide may be unavailable in your country or region For local sales information visit https www tp link com The figures in Chapter 2 Chapter 3 and Chapter 4 are for demonstration purposes only Your swit...

Страница 4: ...stallation Tools 14 2 4 Product Installation 14 Chapter 3 Connection 16 3 1 Ethernet Port 16 3 2 SFP SFP Slot 16 3 3 Console Port 16 3 4 Verify Installation 17 3 5 Power On 18 3 6 Initialization 18 Ch...

Страница 5: ...d is friendly to manage which can fully meet the need of the users demanding higher networking performance TL SX3206HPP TL SG3210XHP M2 TL SG3428MP TL SG3428XMP TL SG3452P TL SG3452XP is also a Power...

Страница 6: ...5 USB 1G RJ45 Port SFP Slot The front panel of TL SG3210XHP M2 is shown as the following figure LED Console Port RJ45 USB 2 5G RJ45 Port SFP Slot The front panel of TL SG3428 is shown as the following...

Страница 7: ...own as the following figure F LED 1G RJ45 Port SFP Slot Console Port USB RJ45 The front panel of TL SG3452P is shown as the following figure F LED 1G RJ45 Port SFP Slot Console Port RJ45 USB Speed PWR...

Страница 8: ...Running at 10 Gbps and transmitting or receiving data Yellow On Running at 100M 1G 2 5G 5Gbps but no activity Yellow Flashing Running at 100M 1G 2 5G 5Gbps and transmitting or receiving data Off No d...

Страница 9: ...ellow On The switch is powered by PWR1 PWR1 and PWR2 are connected Off Green On The switch is powered by PWR2 PWR1 is disconnected or it works improperly Off Off The switch is powered off or both PWR1...

Страница 10: ...ally Green Flashing The supply power exceeds the correponding port s maximum power Yellow On Overload or short circuit is detected Yellow Flashing Power on self test failed Off Not providing PoE power...

Страница 11: ...t Note For TL SG3452X For TL SG3428 LED Indication PWR On The switch is powered on Off The switch is powered off or power supply is abnormal Flashing Power supply is abnormal SYS Flashing The switch w...

Страница 12: ...disconnected or it works improperly Green On Yellow On The switch is powered by PWR1 PWR1 and PWR2 are connected Off Green On The switch is powered by PWR2 PWR1 is disconnected or it works improperly...

Страница 13: ...roperly PoE Max On The remaining PoE power is 7 W Flashing The remaining PoE power keeps 7 W after this LED is on for 2 minutes Off The remaining PoE power is 7 W FAN Green All the fans work properly...

Страница 14: ...t is active on only one console port at a time By default the micro USB connector takes precedence over the RJ45 connector 100 Mbps 1 Gbps 2 5 Gbps 5 Gbps 10 Gbps RJ45 Port Designed to connect to the...

Страница 15: ...for demonstration purposes only Your switch may differ in appearance from the depicted Power Socket Grounding Terminal Kensington Security Slot Kensington Security Slot Secure the lock not provided in...

Страница 16: ...ed by improper use you should observe the following rules Safety Precautions Keep the power off during the installation Wear an ESD preventive wrist strap and make sure that the wrist strap has a good...

Страница 17: ...tems Dust the device regularly and keep the indoor air clean Keep the device well grounded and ensure that the static electricity has been transferred Electromagnetic Interference Electronic elements...

Страница 18: ...lat stable and sturdy enough to support the weight of 5 5 kg at least The rack or workbench has a good ventilation system The equipment room is well ventilated The rack is well grounded Keep the devic...

Страница 19: ...ews as illustrated in the following figure Figure 2 2 Bracket Installation Rack mounting Bracket Screw 3 After the brackets are attached to the device use suitable screws not provided to secure the br...

Страница 20: ...able 3 2 SFP SFP Slot The following figure demonstrates the connection of SFP SFP slot to an SFP SFP module Figure 3 2 Inserting the SFP SFP Module SFP SFP Slot SFP SFP Module 3 3 Console Port CLI Com...

Страница 21: ...akes priority over the Console RJ45 port The console USB port is hot pluggable while the console RJ45 port is not Keep the device power off when plugging the console cable into the console RJ45 port D...

Страница 22: ...The provided plug and the socket in your region may differ from the figures above 3 6 Initialization After the device is powered on it begins the Power On Self Test A series of tests run automaticall...

Страница 23: ...one Mode Switch PC Using the GUI 1 To access the management page of the switch make sure the switch and computer are in the same subnet Open a browser and type the switch s IP address in the address f...

Страница 24: ...s can be centrally configured and monitored via Omada Hardware Controller or Omada Software Controller Note Before the following configurations make sure the switch can access the internet When using...

Страница 25: ...Controller s web page follow the wizard to complete the quick setup 5 After the quick setup the login page appears Enter the username and password you have created and click Log in Then you can furthe...

Страница 26: ...ler 4 If you want to manage the devices reomotely follow the next steps a Make sure that Cloud Access is enabled on your controller and your controller has been bound with your TP Link ID On the Omada...

Страница 27: ...em works normally If the PWR Power LED worked abnormally take the following steps 1 Make sure that the power cable is connected properly and the power contact is normal 2 Make sure the voltage of the...

Страница 28: ...TL SX3206HPP Transmission Medium 10BASE T 2 pair UTP STP of Cat 3 4 5 maximum 100 m Except TL SX3206HPP TL SG3210XHP M2 TL SG3428XF 100BASE TX 2 pair UTP STP of Cat 5 or above maximum 100 m 1000BASE T...

Страница 29: ...SG3452P TL SG3452X TL SG3452XP 0 C to 40 C 32 F to 104 F TL SG3210 TL SG3428 TL SG3428MP TL SG3428X TL SG3428XMP 0 C to 45 C 32 F to 113 F TL SX3206HPP TL SG3210XHP M2 0 C to 50 C 32 F to 122 F Storag...

Страница 30: ...ions of directives 2014 30 EU 2014 35 EU 2009 125 EC 2011 65 EU and EU 2015 863 The original EU Declaration of Conformity may be found at https www tp link com en support ce UK Declaration of Conformi...

Страница 31: ...ce downward The plug on the power supply cord is used as the disconnect device the socket outlet shall be easily accessible Make sure the power socket has a good contact with the ground Please read an...

Страница 32: ...ineers please visit https community tp link com to join TP Link Community For technical support the user guide and other information please visit https www tp link com support or simply scan the QR co...

Отзывы: