background image

2

Appearance

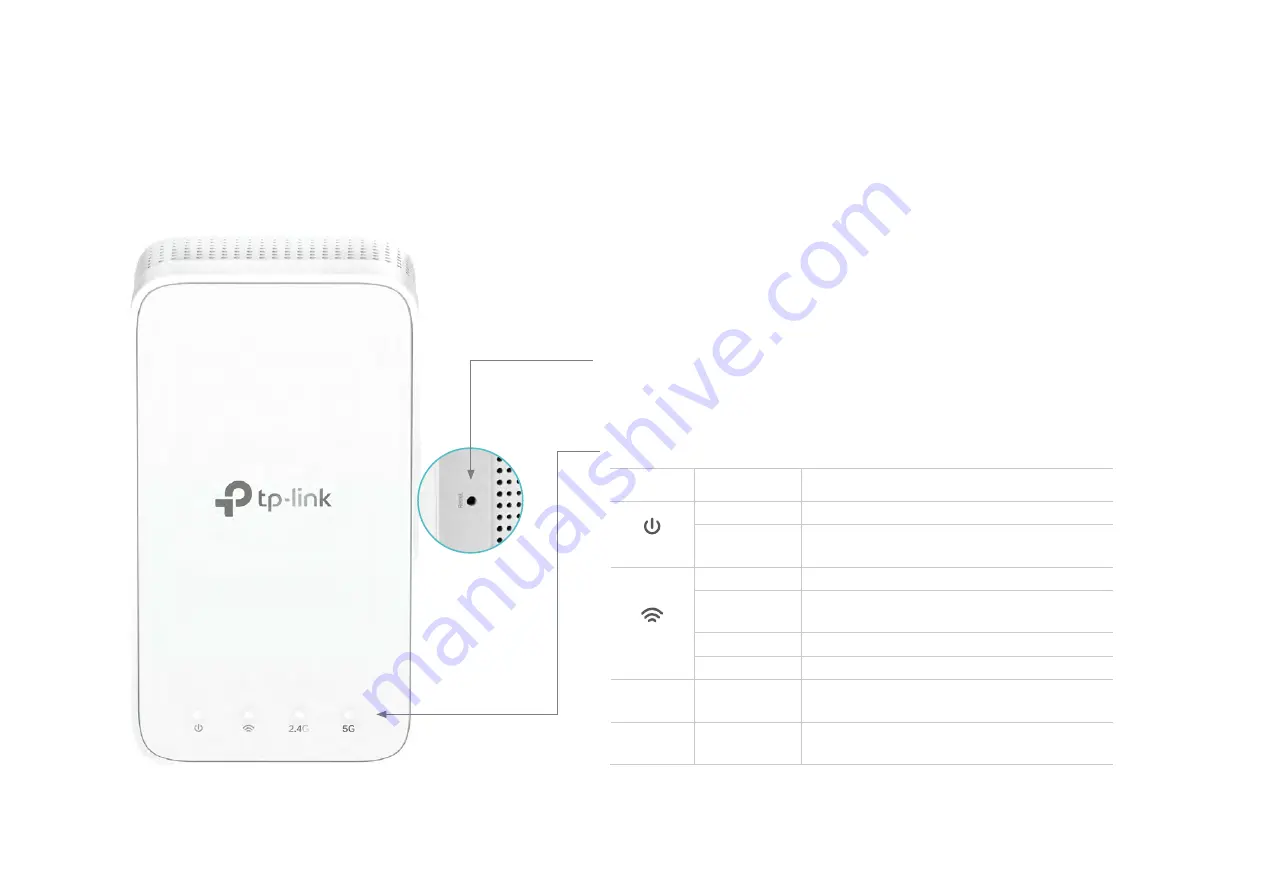
Deco Extender has four LED lights and a Reset button. See the explanation below:

Reset Button:

Press to reset Deco Extender to factory default settings. 

LEDs:

LED

STATUS

INDICATION

Power

On/Off

Deco is on or off.

Pulse

Deco is starting up, upgrading firmware, 

or resetting.

Signal

White Solid Internet service is available.

Red Solid

Deco is connected to main Deco but 

internet service is not available.

White Pulse WPS connection is in progress.

Red Pulse

Deco is disconnected from main Deco.

2.4GHz

On/Off

Deco is connected or not connected to 

main Deco’s 2.4GHz Wi-Fi.

5GHz

On/Off

Deco is connected or not connected to 

main Deco’s 5GHz Wi-Fi.

Содержание Deco M3W

Страница 1: ...Whole Home Mesh Wi Fi System Seamless Roaming Parental Controls Adaptive Path Selection User Guide AC1200 Whole Home Mesh Wi Fi Extender Deco M3W 1910012488 REV1 0 0...

Страница 2: ...Contents About This Guide 1 Appearance 2 Set Up Your Deco Extender 3 Dashboard 5 Update Deco Units 6 Authentication 7...

Страница 3: ...ion that helps you make better use of your device More Info Specific product information can be found on the product page at https www tp link com A Technical Support Forum is provided for you to disc...

Страница 4: ...lse Deco is starting up upgrading firmware or resetting Signal White Solid Internet service is available Red Solid Deco is connected to main Deco but internet service is not available White Pulse WPS...

Страница 5: ...Deco app and set up a Deco network For instructions refer to the user manual of your Deco Whole Home Mesh Wi Fi System Unit 2 Add your Deco Extender On the dashboard tap and select DECOS Identify you...

Страница 6: ...it until its Power LED turns solid on 5 Specify the location Select a location for this Deco Extender If its location is not listed you can create a new one by choosing Custom 6 Finish The Deco app wi...

Страница 7: ...ork you will see the dashboard of the Deco app Here you can view the connected devices and their internet speeds and tap the Internet icon to check the working status of all Deco units View connected...

Страница 8: ...Update Deco Units TP Link is dedicated to improving product features and providing a better customer experience Update Deco units when prompted in the Deco app Update Available Updating Deco Up to dat...

Страница 9: ...s and product names are trademarks or registered trademarks of their respective holders No part of the specifications may be reproduced in any form or by any means or used to make any derivative such...

Страница 10: ...no guarantee that interference will not occur in a particular installation If this equipment does cause harmful interference to radio or television reception which can be determined by turning the eq...

Страница 11: ...r To comply with FCC RF exposure compliance requirements this grant is applicable to only Mobile Configurations The antennas used for this transmittermustbeinstalledtoprovideaseparationdistanceofatlea...

Страница 12: ...link com en ce RF Exposure Information This device meets the EU requirements 2014 53 EU Article 3 1a on the limitation of exposure of the general public to electromagnetic fields by way of health pro...

Страница 13: ...es risques de brouillage pr judiciable aux syst mes de satellites mobiles utilisant les m mes canaux Les produits utilisant la technique d att nuation DFS s lection dynamique des fr quences sur les ba...

Страница 14: ...12 NCC Notice BSMI Notice 5 25GHz 5 35GHz 5 250 5 350GHz Pb Cd Hg CrVI PBB PBDE PCB...

Страница 15: ...l be easily accessible Please read and follow the above safety information when operating the device We cannot guarantee that no accidents or damage will occur due to improper use of the device Please...

Страница 16: ...ipment WEEE This means that this product must be handled pursuant to European directive 2012 19 EU in order to be recycled or dismantled to minimize its impact on the environment User has the choice t...

Страница 17: ...REV1 0 0 1910012486 AC1200 Wi Fi Range Extender RE300 User Guide...

Страница 18: ...3 2 How to Set Up a OneMesh Network 15 Chapter 4 TP Link Cloud Service 16 4 1 Register a TP Link ID 17 4 2 Change Your TP Link ID Information 17 4 3 Manage the User TP Link IDs 18 4 3 1 Add TP Link ID...

Страница 19: ...6 4 Upgrade the Firmware 32 6 5 Backup and Restore Configuration Settings 33 6 6 Change Login Password 34 6 7 Check System Log 34 FAQ 36...

Страница 20: ...anced tab Note Ignoring this type of note might result in a malfunction or damage to the device Tips Indicates important information that helps you make better use of your device More Info The latest...

Страница 21: ...Chapter 1 Get to Know About Your Extender This chapter introduces what the extender can do and its appearance It contains the following sections Product Overview Appearance...

Страница 22: ...utton if available followed by the extender s WPS button Alternatively follow the Quick Setup instructions on the extender s web management page Once the extender is connected to a router you can relo...

Страница 23: ...in progress Off No wireless connection is established 2 4GHz On Off The extender is connected or not connected to the 2 4GHz wireless network of your host router 5GHz On Off The extender is connected...

Страница 24: ...nnection This chapter introduces how to boost your host wireless coverage Please follow the step by step instructions to set up the internet connection It contains the following sections Power On the...

Страница 25: ...e three ways to set up the extender via the TP Link Tether app via a web browser or via the WPS button 2 2 1 Method 1 Via the TP Link Tether App 1 Launch the Apple App Store or Google Play Store and s...

Страница 26: ...Tools Location Assistant You can also manage your extender via Tether such as controlling LEDs sharing passwords of your networks and blocking devices 2 2 2 Method 2 Via a Web Browser 1 Connect your...

Страница 27: ...er Wi Fi On Turn Wi Fi Off Join Other Network Create Network Open Network Preferences TP Link_Extender 2 Follow the instructions of the Quick Setup Wizard to connect the extender to your host router 1...

Страница 28: ...wireless network please click Skip to continue 4 Confirm your host network password 5 Either keep the default SSIDs network names or customize them for the extended networks and then click Next Tips I...

Страница 29: ...r 2 Set Up Internet Connection 6 Follow web instructions to relocate your extender for optimal Wi Fi coverage and performance and then click Done 7 Enjoy Connect to the extended network and enjoy the...

Страница 30: ...n about using WPS button on your host router please refer to the router manufacturer s user guide 2 Wait until the Signal LED changes from blinking to solid on which indicates that the WPS connection...

Страница 31: ...your extender for optimal Wi Fi coverage and performance 1 Plug in the extender about halfway between your router and the Wi Fi dead zone The location you choose must be within the range of your rout...

Страница 32: ...Chapter 3 OneMesh with Seamless Roaming This chapter introduces the TP Link OneMeshTM feature It contains the following sections What s a OneMesh Network How to Set Up a OneMesh Network...

Страница 33: ...luding network name password access control settings and more Seamless Roaming Devices automatically switch between your router and extenders as you move through your home for the fastest possible spe...

Страница 34: ...in the router s OneMesh network and copy the router s wireless settings You can manage all mesh devices in the OneMesh network all on your router s web page If you want to remove the extender from the...

Страница 35: ...me the TP Link Cloud will notify you when an important firmware upgrade is avaliable Surely you can also manage multiple TP Link Cloud devices with a single TP Link ID This chapter introduces how to r...

Страница 36: ...r TP Link ID refer to Manage the User TP Link IDs Once you have registered a TP Link ID on the web management page you can only register another TP Link ID via the Tether APP Please refer to Manage th...

Страница 37: ...ink ID used to log in to the extender for the first time will be automatically bound as the Admin account An admin account can add or remove other TP Link IDs to or from the same extender as Users All...

Страница 38: ...you need another TP Link ID please register a new one via the Tether app Please refer to Manage the Extender via the TP Link Tether App to install the app and register a new TP Link ID 4 The new TP L...

Страница 39: ...Connect your device to the extender s or host router s wireless network 3 Launch the Tether app select the model of your extender and log in with your TP Link ID or the password your set for the exten...

Страница 40: ...ides you on how to configure network settings that are available for this extender It contains the following sections Check Internet Status Configure Wireless Network Change LAN Settings Adjust Wi Fi...

Страница 41: ...e host networks Please go to Settings Wireless Connect to Network to check whether the host network passwords are correct If the problem still exists relocate the extender closer to the router to achi...

Страница 42: ...k is available on your extender please refer to the instructions to set your 5GHz network To extend another host network 1 Go to Settings Wireless Connect to Network 2 Enable Connect to 2 4GHz Network...

Страница 43: ...Network 2 Select Hide SSID broadcast and the corresponding SSID will not be displayed when wireless devices scan for local wireless networks You need to manually enter the SSID to join the network 3...

Страница 44: ...set the extender s Wi Fi coverage depending on how large you want your Wi Fi area to be 1 Visit http tplinkrepeater net and log in with the password you set for the extender 2 Go to Settings Advanced...

Страница 45: ...is needed for the extender 1 Visit http tplinkrepeater net and log in with the password you set for the extender 2 Go to Settings Advanced Settings Access Control 3 Enable Access Control To block spe...

Страница 46: ...k 5 Click OK To permit specific device s 1 Select Whitelist and click Save 2 Click Add in the Devices in Whitelist table Enter the Device Name and MAC Address And you can set the Effective Time for a...

Страница 47: ...Settings Wireless Extended Network and check that the 2 4GHz and 5GHz bands are both enabled Additionally if you are going to disable the 2 4GHz network it s recommended to first make sure all your w...

Страница 48: ...pter presents how to manage and maintain your extender It includes the following sections Set System Time Control LEDs Set Power Schedule Upgrade the Firmware Backup and Restore Configuration Settings...

Страница 49: ...ssword you set for the extender 2 Go to Settings System Tools Time Settings To get system time 1 Select your local Time Zone from the drop down list 2 Click Save To set up Daylight Saving Time 1 Selec...

Страница 50: ...f time period 3 Click Save 6 3 Set Power Schedule The Power Schdule feature allows you to specify a time period during which the extender is off 1 Visit http tplinkrepeater net and log in with the pas...

Страница 51: ...n as shown in the download section of the Support page Make sure that you have a stable connection between the extender and your computer It is NOT recommended to upgrade the firmware wirelessly Backu...

Страница 52: ...er to the default factory settings 1 Visit http tplinkrepeater net and log in with the password you set for the extender 2 Go to Settings System Tools Backup Restore To backup configuration settings C...

Страница 53: ...tplinkrepeater net and log in with the password you set for the extender 2 Go to Settings System Tools Admin Account 3 Enter the old password Then enter the new password twice case sensitive and clic...

Страница 54: ...35 Chapter 6 Manage Your Extender...

Страница 55: ...er is wirelessly connected make sure that you have connected to the extender s SSID Make sure your computer is configured as Obtain an IP address automatically and Obtain DNS server address automatica...

Страница 56: ...efer to your router s user guide 2 Power on your extender and run the Quick Setup to configure your extender 3 Connect all of your devices to the extended network and make sure the router s Link LED r...

Страница 57: ...roduct names are trademarks or registered trademarks of their respective holders No part of the specifications may be reproduced in any form or by any means or used to make any derivative such as tran...

Страница 58: ...mful interference to radio or television reception which can be determined by turning the equipment off and on the user is encouraged to try to correct the interference by one or more of the following...

Страница 59: ...ations The antennas used for this transmitter must be installed to provide a separation distance of at least 20 cm from all persons and must not be co located or operating in conjunction with any othe...

Страница 60: ...th protection The device complies with RF specifications when the device used at 20 cm from your body Restricted to indoor use Canadian Compliance Statement This device complies with Industry Canada l...

Страница 61: ...andes 5250 5350 MHz 5470 5600MHz et 5650 5725MHz Radiation Exposure Statement This equipment complies with IC radiation exposure limits set forth for an uncontrolled environment This equipment should...

Страница 62: ...ty Information Keep the device away from water fire humidity or hot environments Do not attempt to disassemble repair or modify the device Do not use the device where wireless devices are not allowed...

Страница 63: ...O SE SI SK UK Explanations of the symbols on the product label Symbol Explanation Class II equipment AC voltage Indoor use only RECYCLING This product bears the selective sorting symbol for Waste elec...

Отзывы: