TP-Link Archer AX11000 Скачать руководство пользователя страница 8

4

Chapter 1


Get to Know About Your Router

1. 1.  Product Overview

The TP-Link router is designed to fully meet the need of Small Office/Home Office 
(SOHO) networks and users demanding higher networking performance. The powerful 
antennas ensure continuous Wi-Fi signal to all your devices while boosting widespread 
coverage throughout your home, and the built-in Ethernet ports supply high-speed 
connection to your wired devices.
The revolutionary OFDMA is introduced to improve average throughput by 4× and cut 
the latency. Powerful gaming features ensure your gaming stays immersive, and keep 
your network as fast as your reaction speed
Moreover, it is simple and convenient to set up and use the TP-Link router due to its 
intuitive web interface and the powerful Tether app.  

1. 2.  Panel Layout

1. 2. 1.  Top View

The router’s LED is located on the top. You can check the router’s working status by 
following the LED Explanation table.
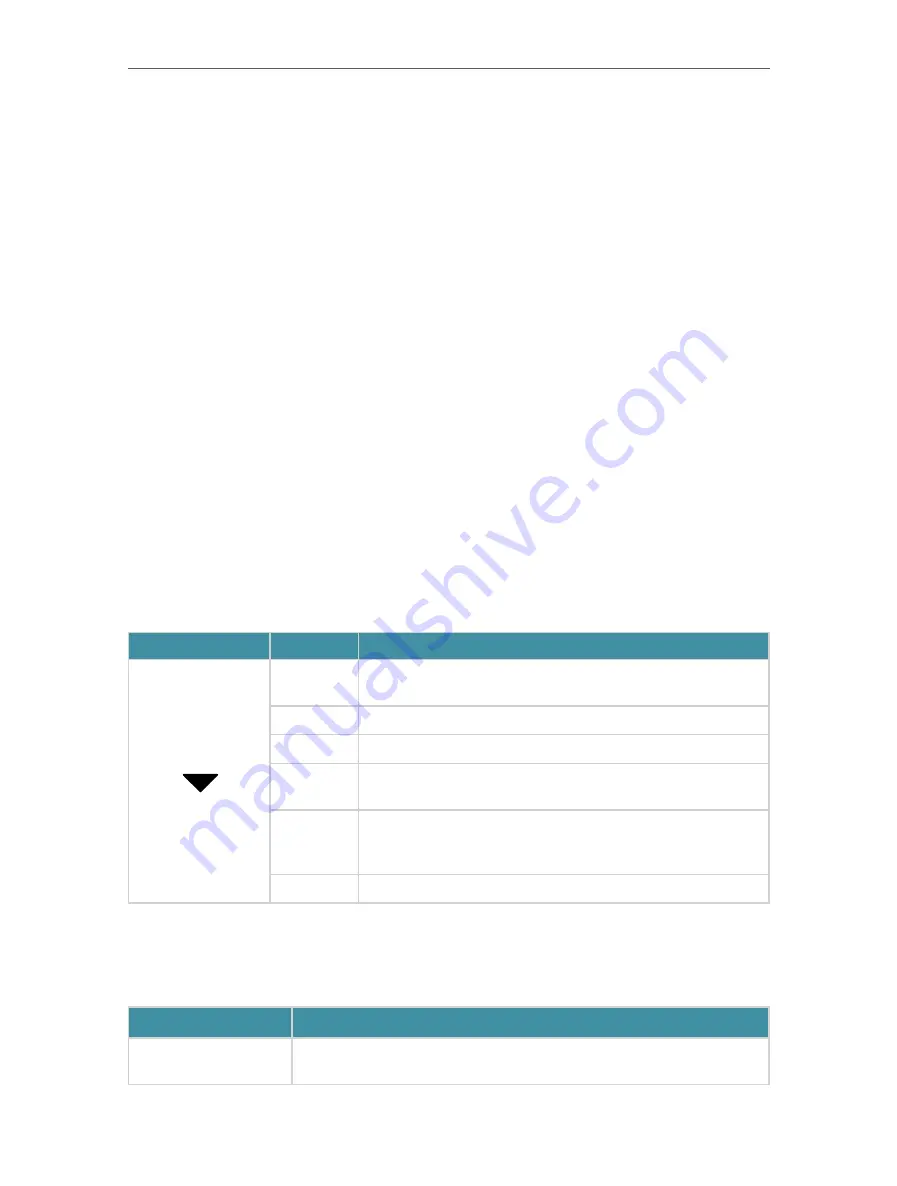
LED Explanation

Name

Status

Indication


Pulsing 

orange

The system is starting up.

Solid white  The router is working normally.

Solid red

No internet connection.

Solid 

orange

The router is connected to the internet, but the Wi-Fi is off.

Pulsing 

white

The firmware is being upgraded, WPS connection is being 

established or the router is being reset. Do not disconnect or 

power off your router.

Off

Power is off or the LED is turned off. 

1. 2. 2.  The Side and Back Panel

The following parts (view from left to right) are located on the rear panel.

Item

Description

USB 2.0 + USB 3.0 

Ports

For connecting your USB storage devices to the router.

Содержание Archer AX11000

Страница 1: ...REV1 0 0 1910012816 User Guide AX6600 Wi Fi 6 Tri Band Gaming Router Archer GX90...

Страница 2: ...2 4 3 Manually Set Up Your Internet Connection 13 4 4 Set Up the Router as an Access Point 16 4 5 Set Up an IPv6 Internet Connection 16 Chapter 5 TP Link Cloud Service 20 5 1 Register a TP Link ID 21...

Страница 3: ...s on the Internet by Port Forwarding 53 10 2 Open Ports Dynamically by Port Triggering 55 10 3 Make Applications Free from Port Restriction by DMZ 56 10 4 Make Xbox Online Games Run Smoothly by UPnP 5...

Страница 4: ...13 4 Password Recovery 86 13 5 Local Management 87 13 6 Remote Management 89 13 7 System Log 90 13 8 Test the Network Connectivity 92 13 9 Set Up System Time 94 13 10 Set the Router to Reboot Regular...

Страница 5: ...ed in the Advanced tab Note Ignoring this type of note might result in a malfunction or damage to the device Tips Indicates important information that helps you make better use of your device symbols...

Страница 6: ...s www tp link com TP Link Community is provided for you to discuss our products and share knowledge at https community tp link com Our Technical Support contact information can be found at the Contact...

Страница 7: ...Chapter 1 Get to Know About Your Router This chapter introduces what the router can do and shows its appearance It contains the following sections Product Overview Panel Layout...

Страница 8: ...t up and use the TP Link router due to its intuitive web interface and the powerful Tether app 1 2 Panel Layout 1 2 1 Top View The router s LED is located on the top You can check the router s working...

Страница 9: ...k Power Port For connecting the router to a power socket via the provided power adapter Power On Off Button Press this button to power on or off the router Button Description Name Description WPS Butt...

Страница 10: ...Chapter 2 Connect the Hardware This chapter contains the following sections Position Your Router Connect Your Router...

Страница 11: ...em if any and remove the backup battery if it has one And hold the antennas from the base as shown below and install them If your internet connection is through an Ethernet cable directly from the wal...

Страница 12: ...e WPS button Wireless devices that support WPS including Android phones tablets and most USB network adapters can be connected to your router through this method Note WPS is not supported by iOS devic...

Страница 13: ...Chapter 3 Log In to Your Router...

Страница 14: ...og in to your router 1 Set up the TCP IP Protocol in Obtain an IP address automatically mode on your computer 2 Visit http tplinkwifi net and create a login password for secure management purposes The...

Страница 15: ...in automates many of the steps and verifies that those steps have been successfully completed Furthermore you can also set up an IPv6 connection if your ISP provides IPv6 service It contains the foll...

Страница 16: ...more log in with your TP Link ID or click Sign Up Now to get one Then follow the instructions to bind the cloud router to your TP Link ID Note To learn more about the TP Link Cloud service please refe...

Страница 17: ...part you can check your current internet connection settings You can also modify the settings according to the service information provided by your ISP Follow the steps below to check or modify your...

Страница 18: ...your ISP in the corresponding fields 3 If you choose PPPoE enter the Username and Password provided by your ISP PPPoE users usually have DSL cable modems 4 If you choose L2TP enter the Username and P...

Страница 19: ...ers are needed according to the secondary connection you have chosen 5 Click SAVE Tips If your internet connection type is BigPond Cable please go to Advanced Network Internet to set your router If yo...

Страница 20: ...ng connect the router to your existing wired router via an Ethernet cable 4 Connect to the Wi Fi of the router and log in again to the web management page http tplinkwifi net and go to Advanced Quick...

Страница 21: ...pe provided by your ISP Tips If you do not know what your internet connection type is contact your ISP or judge according to the already known information provided by your ISP 4 Fill in information as...

Страница 22: ...ate accounts for the IPv4 and IPv6 connections please untick the PPPoE same session with IPv4 connection checkbox and manually enter the username and password for the IPv6 connection 4 6to4 Tunnel An...

Страница 23: ...ndows users are recommended to choose from the first two types Fill in Address Prefix provided by your ISP and click SAVE 6 Click Status to check whether you have successfully set up an IPv6 connectio...

Страница 24: ...ll notify you when an important firmware upgrade is avaliable Surely you can also manage multiple TP Link Cloud devices with a single TP Link ID This chapter introduces how to register a new TP Link I...

Страница 25: ...the router is bound to your TP Link ID you need to log in to the router with the TP Link ID Once you have registered a TP Link ID on the web management page you can only register another TP Link ID vi...

Страница 26: ...22 Chapter 5 TP Link Cloud Service To change your password 1 Click behind the Password 2 Enter the current password then a new password twice And click Save...

Страница 27: ...Ds to from the router 5 3 1 Add TP Link ID to Manage the Router 1 Visit http tplinkwifi net and log in with your TP Link ID 2 Go to Advanced TP Link ID and focus on the Bound Accounts section 3 Click...

Страница 28: ...QR code to download and install the app OR 2 Launch the Tether app 3 Log in with your TP Link ID Note If you don t have a TP Link ID create one first 4 Connect your device to the router s wireless ne...

Страница 29: ...your main network When you have guests in your house apartment or workplace you can create a guest network for them In addition you can customize guest network options to ensure network security and...

Страница 30: ...z 1 5GH 2 wireless network 2 Customize the SSID Don t select Hide SSID unless you want your guests to manually input the SSID for guest network access 3 Set Security to WPA WPA2 Personal and customize...

Страница 31: ...et for the router 2 Go to Advanced Wireless Guest Network Locate the Guest Permissions section 3 Customize guest network options according to your needs Allow guests to see each other Tick this checkb...

Страница 32: ...this checkbox if you want to allow the wireless clients on your guest network to communicate with the devices connected to your router s LAN ports or main network via methods such as network neighbor...

Страница 33: ...to share files and media from the USB storage devices over your home network locally or remotely through the internet The router supports USB external flash drives and hard drives It contains the foll...

Страница 34: ...ure its file system is FAT32 exFat NTFS or HFS Before you physically disconnect a USB device from the router safely remove it to avoid data damage Go to Advanced USB USB Storage Device Device Settings...

Страница 35: ...name and a password to deny anonymous access to the USB disks you should select the Registered User radio box To learn how to set up an account for the access refer to To set up authentication for dat...

Страница 36: ...rney Note If your ISP assigns a private WAN IP address such as 192 168 x x or 10 x x x you cannot use this feature because private addresses are not routed on the Internet Follow the steps below to co...

Страница 37: ...et Use a third party app for network files management Tips Click Set Up a Dynamic DNS Service Account to learn how to set up a domain name for you router 7 1 3 Customize the Access Settings By default...

Страница 38: ...on and specify sharing folders and click SAVE To set up authentication for data security You can set up authentication for your USB device so that network clients will be required to enter username an...

Страница 39: ...access Due to Windows credential mechanism you might be unable to access the USB disk after changing Authentication settings Please log out from the Windows and try to access again Or you can change t...

Страница 40: ...take Windows 7 as an example Tablet Use a third party DLNA supported player 7 3 Time Machine Time Machine backs up all files on your Mac computer to a USB storage device connected to your router 1 Vis...

Страница 41: ...37 Chapter 7 USB Settings 4 Click SELECT to select a location for Time Machine backups 5 Set the Storage Limit for Backups Note 0 means no limit for the space 6 Click SAVE...

Страница 42: ...to help you create a personalized network that caters for the whole family You can ensure appropriate internet access for everyone with Parental Controls save bandwidth for the things that matter with...

Страница 43: ...s from Thunday to Thursday How can I do that 1 Visit http tplinkwifi net and log in with your TP Link ID or the password you set for the router 2 Go to Advanced HomeCare Parental Controls or Game Cent...

Страница 44: ...l then be displayed in the Category Filter list 2 If needed you can edit the blocked content by selecting the categories in the Category Filter list 3 You can also block a specific website or applicat...

Страница 45: ...s profile will be unable to access the internet during this time period 3 Click SAVE Note The effective time limits are based on the time of the router You can go to Advanced System Time Language to m...

Страница 46: ...the Insights column Note If you have not set up a profile for your child yet you should do that first by clicking Add then follow the steps to create a profile Refer to Scenario 1 Setting Up Access Re...

Страница 47: ...ion while I play online games with friends on my computer for the next 2 hours How can I do that 1 Visit http tplinkwifi net and log in with your TP Link ID or the password you set for the router 2 Go...

Страница 48: ...uration you want the device to be prioritized for Done You can now enjoy playing games without lag on your computer for the next 2 hours 8 3 Antivirus Your router supports built in Antivirus powered b...

Отзывы: