background image

OTHER FUNCTIONS

05 4RUNNER NAVI_U (L/O 0408)

99

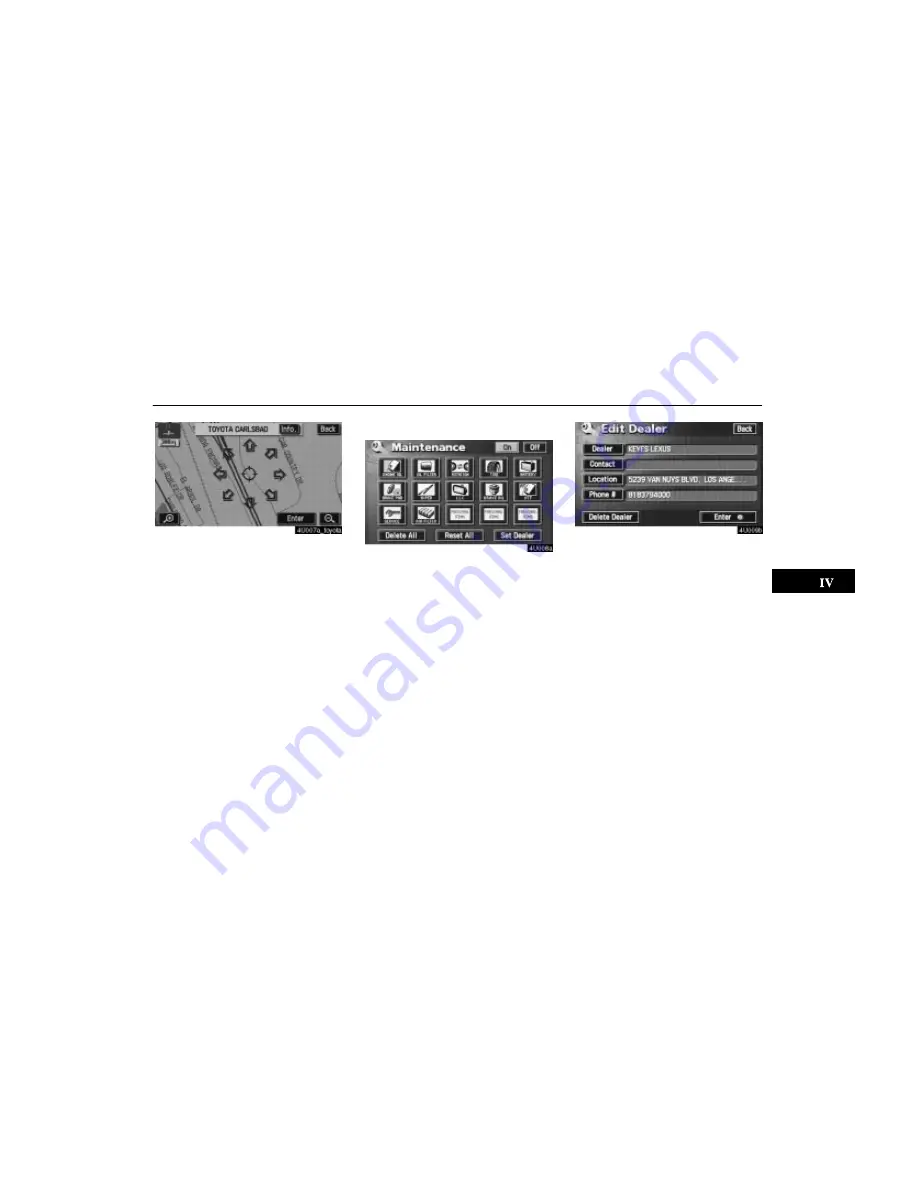
After you input the dealer, the screen changes
and displays the map location of the dealer.
If it is OK, touch the 

“Enter”

 switch.

The screen changes to “Edit Dealer” screen.
(See “(b) Edit dealer”.)

(b) Edit dealer

You can edit the dealer name, staff, loca-
tion and phone number.

1. Touch the 

“Set Dealer”

 switch on

the “Maintenance” screen.  The “Edit
Dealer” screen appears.

2. To edit, touch the corresponding
switch.

Содержание 2005 4Runner Navi_U

Страница 1: ...ast traffic congested Your own personal local knowledge or short cut may at times be faster than the calcu lated routes The navigation system s database includes about 75 Point of Interest categories to allow you to easily select destinations such as restaurants and banks If a destination is not in the database you can enter the street address or a major intersection close to it and the system wil...

Страница 2: ... what you must or must not do in order to avoid or reduce the risk of damage to your vehicle and its equipment INFORMATION This provides additional information Initial screen When you start the engine or turn the ignition switch to the ACC position the initial screen appears and the system begins operating CAUTION When the vehicle is stopped with the engine running always apply the park ing brake ...

Страница 3: ...w to use it and become thoroughly familiar with it Read the entire Navigation System Owner s Manual to make sure you under stand the system Do not allow others to use this system until they have read and under stood the instructions in this manual For your safety some functions may become inoperable when you start driving Unavail able switches are dimmed You can input your destination and select y...

Страница 4: ...ing driv ing restrictions no left turns street closures etc frequently change Therefore before you follow any instruction from the system look to see whether you can comply with the instruction safely and legally This system cannot warn you about such things as the safety of an area condition of streets and availability of emergency servi ces If you are unsure about the safety of an area do not dr...

Страница 5: ...05 4RUNNER NAVI_U L O 0408 v ...

Страница 6: ...gure indicates the map scale 9 3 INFO button Push this button to display the Information Menu screen ii 96 101 109 4 Zoom out switch Touch this switch to reduce the map scale 9 5 Mark switch Touch this switch to register the cursor posi tion as a memory point 6 6 Route switch Touch this switch to change the route 42 44 7 DISPLAY button Push this button to display the Display screen 108 Quick refer...

Страница 7: ...witch to display the foot print map and the building information 58 12 MAP VOICE button Push this button to repeat a voice guidance cancel one touch scroll start guidance and display the current position 5 6 42 13 DEST button Push this button to display the Destination screen x 20 14 Screen configuration switch Touch this switch to change the screen mode 53 15 MENU button Push this button to displ...

Страница 8: ...em s database 26 3 POI Category switch You can select a destination from the POI category 29 4 Previous switch You can select a destination from any of the last 99 previously set destinations and from the previous starting point 34 5 Memory switch You can select the location from those regis tered as Memory points To register memory points see page 66 33 6 Emergency switch You can select one of th...

Страница 9: ...hone switch You can enter a destination by the telephone number 37 11 Coordinates switch You can set a destination using latitude and longitude as coordinates 37 12 Quick access switch You can select one of 5 preset destinations directly To use this function it is necessary to set the Attribute for each memory point To register a Quick Access see page 70 22 13 Home switch You can select your own h...

Страница 10: ... Select User switch Enables recall of up to three memorized user setting patterns 63 3 Setup switch Enables various settings for the navigation system 76 4 My Places switch Enables changes to Memory points and Areas to avoid 66 5 Suspend Guidance and Resume Guidance switch Suspends or resumes guidance 62 6 Volume switch Sets the volume for voice guidance 63 Menu screen ...

Страница 11: ...e operation Display operation 2 Touch switch operation 2 Inputting letters and numbers 3 Current position display 5 Screen scroll operation one touch scroll 5 Map scale 9 Orientation of the map 9 Limitations of the navigation system 10 Map database information and updates 12 SECTION I ...

Страница 12: ...y cold conditions the display may react slowly or operation sound may become louder Touch switch operation This system is operated mainly by the switches on the screen To prevent dam age to the screen lightly touch switches on the screen with your finger When you touch a switch on the screen a beep sounds Do not use objects other than your finger to touch the screen INFORMATION If the system does ...

Страница 13: ...ue to erase letters To input numerals and symbols To display the number keys and symbol keys touch the 0 9 switch Enter numerals and symbols by touching the number keys and symbol keys directly Touching this switch erases one let ter Holding this switch will continue to erase letters Touching this switch displays other symbols To display the list To search for an address or a name touch the List s...

Страница 14: ...n List screen operation When a list is displayed you can scroll or page through the list by using the appropriate switch To shift to the next or previous page To scroll up or down one item at a time This expresses a displayed screen position If appears to the right of the item name the complete name is too long for the display Touch to scroll to the end of the name Touch to scroll to the beginning...

Страница 15: ...sitioning System If your current position is not correct it is automatically cor rected after your vehicle receives signals from the GPS INFORMATION After battery disconnection or on a new vehicle the current position may not be correct As soon as the system receives signals from the GPS the correct current position is displayed To correct the current position manu ally see page 77 Screen scroll o...

Страница 16: ... the current vehicle position map location display To set the cursor position as a destina tion You can set a specific point on the map as a destination using the one touch scroll func tion Touch the Enter switch The screen changes and displays the map location of the selected destination and the route preference See Entering destination on page 38 If there is already a preset destination touch th...

Страница 17: ...cursor is set on a POI icon the name and Info switch are displayed on the top of the screen Touch the Info switch Information such as the name address and phone number are displayed If you touch the Enter switch the posi tion of cursor is set as a destination If there is already a preset destination the Add to switch and the Replace switch are displayed When there is already a preset destination u...

Страница 18: ...ouch the Info switch Information such as the name location and phone number are displayed If you touch the Enter switch the posi tion of cursor is set as a destination If there is already a set destination the Add to switch and the Replace switch are displayed When there is already a preset destination using the Add to switch to set an addi tional destination will set the new one as the first poin...

Страница 19: ...ly You can change the scale of the map display by touching the scale bar directly It is not available during driving The map scale is displayed under the north up symbol or heading up symbol at the top left of the screen INFORMATION When the map scale is at the maximum range of 250 miles 400 km is not shown When the map scale is at the minimum range of 150 feet 50 m is not shown However in the are...

Страница 20: ...hicle position using 3 to 4 satellites The GPS sys tem has a certain level of inaccuracy While the navigation system will compensate for this most of the time occasional positioning errors of up to 300 feet 100 m can and should be expected Generally position er rors will be corrected within a few seconds When your vehicle is receiving signals from the satellites the GPS mark appears at the top lef...

Страница 21: ...le carrier When a long route is searched during high speed driving When driving without setting the current position calibration correctly After repeating a change of direction by going forward and backward or turning on a turntable in the parking lot When leaving a covered parking lot or parking garage When a roof carrier is installed When driving with tire chains installed When the tires are wor...

Страница 22: ...ehicle that vary by time or season or other rea sons The road and map data stored in your nav igation system may not be complete or may not be the latest version After replacing the tire implement the op eration described in the Tire change calibration For details see page 78 This navigation system uses tire turning data and is designed to work with factory speci fied tires for your vehicle Instal...

Страница 23: ...ty performance merchantability fitness for a particular purpose or non infringement GDT does not warrant that the DATABASE is or will be error free No oral or written information or advice provided by GDT your supplier or any other person shall create a warranty LIMITATION OF LIABILITY The price of the DATABASE does not include any consideration for assumption of risk of consequential indirect or ...

Страница 24: ...ATABASE is licensed with limited rights Utilization of the DATABASE is subject to the restrictions specified in the Rights in Technical Data and Computer Database clause at DFARS 252 227 7013 or the equivalent clause for non defense agencies Manufacturer of the DATABASE for North America is Geographic Data Technology Inc at 11 Lafayette Street Lebanon New Hampshire 03766 USA END USER NOTICE PLEASE...

Страница 25: ...tribute it in any form for any purpose Without limiting the foregoing you may not use this information with any products systems or applications installed or otherwise connected to or in communication with vehicles capable of vehicle navigation positioning dispatch real time route guidance fleet management or similar applications No Warranty This information is provided to you as is and you agree ...

Страница 26: ... arising out of or in connection with any use or possession by you of this information END USER NOTICE The marks of companies displayed by this product to indicate business locations are the marks of their respective owners The use of such marks in this product does not imply any sponsorship approval or endorsement by such companies of this product There are two types of areas available for route ...

Страница 27: ...tabase version and disc coverage area 1 Push the MENU button 2 Touch the Map DVD switch Make sure the version of the database on this screen The database version on the screen above may be different from the actual screen To display the disc coverage area touch the Covered Area switch Confirm the covered area on the screen Contact your dealer to find out if there is a more recent update released ...

Страница 28: ... in the compartment and possi bly injure people in the vehicle during sudden braking or in an accident To reduce the chance of injury in the case of an accident or sudden stop ping while driving keep the display closed Take care not to jam your hand while the display is moving Otherwise you could be injured NOTICE Do not obstruct the display while it is moving It could damage your naviga tion syst...

Страница 29: ...t by Emergency 32 Destination input by Memory 33 Destination input by Previous 34 Destination input by Map 34 Destination input by Intersection 35 Destination input by Freeway Ent Exit 36 Destination input by Coordinates 37 Destination input by Phone 37 Starting route guidance 38 Entering destination 38 Route guidance screen 40 Typical voice guidance prompts 40 Setting and deleting destination 42 ...

Страница 30: ...ile 800 m automatically Set the destination again To select an Address POI Name Freeway Ent Exit Intersection or Phone in a different area it is necessary to change the search area If you enter a destination the road nearest to the point you selected is set as the destination CAUTION While you are driving be sure to obey traffic regulations and keep the road conditions in mind If a traffic sign on...

Страница 31: ...kota US5 Oklahoma Texas US6 Illinois Indiana Kentucky Michigan Ohio Wisconsin US7 Arkansas Alabama Louisiana Mississippi Tennessee US8 Connecticut Massachusetts Maine New Hampshire New Jersey New York Rhode Island Vermont US9 Washington D C Delaware Maryland New Jersey Pennsylvania Virginia West Virginia US10 Florida Georgia North Carolina South Carolina Canada Switch Provinces and regions include...

Страница 32: ...ch the En ter switch even while driving Destination input by Quick access Touch any of the quick access switches on the Destination screen The screen changes and displays the map location of the quick access point and the route preference See Entering des tination on page 38 To use this function it is necessary to set the Attribute for each memory point To regis ter the Quick Access see page 70 IN...

Страница 33: ... a street name It is possible to input a street name first Touch the Street switch to display the screen for inputting a street name Input the street name When you find your desired street name touch the corresponding switch The screen changes and displays the map location of the selected destination and the route preference See Entering destination on page 38 If the same address exists in more th...

Страница 34: ... the screen changes You can then input the house num ber If the above screen appears you can select an address range on the screen b Selecting a city to search Touch the City switch To search by city the following three methods are possible 1 Selecting from the last 5 cities 2 Selecting from the nearest 5 cities 3 Inputting the city name INFORMATION To cancel the city setting touch the Any City sw...

Страница 35: ...e screen The current screen changes to the screen for inputting a house number or a street name See page 23 SELECTING FROM THE NEAREST 5 CITIES Touch the Nearest 5 Cities switch Touch the switch of the desired city name from the displayed list The current screen changes to the screen for inputting a house number or a street name See page 23 INPUTTING THE CITY NAME Touch the Input City Name switch ...

Страница 36: ...utting a house number or a street name See page 23 Destination input by POI Name Touch the POI Name switch on the Destination screen Input the name of Point of Interest Touch the switch of the desired destina tion The screen changes and displays the map location of the selected destination and the route preference See Enter ing destination on page 38 If you input the name of a specific Point of In...

Страница 37: ...egory switches See a Selecting a city to search and b Select ing from the categories INFORMATION The desired Point of Interest can be dis played on the map screen For details see page 49 a Selecting a city to search Touch the City switch To search by city the following three methods are possible 1 Selecting from the last 5 cities 2 Selecting from the nearest 5 cities 3 Inputting the city name INFO...

Страница 38: ...408 28 SELECTING FROM THE NEAREST 5 CITIES Touch the Nearest 5 Cities switch Touch the switch of the desired city name INPUTTING THE CITY NAME Touch the Input City Name switch Input the city name Touch the switch of the desired city name from the displayed list ...

Страница 39: ...play a de tailed list of the POI category If the desired POI category is not on the screen touch the List All Catego ries switch to list all POI categories When you touch the desired category the POI name list screen appears Destination input by POI Category The destination can be set by selecting the POI category and the search point Touch the POI Category switch on the Destination screen ...

Страница 40: ...elect another category touch the OK switch to return to the previous screen If you wish to select a destination from the category displayed by the icon touch the List switch b Setting a search point It is possible to display the names of POIs lo cated within approximately 20 miles 30 km from the selected search point Touch the Search Point switch To set search points the following four meth ods ar...

Страница 41: ...THE SEARCH POINT Touch the Current Position switch When you touch an arrow facing the desired point the map scrolls in that direction When you release your finger scrolling stops To set the position of the cursor touch the Enter switch SETTING THE SEARCH POINT VIA THE MAP SCREEN Touch the Map switch When you touch an arrow facing the desired point the map scrolls in that direction When you release...

Страница 42: ...he route preference See Enter ing destination on page 38 Dist To sort in the order of distance from your current location Icon To sort in the order of the POI icons Name To sort in alphabetical order by name On Route When the indicator is illumi nated by touching this switch the list of the items searched along the route is displayed Destination input by Emergency By touching the Emergency switch ...

Страница 43: ...e guidance is unavail able See page 12 Destination input by Memory Touching the Memory switch on the Destination screen displays your list of registered memory points See page 66 for registering and editing memory points When you touch the switch of your de sired memory point the screen changes and displays the map location of the se lected destination and the route prefer ence See Entering destin...

Страница 44: ... Date To list the previous destinations in or der of registered date Name To list the previous destinations in alphabetical order INFORMATION You can delete the list of previous des tinations while your vehicle is stopped if you no longer need them See page 91 Destination input by Map Touch the Map switch on the Destina tion screen The screen changes and displays the map location that was previous...

Страница 45: ...e desired item After inputting the two intersecting streets the screen changes and displays the map location of the selected destination and the route preference See Entering destination on page 38 If the same two streets cross at more than one intersection the screen changes and dis plays the menu to select the city name where the streets intersect Select the city and the map location of the sele...

Страница 46: ... number CA 118 Select the desired freeway by touching the switch You can then select either a freeway En trance or Exit Touch the switch of the desired entrance or exit name The screen changes and dis plays the map location of the selected des tination and the route preference See Entering destination on page 38 Dist Sort In the order of distance from your current position The distance from your c...

Страница 47: ...tion input by Phone Touch the Phone switch on the Destination screen Input a telephone number After inputting a telephone number touch the OK switch and the screen changes and displays the map location of the se lected destination and the road prefer ence See Entering destination on page 38 If there is more than one site having the same number the following screen appears INFORMATION If there is n...

Страница 48: ...n the destination is already set the Add to switch and the Replace switch are displayed Add to To add a destination Replace To delete the existing destina tions and set a new one Change To change the route preference See page 39 Info If this switch is displayed on the top of the screen touch the switch to see name address and phone number etc SCREEN B 3 To start guidance touch the Guide switch 3 R...

Страница 49: ...cannot avoid including a freeway in some cases If the calculated route includes a trip by ferry the route guidance shows a sea route After you travel by ferry the current vehicle position may be incorrect Upon reception of GPS sig nals it is automatically corrected 3 ROUTES SELECTION To select the desired route from three routes touch the 3 Routes switch on SCREEN B Touch the Quick1 Quick2 or Shor...

Страница 50: ...d route When the vehicle approaches a guidance point such as an intersection or a freeway the screen automatically divides in two to display the guidance screen For details see page 53 The current street name will be displayed at the bottom of the screen In some areas the roads have not been com pletely digitized in our database yet For this reason the route guidance may guide the road that is not...

Страница 51: ...es 1 Proceed about 4 miles to the traf fic circle 2 In a quarter of a mile traffic circle ahead and then 3rd exit ahead 3 The 3rd exit ahead 4 The exit ahead 5 Beep sound only One way road One way road The system indicates a U turn if the dis tance between two one way roads of oppo site directions is less than 50 feet 15 m in residential areas or 164 feet 50 m in non residential areas 1 In half of...

Страница 52: ... cannot determine the current vehicle position correctly in cases of poor GPS signal reception the voice guidance may be made ear ly or delayed If you did not hear the voice guidance command push the MAP VOICE button to hear it again To adjust the voice guidance volume see page 63 Setting and deleting destination a Adding destinations You can add destinations and search again for the routes 1 Touc...

Страница 53: ... arrival order of the destinations 1 Touch the Route switch 2 Touch the Reorder switch of Des tination 3 Select the destination in the order of arrival by touching the switch of destina tions Reordered number of arrival is displayed on the right side of the screen When you finish selecting the destinations touch the OK switch The system searches for the guidance route again and displays the entire...

Страница 54: ...the list 4 A message appears to confirm your re quest to delete To delete the destina tion s touch the Yes switch If you touch the Yes switch the data can not be recovered If you touch the No switch the previous screen will return 5 If more than one destination is set touch the OK switch after deleting the destinations The system searches for the guidance route again and displays the en tire route...

Страница 55: ...Touch the Next switch to use another road 5 If more than one destination is set the Add Preferred Road screen appears Touch the Add switch where you wish to add a preferred road b Deleting preferred road You can delete a set preferred road 1 Touch the Route switch 2 Touch the Delete switch of Pre ferred road 3 When more than one preferred road is set a list will appear on the screen Touch the swit...

Страница 56: ...ore than one preferred road is set touch the OK switch after deleting the preferred road The system searches for the guidance route again and displays en tire route c Search condition You can designate the route conditions of the route to the destination 1 Touch the Route switch 2 Touch the Search Condition switch The Search Condition screen appears 3 Touch the Quick Quick1 Quick2 or Short switch ...

Страница 57: ... After detouring the sys tem returns to the original guidance route Whole Route If you touch this switch the system will calculate an entire new route to the destination This picture shows an example of how the system would guide you around a delay caused by a traffic jam 1 This position indicates the location of a traffic jam caused by road repairs or an accident 2 This route indicates the detour...

Страница 58: ... 3 You can turn the indicator on or off by touching the switch When searching for a route the system avoids routes where the indicator is dimmed as much as possible After choosing the conditions touch the OK switch f Starting route from adjacent road You can start the route guidance from the adjacent road ex When the route guidance guides the route on the freeway but you drive on the par allel way...

Страница 59: ...he screen A screen with a limited choice of Points of In terest will be displayed To change the dis played POI see page 90 When you touch the desired Point of Interest category sym bols will appear on the map screen indicating where the POI addresses are located To turn off the symbols of the Points of In terest on the map screen touch the POI Off switch More If you cannot find your desired Point ...

Страница 60: ... Name To sort in alphabetical order by name On Route When the indicator is illumi nated by touching this switch the list of the items searched along the route is displayed To set a POI as a destination You can select one of the Points of Interest icons on the map screen as a destination and use it as route guidance Directly touch the Point of Interest icon that you wish to set as a destination The...

Страница 61: ...ollowing screen displays the list of the roads up to your destination You can scroll through the list of roads by touching or However not all road names in the route may appear on the list If a road changes its name without requiring a turn such as on a street that runs through two or more cities the name change will not ap pear on the list The street name closest to the starting point will be dis...

Страница 62: ...ch 2 Touch the Route Preview switch To indicate the next destination To preview the route to the next des tination To preview the route to the next des tination in fast forward mode To stop the preview To review the route to the previous destination or starting point To review the route to the previous destination or starting point in fast forward mode To indicate the previous destination or start...

Страница 63: ...Depending on the conditions it may not be possible to select certain screen configura tion switches To display single map screen See page 53 To display dual map screen See page 54 To display compass mode screen See page 54 To display turn list screen See page 55 To display arrow screen See page 55 To display freeway information screen See page 55 To display intersection guidance screen or guidance...

Страница 64: ...tion of the map Touch the OK switch when you complete editing The screen returns to the dual map screen c Compass mode Information about the destination and current position as well as a compass is displayed on the screen The destination mark is displayed in the direc tion of the destination When driving refer to the longitude and latitude coordinates and the compass to make sure that your vehicle...

Страница 65: ... to the next corner f Freeway information screen This screen displays the distance to the next junction and exit or POIs in the vicinity of the freeway exit Map To display the selected map of the exit vicinity On the left side of the Map switch up to five POIs around the selected exit are dis played To scroll for farther junctions or exits To scroll for closer junctions or exits To scroll for the ...

Страница 66: ...ction guidance screen disappears and the map screen appears When touching the switch or pushing the MAP VOICE button the intersec tion guidance screen reappears INFORMATION Intersection guidance can be turned on or off See page 85 Guidance screen on freeway This screen automatically appears when the vehicle approaches a junction or exit on a freeway The distance to the junction or exit is shown at...

Страница 67: ...h this switch to display the follow ing screen 2 Touch the number switch of the des tination you wish to display The distance and the estimated travel time from the current position to the selected des tination are displayed Displayed while driving along the guidance route Displayed while driving off the guidance route The destination direction is indicated by an arrow INFORMATION When the vehicle...

Страница 68: ...te the foot print map display Touch the switch INFORMATION If the map or the current position is moved to the area which is not cov ered by the foot print map the screen scale automatically changes to 150 feet 50 m On the foot print map a one way street is displayed by It is not possible to perform scrolling on the foot print map one touch scroll while driving To display building information Infor...

Страница 69: ...ction arrow move the cursor to the position of the building you wish to display information 3 Touch the Building Info switch 4 Details of POIs in some buildings may be displayed If you wish to see detailed POI information touch the building name You can see the detail of the selected POIs ...

Страница 70: ...DESTINATION INPUT AND ROUTE GUIDANCE 05 4RUNNER NAVI_U L O 0408 60 ...

Страница 71: ...calibration 77 Distance unit 79 Estimated travel time 79 Auto reroute 81 Adjusting time zone 81 Auto voice guidance 82 Voice guidance in all modes 83 Notifying traffic restriction 84 Intersection guidance 85 Guidance screen on freeway 86 Street name on scroll map 87 Display of building shape 88 Screen layout function Function 89 POI category change Show POI Icons 90 Delete previous point 91 Map co...

Страница 72: ...d Guidance switch INFORMATION When you do not have route guidance the Suspend Guidance switch cannot be used The screen will return to the current posi tion map without route guidance To resume guidance You can resume the suspended route guidance Push the MENU button to display the Menu screen and touch the Resume Guidance switch The screen will change to the current posi tion map with route guida...

Страница 73: ...highlighted in green INFORMATION During route guidance the voice guid ance continues even if the navigation screen is changed to other screens Adaptive Volume Control If you turn the Adaptive Volume Control on the volume is turned up automatically when the vehicle speed exceeds 50 mph 80 km h To turn the Adaptive Volume Control system on touch the switch The indicator will be highlighted User sele...

Страница 74: ...ired User number The confirmation screen will appear To register touch the Yes switch To re turn to the previous screen touch the No or Back switch When you touch the switch already regis tered this screen appears To replace touch the Yes switch To cancel the re placement touch the No or Back switch ...

Страница 75: ...ush the MENU button to display the Menu screen Then touch the Select User switch Touch the User number switch you wish to change The above message appears then the map screen will be displayed To delete user Touch the Delete switch of User num ber you wish to delete ...

Страница 76: ...o return to the previous screen touch the No or Back switch My places You can register and keep your own memory points like restaurants sports fa cilities etc and use the memory points to input a destination a Registering memory points 1 Push the MENU button to display the Menu screen and touch the My Places switch ...

Страница 77: ...nput the desired point in the same way as inputting a destination See page 20 When you finish memory point registration the memory point data screen will appear You can set the icon attribute name location and phone number Touch the desired switch you want to set For details see b Editing memory points INFORMATION Up to 106 memory points can be regis tered ...

Страница 78: ...ry Points The screen lists the memory points Date Touch this switch to list the memory points in order of the registered date Icon Touch this switch to list the memory points in order of the icon type Name Touch this switch to list the memory points in alphabetical order Attribute Touch this switch to list the memory points in order of the home and quick access number Touch the desired memory poin...

Страница 79: ... display sound icons When your vehicle approaches the memory point the sound which you chose will sound Touch the desired sound icon The next screen appears when you touch the Bell with direction switch Touch the direction switches and adjust the direction Touch the Enter switch The bell sounds only when your vehicle ap proaches this point in the direction that you set ...

Страница 80: ...et the attrib ute of the memory points as Home or Quick access 1 to 5 Touch the desired attribute It is possible to replace a registered attribute To replace the attribute touch the Yes switch To return to the previous screen touch the No or Back switch To delete the attribute touch the Del switch ...

Страница 81: ...ntry has been completed touch the OK switch on the screen The previous screen will be displayed Show Name You can set the name of a memory point to be displayed or not on the map To show the name touch the On switch Not to show it touch the Off switch To change Location Touch the eight direction switch to move the cursor to the desired point on the map Touch the Enter switch and the previous scree...

Страница 82: ...eting memory points 1 Push the MENU button to display the Menu screen and touch the My Places switch 2 Touch the Delete switch of the Memory Points 3 Touch the corresponding switch To delete all memory points touch the De lete All switch For efficient memory point search memory points can be sorted by the Date Icon Name or Attribute switch To delete touch the Yes switch To cancel the deletion touc...

Страница 83: ...ing through the area to avoid a route passing through the area to avoid may be shown a Registering area to avoid 1 Touch the Register switch of the Areas to avoid 2 Enter the location in the same way as inputting a destination or display the map of the area you wish to avoid See page 20 INFORMATION Up to 10 locations can be registered as point area to avoid If there are 10 loca tions already regis...

Страница 84: ...ch to change the size of the area to avoid b Editing area to avoid 1 Touch the Edit switch of the Areas to Avoid to display the Edit Area to Avoid screen 2 To edit an area to avoid touch the cor responding switch 3 Touch the Name Location or Area Size switch on this screen ...

Страница 85: ...The avoid area name can be set to be dis played or not on the map To show the name touch the On switch Not to show it touch the Off switch To change Location Set the cursor to the desired location then touch the Enter switch The previous screen will be displayed To change Area size Touch either or switch to change the size of area you want to avoid and touch the OK switch The previous screen will ...

Страница 86: ...u screen touch the Setup switch Touch the items you wish to set 3 Touch the OK switch on the screen and then the previous screen will be dis played Default This switch initializes all of the set tings Calibration You can adjust the current ve hicle position mark manually Distance You can select km or miles as the distance unit Estimated Travel Time You can set the system to display the travel time...

Страница 87: ...et name on the map screen Show POI Icons You can choose 6 icons displayed on Show POI Icons top screen Previous Point You can delete the pre vious destination Map Color Day You can select the de sired map color Map Color Night You can select the de sired map color Screen Animation You can set some screen displays to be animated Current position calibration When driving the current vehicle position...

Страница 88: ...The tire change calibration function will be used when replacing the tires This func tion will adjust the mis calculation caused by the circumference difference between the old tires and new ones If this proce dure is not performed when tires are re placed the current vehicle position mark may be incorrectly displayed To perform a distance calibration procedure touch the Tire Change switch on the ...

Страница 89: ... Touch the Setup switch 3 Touch the km or miles switch of Distance to choose the distance unit The selected switch is highlighted in green 4 Touch the OK switch Estimated travel time You can set the speed that is used for the calculation of the estimated travel time 1 Push the MENU button ...

Страница 90: ...switch 5 When you finish setting the desired speeds touch the OK switch INFORMATION The displayed time to the destination is the approximate driving time that is calculated based on the speeds you selected and your actual position along the guidance route The time shown on the screen may vary greatly depending on your prog ress along the route which may be af fected by road conditions such as traf...

Страница 91: ...e is not available To turn the Auto Reroute mode on 1 Push the MENU button 2 Touch the Setup switch 3 Touch the On switch of Auto Reroute The selected switch is highlighted in green INFORMATION If your vehicle strays from the guidance route the system searches for a new route to the destination The new route may or may not take you back to the pre vious route depending on how far you are off the o...

Страница 92: ...e screen and the Setup screen will be displayed Auto voice guidance When the Auto Voice Guidance feature is turned on the voice guidance can be heard automatically When the Auto Voice Guidance feature is turned off the voice guidance can be heard only if you push the MAP VOICE button To turn the Auto Voice Guidance mode on 1 Push the MENU button 2 Touch the Setup switch Then touch switch to displa...

Страница 93: ...hen the Voice Guidance in All Modes feature is turned on you can hear the voice guidance in all modes When the Voice Guidance in All Modes feature is turned off voice guidance can not be heard when using the audio sys tem To turn the Voice Guidance in All Modes on 1 Push the MENU button 2 Touch the Setup switch Then touch switch to display page 2 of the Setup screen ...

Страница 94: ... the OK switch Notifying traffic restriction When the Notify Traffic Restriction fea ture is turned on the system notifies you of traffic or seasonal restrictions To turn the Notify Traffic Restriction mode on 1 Push the MENU button 2 Touch the Setup switch Then touch switch to display page 2 of the Setup screen ...

Страница 95: ...K switch Intersection guidance When the Intersection Guidance feature is turned on the system will display the in tersection guidance screen if you drive with route guidance To turn the Intersection Guidance mode on 1 Push the MENU button 2 Touch the Setup switch Then touch switch to display page 2 of the Setup screen ...

Страница 96: ...ance screen on freeway When the Guidance Screen on Freeway feature is turned on the system will dis play the lane guidance screen if you drive on a freeway with route guidance To turn the Guidance Screen on Free way mode on 1 Push the MENU button 2 Touch the Setup switch Then touch switch to display page 2 of the Setup screen ...

Страница 97: ...eet name on scroll map When the Street Name on Scroll Map feature is turned on the system will dis play the name of a street where the cursor is positioned on the scroll map To turn the Street Name on Scroll Map mode on 1 Push the MENU button 2 Touch the Setup switch Then touch switch twice to display page 3 of the Setup screen ...

Страница 98: ...f building shape When the Display Building Shape fea ture is turned on the system will display the building shape on the map screen us ing a scale of 150 feet 50 m to 300 feet 100 m To turn the Display Building Shape mode on 1 Push the MENU button 2 Touch the Setup switch Then touch switch twice to display page 3 of the Setup screen ...

Страница 99: ...t function Function You can set display or hide each switch and current street name on the map screen 1 Push the MENU button 2 Touch the Setup switch Then touch switch twice to display page 3 of the Setup screen 3 Touch the Change switch of the Function 4 Touch the switch corresponding to the desired setting Then touch the OK switch ...

Страница 100: ...isplayed on the Show POI Icons top screen so that you can easily set which icons to display on the map screen 1 Push the MENU button 2 Touch the Setup switch Then touch switch twice to display page 3 of the Setup screen 3 Touch the Change switch of Show POI Icons 4 Touch the category switch you wish to change ...

Страница 101: ...sponding to the desired category Then touch the OK switch Delete previous point You can delete your previous destination 1 Push the MENU button 2 Touch the Setup switch Then touch switch twice to display page 3 of the Setup screen 3 Touch the Delete switch of Pre vious Point ...

Страница 102: ...cient previous point search pre vious points can be sorted by the Date or Name switch 5 To delete the point touch the Yes switch To cancel the deletion touch the No switch Map color 1 Push the MENU button 2 Touch the Setup switch Then touch switch three times to display page 4 of the Setup screen ...

Страница 103: ... the default map color Screen animation When the Screen Animation feature is turned on some switches and screens be come animated e g change map guid ance on the map screen To turn the Screen Animation mode on 1 Push the MENU button 2 Touch the Setup switch Then touch switch three times to display page 4 of the Setup screen 3 Touch the On switch of Screen Animation and touch the OK switch ...

Страница 104: ...ADVANCED FUNCTIONS 05 4RUNNER NAVI_U L O 0408 94 ...

Страница 105: ...OTHER FUNCTIONS 05 4RUNNER NAVI_U L O 0408 95 OTHER FUNCTIONS Other functions Maintenance information 96 Calendar with memo 101 Screen adjustment 108 Screen setting 109 SECTION IV ...

Страница 106: ...te arrives or the driving distance reaches a pre determined set ting the Information screen will be dis played This screen will appear every time the system is turned on until you touch the Do not display this message again switch To prevent this information screen from being displayed again touch the Do not dis play this message again switch 1 Push the INFO button to display the Information Menu ...

Страница 107: ...s appear Delete All To cancel all conditions which have been inputted Reset All To reset the item which has sat isfied a condition Touch the Off switch at the top of the Maintenance screen to turn off the informa tion screen When your vehicle needs to be serviced the icon color will change to orange INFORMATION For scheduled maintenance informa tion please refer to the Scheduled Maintenance Guide ...

Страница 108: ...place ATF Scheduled maintenance Replace air filter Personal event a Register dealer You can register the dealer name staff location and phone number 1 Touch the Set Dealer switch on the Maintenance screen 2 Enter the location of the dealer in the same way as for destination input See page 20 ...

Страница 109: ...ation of the dealer If it is OK touch the Enter switch The screen changes to Edit Dealer screen See b Edit dealer b Edit dealer You can edit the dealer name staff loca tion and phone number 1 Touch the Set Dealer switch on the Maintenance screen The Edit Dealer screen appears 2 To edit touch the corresponding switch ...

Страница 110: ...input up to 24 letters After inputting touch the OK switch at the bottom right of the screen The previous screen will be displayed To edit Location Set the cursor to the desired point and touch the Enter switch on the screen To edit Phone telephone number Touch numeral keys After inputting touch the OK switch The previous screen will be displayed ...

Страница 111: ... on the Set Dealer screen The screen changes and displays the map location of the registered dealer and the Route Preference See Entering destination on page 38 Calendar with memo This system informs you of a memo entry At the specified date the memo informa tion will be displayed when the navigation system is in operation The memo infor mation screen will appear every time the system is turned on...

Страница 112: ...button Then touch the Calendar switch The current date is circled in yellow If the cur rent date is not displayed on the screen touch the Today switch to display the current month calendar a Inputting a memo 1 Touch the day you want to add a memo 2 To display the Memo screen touch the Add Memo switch ...

Страница 113: ...ter text up to 24 letters After entering the text touch the OK switch at the bottom right of the screen Location Touch the Location switch to set loca tion A screen similar to the destination input screen appears Input the same way as in putting a destination See page 20 You can add the memos up to 100 until December 31 2022 ...

Страница 114: ...UNNER NAVI_U L O 0408 104 The date inputted is marked as shown above You can choose the desired mark and or date color Mark color Touch the Mark switch Touch your desired color for the mark Date color Touch the Date switch ...

Страница 115: ...color touch the OK switch to display the previous screen b Adding a memo To add a memo touch the corresponding date The Memo screen appears on the dis play Touch the Add Memo switch See page 102 for inputting a memo You can add up to 100 memos c Deleting a memo Touch the corresponding date Touch the corresponding memo switch and then touch the Delete switch on the screen A message appears on the d...

Страница 116: ...NNER NAVI_U L O 0408 106 d Editing a memo To edit a memo touch the corresponding date and then touch the memo you wish to edit Touch the Memo or Location switch e Memo list 1 To list the memos you added touch the List switch ...

Страница 117: ... switch Touch the number keys After setting the period touch the OK switch The Memo list screen will be dis played You can set a period from January 1 2003 through December 31 2022 for searching To delete and or edit the memo touch the desired memo switch To delete all memos touch the Delete All switch A message appears on the display To delete touch the Yes switch To cancel the deletion touch the...

Страница 118: ... To display the Display screen push the DISPLAY button Contrast and brightness adjustment CONTRAST Strengthens the contrast of the screen CONTRAST Weakens the contrast of the screen BRIGHTNESS Brightens the screen BRIGHTNESS Darkens the screen After adjusting the screen touch the OK switch The screen goes off when you touch the SCREEN OFF switch To turn the dis play screen back on push any button ...

Страница 119: ...de with the headlight switch turned on this condition is memorized in the system even with the en gine turned off Screen setting 1 Push the INFO button to display the Information Menu screen 2 Touch the Screen Setting switch a Automatic transition You can select a function that enables au tomatic return to the navigation screen from the audio screen Select ON or OFF and then touch the OK switch ON...

Страница 120: ...OTHER FUNCTIONS 05 4RUNNER NAVI_U L O 0408 110 b Background color You can select a background color Select the desired background color and then touch the OK switch ...

Страница 121: ...AUDIO SYSTEM 05 4RUNNER NAVI_U L O 0408 111 AUDIO SYSTEM Audio system Quick reference 112 Using your audio system 113 Audio system operating hints 122 V SECTION V ...

Страница 122: ... to choose an AM sta tion For details see pages 114 and 116 4 FM button Push this button to choose an FM sta tion For details see pages 114 and 116 5 DISC button Push this button to turn the compact disc player on For details see pages 114 and 120 6 SCAN button Push this button to scan radio stations or the tracks on a compact disc For de tails see pages 117 and 121 7 OPEN button Push this button ...

Страница 123: ...of the basic fea tures of your audio system Some information may not pertain to your system Your audio system works when the ignition switch is in the ACC or ON position NOTICE To prevent the battery from being dis charged do not leave the audio system on longer than necessary when the en gine is not running a Turning the system on and off PWR VOL Push this knob to turn the audio system on and off...

Страница 124: ...ll be turned off when you eject the com pact disc If the other function was previously playing it will come on again The switches for radio and compact disc player operation are displayed on the function switch display screen when the audio control mode is selected Touch them lightly and directly on the screen The selected switch is highlighted in green or yellow INFORMATION If the system does not...

Страница 125: ...will display the sound control mode Ad just the tone and balance as follows To adjust the tone touch the or switch on the screen To adjust the bal ance between the front and rear speakers touch the FRONT or REAR switch on the screen and to adjust the balance be tween the left and right touch the L or R switch on the screen BASS Adjusts low pitched tones MID Adjusts mid pitched tones TREB Adjusts h...

Страница 126: ...el separation to prevent the weak signal from creating noise If the signal becomes extremely weak the radio switches from stereo to mono reception In this case ST disappears from the screen b Presetting a station 1 Tune in the desired station 2 Touch one of the switches 1 6 you want and hold it until a beep is heard This sets the station to the switch and the fre quency appears on the switch Each ...

Страница 127: ...uch the SCAN switch on the screen or push the SCAN button for longer than approximately a second P SCAN appears on the screen The radio will tune in the next preset station stay there for a few seconds and then move to the next preset station To select a station touch the SCAN switch or push the SCAN button again d Radio Data System Your audio system is equipped with Radio Data Systems RDS RDS mod...

Страница 128: ...est of the message When the system can show the station name RDS appears on the display Each time you touch the MSG switch indication on the dis play changes from the band to the station name to radio text in this order After six sec onds pass indication returns to the band e Traffic announcement TRAF switch A station that regularly broadcasts traffic in formation is automatically located When you...

Страница 129: ... played In this case CD CHECK appears on the screen CAUTION Do not place anything on the opened display as such items may be thrown about in the compartment and possi bly injure people in the vehicle during sudden braking or in an accident To reduce the chance of injury in case of an accident or sudden stop while driving keep the display closed Take care not to jam your hand while the display is m...

Страница 130: ...0 b Ejecting a compact disc To stop and eject the compact disc push the OPEN button to lower the display Push the DISC button c Playing a compact disc Push the DISC button if a compact disc is already loaded in the slot CD appears on the screen ...

Страница 131: ...e compact disc player will play the next track for 10 seconds then scan again To se lect a track touch the SCAN switch on the screen or push the SCAN button a second time If the player reaches the end of the disc it will continue scanning at track 1 After all the tracks are scanned in one pass normal play resumes f Other compact disc player functions RPT switch Use it for automatic repeat of the t...

Страница 132: ...oes not mean there is a problem with your radio it is just the normal result of conditions outside the vehicle For example nearby buildings and terrain can interfere with FM reception Power lines or telephone wires can interfere with AM sig nals And of course radio signals have a lim ited range The farther you are from a station the weaker its signal will be In addition re ception conditions chang...

Страница 133: ...h as high ten sion power lines lightening or electrical mo tors This results in static CARING FOR YOUR COMPACT DISC PLAYER AND DISCS Your compact disc player is intended for use with 12 cm 4 7 in discs only Extremely high temperatures can keep your compact disc player from working On hot days use the air conditioning to cool the vehicle interior before you listen to a disc Bumpy roads or other vib...

Страница 134: ...t translucent discs Low quality discs Labeled discs NOTICE Do not use special shaped transparent translucent low quality or labeled discs such as those shown in the illustrations The use of such discs may damage the player or changer or it may be impossi ble to eject the disc ...

Страница 135: ...skip or to repeat a section of a track To see a pin hole hold the disc up to the light Remove discs from the compact disc player when you are not listening to them Store them in their plastic cases away from moisture heat and direct sunlight To clean a compact disc Wipe it with a soft lint free cloth that has been dampened with water Wipe in a straight line from the center to the edge of the disc ...

Отзывы: