background image

85

DISC
By using this button, you can select a disc
you wish to listen to.
Push either side of the button until the
number of the disc you want to listen to
appears on the display. If you want to re-
turn to the beginning of the current disc,
push the down side of the button one time,
quickly.

Dolby 


 B

.

C NR*

If you are listening to a tape that was re-
corded with Dolby

 B or C Noise Reduc-

tion, push the button by the double-D
symbol until the appropriate symbol ap-
pears on the display. To turn off Dolby

NR, push the button until the symbol dis-
appears from the display.
The Dolby B NR mode reduces tape noise
by about 10 dB. The Dolby C NR mode re-
duces tape noise by another 10 dB, or
about 20 dB total. For best sound repro-
duction, select the same NR mode that
was used to record the tape.

*: Dolby noise reduction manufactured under license from Dolby Lab-
oratories Licensing Corporation. “DOLBY” and the double D symbol

 are trademarks of Dolby Laboratories Licensing Corporation.

Five EQ settings

EQ (Equalizer)

Your audio system can store five different
EQ settings in its memory so that you will
not need to readjust in every time you lis-
ten to a different program.
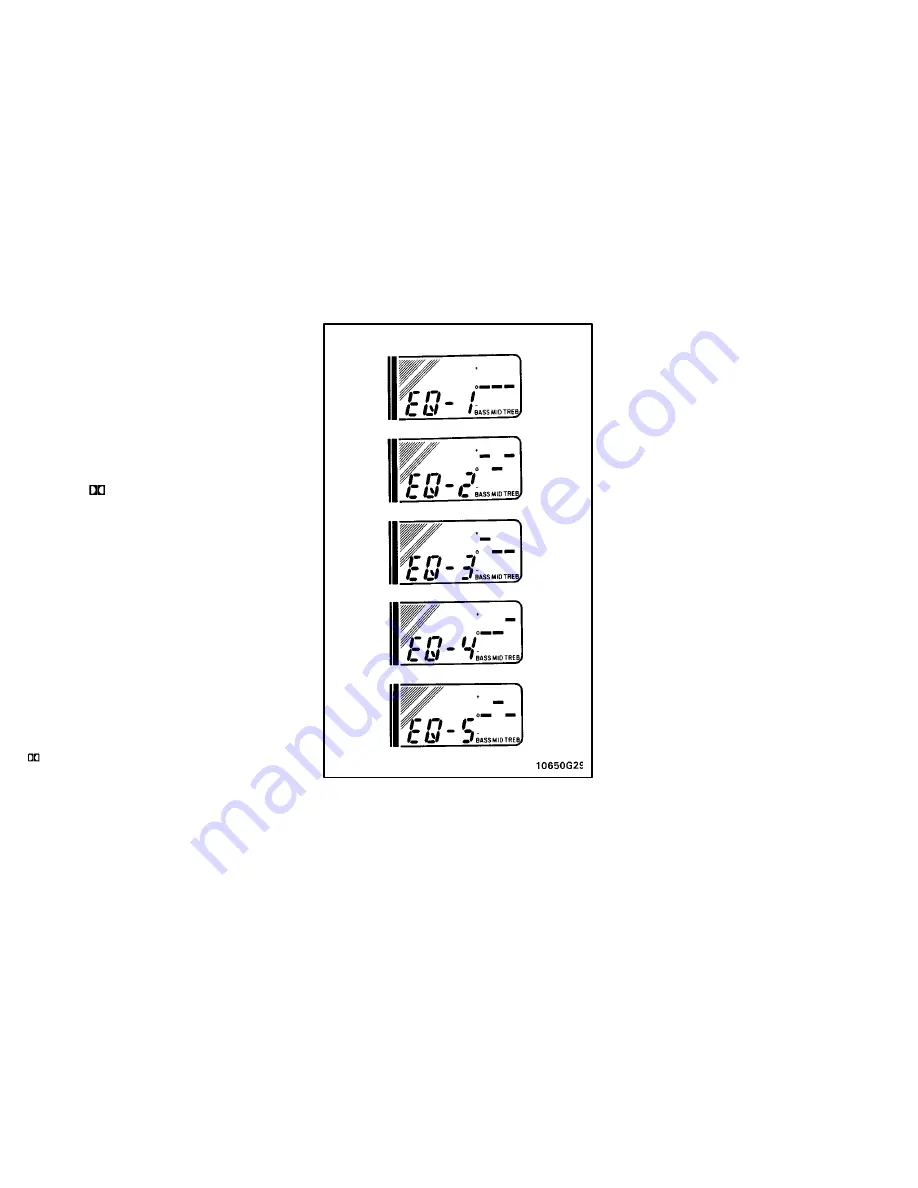
Five common settings are stored in the
system’s memory when it is manufac-
tured (see illustration).
To use a preset EQ setting: Push “EQ”.
The levels for the first setting and “EQ-1”
will appear on the display. Push “EQ” until
you reach the setting you want. The audio
system will adjust the program you are
hearing to the selected setting.
To change a preset EQ setting: Push “EQ”
until the setting you want to change ap-
pears on the display. Adjust the bass,
mid-range, and treble levels using the
“BASS/BAL”, “MID”, and “TREB/FADE”.
To save an EQ setting: After you have
changed a setting, push “EQ” until you
hear a beep. This will replace the original
factory setting with your new one.
To cancel one of the EQ settings you
saved: With the setting on the display,
push in and hold “EQ” until you have
heard both the first “save” beep and a sec-
ond beep that means the setting has been
canceled. The original factory setting will
appear on the display.

Содержание 1996 Avalon

Страница 1: ...Part 1 1 OPERATION OF INSTRUMENTS AND CONTROLS Chapter 1 1 Overview of instruments and controls Instrument panel overview Instrument cluster overview Indicator symbols on the instrument panel...

Страница 2: ...t 5 Center vents 6 Electric moon roof switch or front interior light and front personal lights 7 Power door lock switch 8 Power window switches 9 Seat heater switch 10 Glovebox 11 Automatic transmissi...

Страница 3: ...ng pattern selector button 5 Thermometer 6 Clock 7 Emergency flasher switch 8 Car audio 9 Miscellany box 10 Air conditioning controls 11 Ashtray and cigarette lighter 12 Rear window defogger switch 13...

Страница 4: ...e coolant temperature gauge 3 Tachometer 4 Speedometer 5 Odometer 6 Trip meter 7 Trip meter reset knob 8 Service reminder indicators or indicator lights 9 Theft deterrent system indicator light Instru...

Страница 5: ...ight 1 Seat belt reminder light 1 Discharge warning light 1 Low oil pressure warning light 1 Malfunction indicator lamp 1 Low fuel level warning light 1 Open door warning light 1 SRS airbag warning li...

Страница 6: ...e control indicator light 2 1 For details see Service reminder indicators and warn ing buzzers in Chapter 1 5 2 If this light flashes see Cruise control in Chapter 1 6 Automatic transmission indicator...

Страница 7: ...glovebox when you have your vehicle parked leave the subkey with the attendant Since the doors and trunk lid can be locked without a key you should always carry a spare master key in case you acci den...

Страница 8: ...will un lock the driver s door and twice in succession will unlock all the doors simul taneously LOCKING AND UNLOCKING WITH IN SIDE LOCK KNOB Move the lock knob To lock Push the knob forward To unlock...

Страница 9: ...ows you to lock a rear door so it can be opened from the outside only not from inside We recommend using this feature whenever small children are in the vehicle CAUTION Before driving be sure that the...

Страница 10: ...or if the key is in the ignition switch locking cannot be performed by the LOCK switch You have 30 seconds to open a door after using the wireless unlock feature If a door is not opened by then all t...

Страница 11: ...erates properly If the trans mitter still does not operate properly con tact your Toyota dealer MODEL FCC ID GQ43VT7T ISC 1470 K1361 MADE IN U S A This device complies with part 15 of the FCC rules Op...

Страница 12: ...then release it OPERATING THE PASSENGERS WIN DOWS Use the switches on the passengers doors The driver s door also has switches that control the passengers windows The window moves as long as you hold...

Страница 13: ...eave small children alone in the vehicle especially with the igni tion key still inserted They could use the power window switches and get trapped in a window Unat tended children can become in volved...

Страница 14: ...precautions in Part 2 for precautions to observe in load ing luggage To close the trunk lid lower it and press down on it After closing the trunk lid try pulling it up to make sure it is securely clos...

Страница 15: ...trunk lid try pulling it up to make sure it is securely locked To open the hood do the following 1 Pull the hood lock release lever The hood will spring up slightly 2 In front of the vehicle pull up o...

Страница 16: ...ood may be opened to prepare for the setting Be careful not to use the key or wireless remote control transmitter when opening any door This will cancel the system 4 After making sure the indicator li...

Страница 17: ...CELLING THE SYSTEM Unlock either front door with the key or wireless remote control transmitter This cancels the system completely and the starter circuit cut will be cancelled at once INDICATOR LIGHT...

Страница 18: ...the cap hang it on the cap hanger It is not unusual to hear a slight swoosh when the cap is opened When installing turn the cap clockwise till you hear a click If the cap is not tightened securely the...

Страница 19: ...of the UP side You may stop the moon roof at any de sired position The roof will move while the switch is being pushed and stop when re leased CAUTION To avoid serious personal injury you must do the...

Страница 20: ...20...

Страница 21: ...ady and severe inju ries can occur in the event of emergency braking or a collision Adjust the driver s seat so that the foot pedals steering wheel and instrument panel controls are within easy reach...

Страница 22: ...e seat belts provide maxi mum protection when the driver and the passenger are sitting up straight and well back in the seats If you are reclined the lap belt may slide past your hips and apply restra...

Страница 23: ...g under the lap belt during a collision avoid reclining the seatback any more than needed The seat belts provide maxi mum protection when the driver and the passenger are sitting up straight and well...

Страница 24: ...pull or push the head restraint The head restraint is most effective when it is close to your head Therefore using a cushion on the seatback is not recom mended CAUTION Adjust the top of the head res...

Страница 25: ...hat the belt lays across the shoulder Pregnant woman Toyota recommends the use of a seat belt Ask your doctor for specific recommendations The lap belt should be worn securely and as low as possible o...

Страница 26: ...hat the belt lays across the shoulder Pregnant woman Toyota recommends the use of a seat belt Ask your doctor for specific recommendations The lap belt should be worn securely and as low as possible o...

Страница 27: ...eve can be seen The warning label RE PLACE BELT will appear if the belt receives a severe impact or other force Adjust the seat as needed front seats only and sit up straight and well back in the seat...

Страница 28: ...ckle are locked and that the belt is not twisted Do not insert coins clips etc in the buckle as this may prevent you from properly latching the tab and buckle If the seat belt does not function normal...

Страница 29: ...lace the shoulder belt under your arm To release the belt press the buckle release button and allow the belt to re tract If the belt does not retract smoothly pull it out and check for kinks or twists...

Страница 30: ...adjust the belt position To shorten the belt pull the free end of the belt Position the lap belt as low as possible on your hips not on your waist then adjust it to a snug fit CAUTION High positioned...

Страница 31: ...ident increasing the chance of personal injury Never use the seat belt extender if you can fasten the seat belt with out it Remember that the extender pro vided for you may not be safe when used on a...

Страница 32: ...tection provided by the seat belts Vehicles with separate front seats The SRS airbags are designed to pro tect the driver and front passenger Vehicles with bench front seats The SRS airbags are design...

Страница 33: ...arable to an approxi mate 20 km h 14 mph collision when im pacting straight into a fixed barrier that does not move or deform If the severity of the impact is below the above threshold level the SRS a...

Страница 34: ...hen a chemical reaction in the inflators momentarily fills the air bags with non toxic nitrogen gas to help restrain the forward motion of the occu pants When the airbags inflate they produce a fairly...

Страница 35: ...their seat belts when driving For instructions and pre cautions concerning the seat belt system see Seat belts in this chapter A baby or small child who is too small to use a seat belt should be prope...

Страница 36: ...system in the rear seat For instruc tions concerning the installation of a child restraint system see Child restraint in this chapter Do not put objects on or in front of the dashboard or steering wh...

Страница 37: ...NOTICE This SRS airbag system has a service re minder indicator to inform the driver of op erating problems If either of the following conditions occurs this indicates a mal function of the airbags Co...

Страница 38: ...llustrations CAUTION After installing the child restraint system make sure it is secured in place If it is not restrained secure ly it may cause injury to the child in the event of a sudden stop or ac...

Страница 39: ...e child and front passenger in case of sudden braking or a collision If your driving position is not satis factory install the child restraint system at another position 1 Fasten the lap and shoulder...

Страница 40: ...child restraint system and allow it to retract To hold the child restraint system securely let the shoulder belt retract as far as it will go while firmly pushing down the child re straint system 4 If...

Страница 41: ...strap B TOP STRAP ANCHORS AND LOCA TIONS On the filler panel behind the rear seat a Using the illustration as a guide run your fingers across the trim of the filler panel itself to locate the position...

Страница 42: ...t system which re quires use of a top strap should only be installed in the rear seat CAUTION Do not use a rear facing child re straint system in the front seat be cause the force of the rapid infla t...

Страница 43: ...e buckle as this may prevent you from properly latching the tab and buckle If the seat belt does not function normally immediately contact your Toyota dealer 2 Fully extend the shoulder belt to put in...

Страница 44: ...child restraint system which re quires use of a top strap should only be installed in the rear seat When installing a child restraint system in the front seat center position move the driver and pass...

Страница 45: ...estraint system move the driver and passenger seats as far back as possible set both seat backs to the same angle as the back of the child restraint system set both seat cushions at the same height an...

Страница 46: ...irmly pushing down the child re straint system CAUTION Make sure the seat belt is securely locked Also make sure the child re straint system is secure by pushing and pulling it in different directions...

Страница 47: ...g After adjusting the steering wheel try moving it up and down to make sure it is locked in position Adjust the mirror so you can see the side of your vehicle in the mirror Be careful when judging the...

Страница 48: ...face Use a spray de icer to free the mirror To reduce glare from the headlights of the vehicle behind you during night driving operate the lever on the lower edge of the mirror Daylight driving Lever...

Страница 49: ...48...

Страница 50: ...oundings Manually twist the knob to the position 2 to turn on the headlights if they are need ed immediately when entering a dark tun nel parking structure etc The automatic light control sensor is on...

Страница 51: ...the lever away from you position 1 Pull the lever toward you position 2 for low beams The headlight high beam indicator light blue light on the instrument panel will tell you that the high beams are...

Страница 52: ...gine started even with the light switch in the OFF position They will not go off until the igni tion switch is turned off To turn on the other exterior lights and in strument panel lights twist the kn...

Страница 53: ...nel flash faster than normal a front or rear turn signal bulb is burned out To turn on the emergency flashers push the switch All the turn signal lights will flash To turn them off push the switch onc...

Страница 54: ...To turn on the interior light slide the switch The interior light switch has the following positions ON Keeps the light on all the time OFF Turns the light off DOOR Turns the light on when a door is o...

Страница 55: ...rn on the front personal lights push the switch To turn the lights off push the switch once again To turn on the rear personal light push the switch To turn the light off push the switch once again Fr...

Страница 56: ...ing time inter val when the wiper lever is in the intermit tent position position 1 Twist the band upward to increase the time between sweeps and downward to decrease it To squirt washer fluid push th...

Страница 57: ...e thin heater wires on the inside of the rear window will quickly clear the surface An indicator light will illuminate to indicate the defogger is operating Push the switch once again to turn the de f...

Страница 58: ...ll Needle at F Nearly empty Needle at E It is a good idea to keep the tank over 1 4 full This fuel gauge has a non return type needle which remains at the last indicated position when the ignition swi...

Страница 59: ...at in the engine cooling system as this may cause the engine to overheat The thermostat is designed to control the flow of coolant to keep the temperature of the engine within the specified operating...

Страница 60: ...o The black digits on white indicate tenths of kilometers or miles 3 Trip meter reset knob It resets the trip meter to zero To reset the trip meter push the knob Type A Type B The thermometer indicate...

Страница 61: ...mewhere in the brake system Check the fluid level of the see through reservoir To make sure the parking brake has not caused the warning light to come on check to see that the parking brake is fully r...

Страница 62: ...onally flicker when the engine is idling or it may come on brief ly after a hard stop There is no cause for concern if it then goes out when the en gine is accelerated slightly The light may come on w...

Страница 63: ...re in the parts monitored by the warning light system Contact your Toyota dealer as soon as possible to service the vehicle The light does not come on when the ignition key is turned to the ACC or ON...

Страница 64: ...s door a buzzer will remind you to remove the key LOCK Engine is off and the steer ing wheel is locked The key can be re moved only at this position You must push in the key to turn the key from ACC t...

Страница 65: ...ownshift the transmission by turning off the overdrive switch engine braking will not be applied because the cruise control is not cancelled For ways to decrease the vehicle speed see Cruise control i...

Страница 66: ...en if you downshift the transmission by turning off the overdrive switch engine braking will not be applied because the cruise control is not cancelled For ways to decrease the vehicle speed see Cruis...

Страница 67: ...will downshift to the third gear Shift into the 2 position The trans mission will downshift to the second gear when the vehicle speed drops down to or lower than the maximum al lowable speed for seco...

Страница 68: ...verdrive Always keep your foot on the brake pedal while stopped with the engine running This prevents the vehicle from creeping CAUTION NOTICE Do not hold the vehicle on an upgrade with the accelerato...

Страница 69: ...r hills a greater speed change will occur so it is better to drive without the cruise control To help maintain maximum con trol of your vehicle do not use the cruise control when driving in heavy or v...

Страница 70: ...mph below the preset speed the preset speed will also automatically cancel out If the preset speed automatically cancels out other than for the above cases have your vehicle checked by your Toyota de...

Страница 71: ...be resumed CRUISE CONTROL FAILURE WARNING If the CRUISE indicator light in the in strument cluster flashes when using the cruise control press the CRUISE ON OFF button to turn the system off and then...

Страница 72: ...and features CD Compact Disc Auto changer Anti theft system Car audio system operating hints Air conditioning system Controls Air flow selector settings Operating tips Instrumental panel vents Type 1...

Страница 73: ...gely determined by the mix of the treble mid range and bass levels In fact different kinds of music and vocal programs usually sound better with differ ent mixes of treble mid range and bass Balance A...

Страница 74: ...hanger see CD Compact Disc Auto changer The compact disc player will play from track 1 through to the end of the disc Then it will play from track 1 again Never try to disassemble or oil any part of t...

Страница 75: ...74 Details of specific buttons controls and features are described in the alphabetical listing that follows Using your audio system controls and features Type 1 1...

Страница 76: ...75 Details of specific buttons controls and features are described in the alphabetical listing that follows Type 1 2...

Страница 77: ...76 Details of specific buttons controls and features are described in the alphabetical listing that follows Type 1 3...

Страница 78: ...l be able to eject a cassette but you will not be able to reinsert it AM FM Push AM FM to switch between the AM and FM bands Types 1 1 and 1 2 AM or FM will ap pear on the display Type 1 3 AM or FM1 o...

Страница 79: ...as re corded with Dolby Noise Reduction push the button marked with the double D symbol The double D symbol will appear on the display Push the button again to turn off Dolby NR The Dolby NR mode redu...

Страница 80: ...R VOL to adjust the front rear balance REW FF Rewind Fast forward Push the FF side of the button to fast for ward a cassette tape FF will appear on the display Push the REW side to re wind a tape REW...

Страница 81: ...on the other side SKIP Type 1 3 only The skip feature allows you to fast forward past long stretches of blank tape This is especially useful at the end of cassettes Push SKIP SKIP will appear on the d...

Страница 82: ...TUNE to step up or down the station band If you hear a beep you held the button too long and the radio will go into the seek mode Seeking In the seek mode the radio finds and plays the next station up...

Страница 83: ...82 Button display for radio cassette tape player compact disc player Type 2...

Страница 84: ...e time and hold them in until you hear a beep Eject Button Push this button to eject a cassette After you turn the ignition to LOCK you will be able to eject a cassette or disc but you will not be abl...

Страница 85: ...act Disc Player If you want to fast forward or reverse through a compact disc track push and hold in the fast forward or reverse button When you release the button the compact disc player will resume...

Страница 86: ...oratories Licensing Corporation Five EQ settings EQ Equalizer Your audio system can store five different EQ settings in its memory so that you will not need to readjust in every time you lis ten to a...

Страница 87: ...aying or fast forwarding PWR VOL Power Volume Push PWR VOL to turn the audio sys tem on and off Turn PWR VOL to adjust the volume RAND Random The random feature allows you to listen to the tracks on a...

Страница 88: ...sc player will play the first track of the next disc for 10 sec onds then scan to the next disc To select a disc push SCAN a second time If the player has scanned all the discs it will stop scanning S...

Страница 89: ...o finds and plays the next station up or down the sta tion band To seek a station push and hold the or side of TUNE until you hear a beep Do this again to find another station The compact disc player...

Страница 90: ...ger 3 While pressing the lock release button on the magazine draw out a tray 4 Place a disc on the tray with its label face up and insert the tray into the slot The magazine can store 12 discs of 12 c...

Страница 91: ...er electrical ser vice is performed on your vehicle Choose a security code that is easy to re member and keep a copy of it not in your Toyota NOTICE If you pushed any wrong buttons on the anti theft s...

Страница 92: ...example 209 To set the first digit Push 1 until the digit you want appears on the display To set the second digit Push 2 until the digit you want appears on the display To set the third digit Push 3 u...

Страница 93: ...as been accepted turn the ignition to LOCK and then back to ACC SEC should appear on the display Choose a security code that is easy to re member and keep a copy of it not in your Toyota Changing the...

Страница 94: ...you want appears on the display To set the third digit Push 3 until the digit you want appears on the display 4 The three digit code should be on the display Push SCAN The display will read 5 Repeat...

Страница 95: ...ould appear on the display NOTICE A tenth error will activate the anti theft system and HELP will appear on the display The audio system will be completely inoperable At this time the anti theft light...

Страница 96: ...y Push SCAN The display will read 5 Wait for 10 seconds until the security system is deactivated and the display goes dark If you pushed any wrong buttons Err and the number of errors you have made wi...

Страница 97: ...have 10 seconds to enter each digit For example 209 To set the first digit Push 1 until the digit you want appears on the display To set the second digit Push 2 until the digit you want appears on th...

Страница 98: ...with your radio it is just the normal result of conditions outside the vehicle For example nearby buildings and terrain can interfere with FM reception Power lines or telephone wires can interfere wi...

Страница 99: ...quality cassette tapes can cause many problems including poor sound inconsistent playing speed and constant auto reversing They can also get stuck or tangled in the cas sette player Do not use a casse...

Страница 100: ...ree cloth that has been damp ened with water Wipe in a straight line from the center to the edge of the disc not in circles Dry it with another soft lint free cloth Do not use a conventional re cord c...

Страница 101: ...100 1 Fan Speed Selector 2 Temperature Selector 3 Air Flow Selector 4 Air Intake Selector 5 A C Button Air conditioning system Controls Type 1 Manual air conditioning controls...

Страница 102: ...101 1 AUTO Button 2 Fan Speed Selector 3 Temperature Selector 4 Air Flow Selector 5 Air Intake Selector 6 A C Button Type 2 Automatic air conditioning controls...

Страница 103: ...o adjust the fan speed unless you desire another fan speed mode Temperature selector Turn the knob to adjust the temperature to the right to warm to the left to cool Air flow selector Turn the knob ty...

Страница 104: ...em A C button To turn on the air conditioning press the A C button The A C button indicator will come on To turn the air conditioning off press the button again If the A C button indicator flashes the...

Страница 105: ...104 Air flow selector settings...

Страница 106: ...Press in the AUTO button Temperature To the desired temperature Air intake FRESH outside air Air conditioning OFF For manual operation Fan speed Any setting except OFF Temperature Towards WARM Air int...

Страница 107: ...nditioning ON For manual operation Fan speed Any setting except OFF Temperature Towards WARM to heat COLD to cool Air intake FRESH outside air Air flow WINDSHIELD Air conditioning ON On humid days do...

Страница 108: ...107 Side vents Lower vent If air flow control is not satisfactory check the instrument panel vents The instru ment panel vents may be opened or closed as shown Instrument panel vents...

Страница 109: ...108...

Страница 110: ...the minutes Push the M button If quick adjustment to a full hour is de sired push the 00 button For example if the 00 button is de pressed when the time is between 1 01 1 29 the time will change to 1...

Страница 111: ...re vent other cigarette butts from catching fire After using the ashtray push it back in completely To remove the ashtray pull the ashtray lid and pull it out To reduce the chance of injury in case of...

Страница 112: ...cup holder is designed for holding cups or drink cans fit snugly in its holes To use the cup holder push on the lid Do not place anything else on the cup holder as such items may be thrown about and...

Страница 113: ...not place anything else on the cup holder as such items may be thrown about and possibly injure people in the vehicle during sud den braking or an accident Keep the cup holder shut when not in use Do...

Страница 114: ...to avoid hard stops during the first 300 km 200 miles Do not drive for a long time at any single speed either fast or slow Do not tow a trailer during the first 800 km 500 miles FUEL TYPE Your new ve...

Страница 115: ...ixed with MTBE make certain that it does not contain more than 15 of MTBE If the use of gasolines containing MTBE causes poor driveability and or poor fuel economy you should discontinue the use of fu...

Страница 116: ...anything that might burn easily such as grass leaves paper or rags A large amount of unburned gases flowing into the three way catalytic converter may cause it to overheat and create a fire hazard To...

Страница 117: ...If you hit something or notice a change in the sound of the exhaust have the system checked immediately Do not run the engine in a garage or enclosed area except for the time needed to drive the vehic...

Страница 118: ...s consumed by high speed driv ing and frequent acceleration and decel eration A new engine consumes more oil since its pistons piston rings and cylinder walls have not become conditioned When judging...

Страница 119: ...ot drive your vehicle with only a single brake system Have your brakes fixed immediately BRAKE BOOSTER The brake booster uses engine vacuum to power assist the brakes If the engine should quit while y...

Страница 120: ...irmly Do not pump the brake The brake pedal pulsation caused by the anti lock brake system may indicate haz ardous road surface conditions Although the anti lock brake system assists in pro viding veh...

Страница 121: ...e worn to where replacement is required If you hear a squealing or scraping noise while driving have the brake pads checked and replaced by your Toyota dealer as soon as possible Expensive ro tor dama...

Страница 122: ...through the windshield from outside This is the primary identification number for your Toyota It is used in registering the ownership of your vehicle The vehicle identification number VIN is also on...

Страница 123: ...ake sure what kind of tires your ve hicle is originally equipped with 1 Summer tires Summer tires are high speed capability tires best suited to highway driving under dry conditions Since summer tires...

Страница 124: ...n tires on your vehicle as this can cause dangerous handling charac teristics resulting in loss of control Do not use tires other than the manufacturer s designated tires and never mix tires or wheels...

Страница 125: ...124...

Страница 126: ...l angle 3 Adjust inside and outside rear view mirrors 4 Lock all the doors 5 Fasten seat belts 1 Apply the parking brake firmly 2 Turn off unnecessary lights and acces sories 3 Put the selector lever...

Страница 127: ...OTICE If the engine becomes difficult to start or stalls frequently have the engine checked immediately Always slow down in gusty cross winds This will allow you much better control Drive slowly onto...

Страница 128: ...ility tires or not before driving at such speeds Do not continue normal driving when the brakes are wet If they are wet your vehicle will require a lon ger stopping distance and it may pull to one sid...

Страница 129: ...ire chains window scraper bag of sand or salt flares small shovel jump er cables etc Your vehicle is designed primarily as a passenger carrying vehicle Towing a trailer will have an adverse effect on...

Страница 130: ...front About 60 of the trailer load should be in the front half of the trailer and the re maining 40 in the rear HITCHES Use only a hitch which is recom mended by the hitch manufacturer and conforms t...

Страница 131: ...ions See your local recreational vehicle dealer or rental agency for the correct type of wiring and relays for your trail er Check for correct operation of the turn signals and stop lights each time y...

Страница 132: ...aces Avoid jerky starts or sudden accelera tion Avoid jerky steering and sharp turns The trailer could hit your vehicle in a tight turn Slow down before making a turn to avoid the necessity of sudden...

Страница 133: ...2 km h 45 mph may cause loss of control Slow down and downshift before descending steep or long down hill grades Do not make sudden downshifts Avoid holding the brake pedal down too long or too freque...

Страница 134: ...rough roads Improper alignment not only causes faster tire wear but also puts an extra load on the engine which in turn wastes fuel Keep the bottom of your vehicle free from mud etc This not only les...

Страница 135: ...134...

Страница 136: ...e interior light 3 If the light is out dim or goes out when the starter is cranked the battery is dis charged You may try jump starting See c Jump starting for further instructions If the light is O K...

Страница 137: ...mp starting and avoid spilling acid on your skin clothing or vehicle If you should accidentally get acid on yourself or in your eyes re move any contaminated clothing and flush the affected area with...

Страница 138: ...negative terminal on the booster battery d Connect the clamp at the other end of the negative black jumper cable to a sol id stationary unpainted metallic point of the vehicle with the discharged bat...

Страница 139: ...harder than usual CAUTION If your engine coolant temperature gauge indicates overheating if you experience a loss of power or if you hear a loud knocking or pinging noise the engine has probably overh...

Страница 140: ...checked as soon as possible at your Toyota dealer 1 Reduce your speed gradually keeping a straight line Move cautiously off the road to a safe place well away from the traffic Avoid stopping on the c...

Страница 141: ...irection 2 un til the jack is firmly secured to prevent it flying forward during a collision or sudden braking To remove the spare tire 1 Loosen the nut and remove it 2 Remove the spare tire cover 3 L...

Страница 142: ...for the front wheels or from the rear for the rear wheels Steel wheels Aluminum wheels 3 Remove the wheel ornament Pry off the wheel ornament using the bev eled end of the wheel nut wrench as shown D...

Страница 143: ...the correct jack point as shown Make sure the jack is positioned on a level and solid place 6 After making sure that no one is in the vehicle raise it high enough so that the spare tire can be instal...

Страница 144: ...sion on the mounting surfaces with a wire brush or such Installation of wheels without good metal to metal contact at the mounting surface can cause wheel nuts to loosen and eventually cause a wheel t...

Страница 145: ...curely engaged over the nut Tighten each nut a little at a time in the or der shown Repeat the process until all the nuts are tight Steel wheels Aluminum wheels 10 Reinstall the wheel ornament 1 Put t...

Страница 146: ...sibility of personal injury during a collision or sudden braking CAUTION If towing is necessary we recommend you have it done by your Toyota dealer or a commercial tow truck service Proper equipment w...

Страница 147: ...the front wheels NOTICE Never tow from the rear with the front wheels on the ground as this may cause serious damage to the transmission c Towing with sling type truck NOTICE Do not tow with sling typ...

Страница 148: ...e brakes and steering will not work so steering and braking will be much harder than usual If you cannot shift the selector lever out of P position to other positions even though the brake pedal is de...

Страница 149: ...the cover 6 Start the engine For your safety keep the brake pedal depressed Be sure to have the system checked by your Toyota dealer as soon as possible Many Toyota dealers can make a new key if you...

Страница 150: ...er you can purchase a new one at your Toyota dealer You can use the wireless remote control system with the new transmitter Contact your Toyota dealer for detailed informa tion If you lose your wirele...

Страница 151: ...150...

Страница 152: ...cle for an extended period of time may cause corrosion even though other parts of the vehicle may be dry High temperatures will cause corro sion to those components of the ve hicle which are prevented...

Страница 153: ...ated to resist corrosion Your Toyota dealer will be happy to assist in supplying and instal ling the shields if they are recommended for your area Do not park your vehicle in a damp poorly ventilated...

Страница 154: ...d precau tions Be sure to polish and wax the chrome trim as well as the paint 3 Wax the vehicle again when water does not bead but remains on the surface in large patches Always remove the plastic bum...

Страница 155: ...eaning Soak a clean soft cloth in water or luke warm water then lightly wipe off any dirt Do not use organic substances solvents kerosene alcohol gas oline etc or alkaline or acidic solutions These ch...

Страница 156: ...r surface to harden and shrink Keep your ve hicle in a shaded area especially in the summer The interior of your vehicle is apt to heat up on hot summer days so avoid placing on the upholstery items m...

Страница 157: ...156...

Страница 158: ...owner s responsibility to insure that the general maintenance items are performed regularly These checks or inspections can be done either by yourself or a qualified technician or if you prefer your...

Страница 159: ...a few basic automotive tools Simple instructions for how to per form them are presented in Part 7 If you are a skilled do it yourself me chanic the Toyota service manuals are recommended Please be awa...

Страница 160: ...t for changes in steering condition such as hard steering or strange noise Seats Check that all front seat controls such as seat adjusters seatback recliner etc op erate smoothly and that all latches...

Страница 161: ...di ately See engine exhaust cautions in Part 2 Be on the alert for changes in perfor mance sounds and visual tip offs that in dicate service is needed Some important clues are as follows Engine missin...

Страница 162: ...Part 7 161 DO IT YOURSELF MAINTENANCE Chapter 7 1 Introduction Engine compartment overview Fuse locations Do it yourself service precautions Parts and tools...

Страница 163: ...Power steering fluid reservoir 3 Engine oil filler cap 4 Brake fluid reservoir 5 Fuse blocks 6 Battery 7 Engine cooling fans 8 Engine oil level dipstick 9 Windshield washer and headlight cleaner fluid...

Страница 164: ...163 Canada only Fuse locations...

Страница 165: ...cidental injury Here are a few precautions that you should be especially careful to observe When the engine is running keep hands clothing and tools away from the moving fan and engine drive belts Rem...

Страница 166: ...ation for informa tion concerning recycling or dis posal Remember that battery and igni tion cables carry high currents or voltages Be careful of accidental ly causing a short circuit Add only deminer...

Страница 167: ...fluid Parts if level is low Automatic transmission fluid DEX RON II or III Tools Rag or paper towel Funnel only for adding fluid Checking battery condition Non maintenance batteries Tools Warm water B...

Страница 168: ...Reinsert the dipstick push it in as far as it will go or the reading will not be cor rect 4 Pull the dipstick out and look at the oil level on the end CAUTION Be careful not to touch the hot exhaust...

Страница 169: ...re added to some oil containers to help you select the oil you should use The API Service Symbol is located any where on the outside of the container The top portion of the label shows the oil quality...

Страница 170: ...Coolant type selection Your coolant must contain ethylene gly col antifreeze In addition to preventing freezing and subsequent damage to the engine this will also prevent corrosion Further supplementa...

Страница 171: ...icle has been driven around 80 km h 50 mph for 20 minutes a little more in frigid temperatures the fluid is hot 60 C 80 C or 140 F 175 F You may also check the level when the fluid is cold about room...

Страница 172: ...mage from road hazards If a tire frequently needs refilling have it checked by your Toyota dealer The following instructions for check ing tire pressure should be observed The pressure should be check...

Страница 173: ...rate with age even if they have never or seldom been used This also applies to the spare tire and tires stored for future use REPLACING YOUR TIRES When replacing a tire use only the same size and cons...

Страница 174: ...ll wheels Installing snow tires on the front wheels only can lead to an excessive difference in road grip capability between the front and rear tires which could cause loss of vehicle control When sto...

Страница 175: ...er calibration stopping ability headlight aim bumper height vehicle ground clearance and tire or snow chain clearance to the body and chassis Replacement with used wheels is not rec ommended as they m...

Страница 176: ...bat tery EMERGENCY MEASURES If electrolyte gets in your eyes flush your eyes with clean water for at least 15 minutes and get im mediate medical attention If pos sible continue to apply water with a...

Страница 177: ...e When checking the battery re move the ground cable from the negative terminal mark first and reinstall it last Be careful not to cause a short cir cuit with tools Take care no solution gets into the...

Страница 178: ...ondition by the hydrometer color Maintenance type battery Hydrometer color Condition Type A Type B Condition GREEN BLUE Good DARK WHITE Charging necessary Have battery checked by your Toyota dealer CL...

Страница 179: ...lugs 2 If recharging with the battery installed on the vehicle be sure to disconnect the ground cable 3 Be sure the power switch on the re charger is off when connecting the char ger cables to the bat...

Страница 180: ...od If the fuse has blown push a new fuse into the clip Only install a fuse with the amperage rat ing designated on the fuse box lid If you do not have a spare fuse in an emergency you can pull out the...

Страница 181: ...tute because it may damage your vehicle s paint The following illustrations show how to gain access to the bulbs When replacing a bulb make sure the ignition switch and light switch are off Use bulbs...

Страница 182: ...light 8 E Front personal lights 8 C Rear personal lights 8 C Glovebox light 1 2 D Door courtesy lights 194 5 D Trunk light 3 E A HB4 halogen bulbs B HB3 halogen bulbs C Single end bulbs D Wedge base...

Страница 183: ...a new bulb and the connec tor into the mounting hole Aiming is not necessary after replacing the bulb When aiming adjustment is nec essary contact your Toyota dealer Use a Phillips head screwdriver P...

Страница 184: ...183 Remove the front side marker unit Use a Phillips head screwdriver Use a Phillips head screwdriver Front turn signal lights Front side marker lights...

Страница 185: ...184 a Rear turn signal light b Stop and tail light c Back up light Rear turn signal stop and tail and back up lights...

Страница 186: ...185 Use a Phillips head screwdriver Removing cover clips Installing cover clips License plate lights...

Страница 187: ...186 High mounted stoplight type A High mounted stoplight type B...

Страница 188: ...187...

Страница 189: ...188...

Страница 190: ...all height mm in Wheelbase mm in Front tread mm in Rear tread mm in Vehicle capacity weight occupants luggage kg lb 4830 190 1 1785 70 2 1425 56 1 1 1440 56 7 2 2720 107 0 1550 61 0 1525 60 0 410 904...

Страница 191: ...higher is recommended Fuel tank capacity L gal Imp gal 70 18 5 15 4 ENGINE Valve clearance engine cold mm in Intake 0 15 0 25 0 006 0 010 Exhaust 0 25 0 35 0 010 0 014 Spark plug type NIPPONDENSO PK20...

Страница 192: ...Charging Rates Non maintenance battery 5 A max Maintenance type battery Quick charge 15 A max Slow charge 5 A max AUTOMATIC TRANSAXLE Automatic transmission Fluid capacity drain and refill L qt Imp qt...

Страница 193: ...diagno sis system 5 OBD 7 5 A On board diagnosis system 6 HAZ 10 A Turn signal lights emer gency flasher Engine compartment Canada 7 DOME 7 5 A Interior light personal light vanity mirror light door c...

Страница 194: ...m 25 SEAT HEATER 20 A Seat heater 26 TURN 7 5 A Turn signal lights emer gency flasher 27 ECU IG 10 A Cruise control system anti lock brake system shift lock system power antenna power door lock system...

Страница 195: ...deterrent system outside rear view mirror control system Audio system service reminder indicators 35 HEATER 10 A Air conditioning con trol system rear window defogger starter system 36 STARTER 5 A Sta...

Страница 196: ...Motor Sales U S A Inc Toll free 1 800 331 4331 If NHTSA receives similar complaints it may open an investigation and if it finds that a safety defect exists in a group of vehicles it may order a reca...

Страница 197: ...lowest are A B and C and they represent the tire s ability to stop on wet pavement as measured under controlled conditions on specified govern ment test surfaces of asphalt and con crete A tire marked...

Страница 198: ...u may require Please leave this Owner s Manual in this vehicle at the time of resale The next owner will need this information also All information and specifications in this manual are current at the...

Страница 199: ...ner s Manual Supplement Mainte nance Schedule Accessories spare parts and modification of your Toyota A wide variety of non genuine spare parts and acces sories for Toyota vehicles are currently avail...

Страница 200: ...ltiport fuel injection system cruise control system antilock brake system and SRS airbag system be sure to check with your Toyota dealer for precautionary mea sures or special instructions regarding i...

Страница 201: ......

Страница 202: ...197 Gas station information Fuel type UNLEADED GASOLINE Research Octane Number 91 Octane Rating 87 or higher For improved vehicle performance the use of premium unleaded gasoline with a Research Octa...

Отзывы: