Figure 28: Removing front burner tray screws.
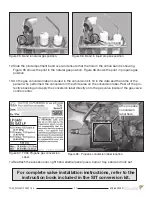
Orifice
Pilot gas line
Air shutter
Pilot assy.
bracket
Figure 29: Underside of burner.
Figure 30: Orifice.
15
TC30_NG04D 200317-24
5056.42904D
6. Remove the 2 front and 1 rear screws holding the burner tray in place (Figure 28).
7. Gently lift up the burner tray from its supports while sliding it to the left to disengage the burner
tube from the orifice. Lift the tray, turn it on its side and lay it on its edge to expose the orifice and
the pilot assembly (Figure 29). Remove the pilot assembly bracket with its wires and pilot gas line
attached while the burner kit is on its side (See “Figure 33” on page 16).
8. Using a 1/2” wrench, undo the natural gas burner orifice (Figure 29) and replace with the pro-
pane gas orifice that comes with the conversion kit (Figure 30). Apply a small amount of pipe joint
compound to the threads of the propane burner orifice to ensure a good seal, before screwing it
into the fitting.
Figure 31: Air shutter fully closed for natural gas.
Содержание TC30.NG04D
Страница 21: ...21 TC30_NG04D 200317 24 5056 42904D ...
Страница 22: ...TC30_NG04D 200317 24 5056 42904D 22 ...
Страница 23: ...23 TC30_NG04D 200317 24 5056 42904D ...


