Tower Hobbies T16008 Скачать руководство пользователя страница 11

Safety and Instruction Manual

11

Helpline: +44 (0) 333 220 6066 

Making Yoghurt

1.  Firstly boil the required amount of milk, 

and then allow to cool to below 40

o

C, add 

cooled milk and natural yoghurt to the 
cook pot.

2.  Place the lid on to the unit and make sure 

the steam valve is in the closed position. 
Select the Yoghurt function then press 
start, there is no warm up cycle for this 
function.

3.  Once the cycle has completed 3 beeps 

will sound, release any built steam, then 
turn your lid anti-clockwise to open. Place 
yoghurt in to desired receptacles and 
refrigerate, yoghurt will stiffen once cooled.

Cooking Cake

1.  Fill the cooking pot to 1⁄5 with water, place 

the steam rack in to the cooking pot, put 
the required amount of cake mix in to the 
receptacle that you are going to cook in.

2.  Place this on to the steam rack, cover with 

lid and close, also close the steam vent.

3.  Select the cake function by continuously 

pressing the menu button until you 
reach the cake cycle, adjust time where 
necessary, then press the start button, 
once the warming cycle reaches the 
set temperature, your cooking cycle will 
proceed.

4.  Once the cycle is complete you will hear 

3 bleeps, release the steam by turning the 
steam valve clockwise, once the steam 
has released and your Digital Pressure 
Cooker & Smoker has de-pressurised 
you may open the lid by turning it anti-
clockwise. Remove the cake and place on 
a cooling rack, before serving.

Cooking Fish

1.  Fill the cooking pot to the minimum 1⁄5 

level with water, insert the steam rack in 
to the pot securing on to the built in ridge, 
place your fish on to the steam rack and 
season to taste.

2.  Place the lid on to the unit and turn 

clockwise to close, make sure the steam 
vent is in the closed position, with the 
circle facing the arrow.

3.  Press the menu button until you reach the 

Fish function, amend time if required, then 
press Start. The Digital Pressure Cooker 
& Smoker will then go in to the warm up 
cycle, once temperature has reached, the 
cooking cycle will commence.

4.  Once complete you will hear 3 beeps, 

release the built up steam by turning the 
steam vent to the open position and wait 
until steam has finished releasing.

5.  Turn the lid anti-clockwise to open the 

cooker, carefully remove your cooked fish 
from the steam rack and serve.
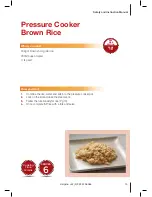
Cooking Pulses

1.  Firstly wash your required pulses, follow 

instructions on the packet for the amount 
of water required to the amount of chosen 
pulse, and place both the water and pulse 
in to the cooking pot, close lid and steam 
valve.

2.  Select the Pulses function by pressing 

the menu button, adjust time if required, 
then press the Start button, the warm 
up procedure will start, once the correct 
temperature has been reached the 
cooking process will begin.

3.  When complete you will hear 3 beeps, 

the keep warm function will automatically 
commence, if you do not require this then 
press cancel.

4.  Remove your pulse and use as required.

Содержание T16008

Страница 1: ...6 Litre Digital Pressure Cooker Smoker Safety and Instruction Manual PLEASE READ CAREFULLY T16008 Subject to registering Your Extended Guarantee online at www towerhouswares co uk ...

Страница 2: ...iful inexpensive untarnishable Plate at prices all can afford to pay 1961 Tower became one of the largest manufacturers of aluminium holloware electric kettles tea pots and other household articles with over 1 000 employees 1974 Russell Hobbs took ownership of the expanding Tower brand Infusing great flavours If you love authentic smoked barbecue flavours you will adore the Tower 6 Litre Digital P...

Страница 3: ...hentic BBQ flavours Also suitable for steaming rice cooking etc Foods retain more nutrients vitamins and minerals and are more tasty Saves energy as cooking is done in just one container on one heat source Saves time when cooking cooking can be up to 70 faster Less washing up is required as only one cooking pot is used and the pressure cooker lid eliminates splashes and boil overs Contents 1 Speci...

Страница 4: ...eal 1 Safety Lock Override Pin not shown 2 Digital Pressure Cooker and Smoker 3 Steam Release Valve 4 Control Panel 5 Cook Pot 6 Smoke Pot 7 Water Catch Pot 8 Smoking Rack 9 Wood Chips 10 Smoke Box and Lid 11 Smoking rack shelves 12 Rice Spoon 13 Measuring Cup 14 Steam Rack 1 SPECIFICATIONS C ontrol Panel Displ a y S t eam Release Val v e 2 1 5 6 7 8 9 10 11 12 13 14 3 4 ...

Страница 5: ... ring and steam release valve are guaranteed for 1 year from date of purchase The main body and lid are guaranteed for the extended free warranty subject to registration If any defect arises due to faulty materials of workmanship the faulty products must be returned to the place of purchase Refund or replacement is at the discretion of the retailer The gasket lid sealing ring should be checked reg...

Страница 6: ...wall socket then remove the plug from the socket when not in use or before cleaning Switch off and unplug before fitting or removing tools attachments after use and before cleaning Close supervision is necessary when any appliance is used by or near children Children should not play with the appliance This appliance can be used by children aged from 8 years and above and persons with reduced physi...

Страница 7: ...or other cereals rice split peas noodles macaroni rhubarb or spaghetti Always check the pressure release devices for clogging before use rinse the steam valve under warm water to release any debris obstructing the vent Always check inside the lid underneath the steam vent for any unwanted food clogging Do not open the Digital Pressure Cooker Smoker until the unit has cooled and internal pressure h...

Страница 8: ...uired cooking function on the control panel 7 Once cooking has finished turn the steam release valve to release pressure Once the pressure has dropped the safety valve located on the rear of the lid will release 8 Turn the handle anti clockwise to remove the lid Smoking 1 Place your Digital Pressure Cooker Smoker on a stable heat resistant surface 2 Connect power lead to the base of the Digital Pr...

Страница 9: ... function you can do this by pressing the Hours and Minutes buttons this will then increase or decrease your cooking time in minutes Once you have selected your function press the start button this will then go into warming up mode once the Digital Pressure Cooker Smoker has reached the set temperature the cooking time will start If you wish to pre set the Digital Pressure Cooker Smoker as to dela...

Страница 10: ...ise to open your rice is now ready to serve Cooking Chicken 1 Place your chicken in to the Digital Pressure Cooker Smoker if browning is required firstly do this by adding a little oil and select your browning function and press start with the lid off toss your chicken around inside the cooking pot while going through the warming up cycle this will brown the chicken 2 Add the 225ml of chicken stoc...

Страница 11: ...lockwise Remove the cake and place on a cooling rack before serving Cooking Fish 1 Fill the cooking pot to the minimum 1 5 level with water insert the steam rack in to the pot securing on to the built in ridge place your fish on to the steam rack and season to taste 2 Place the lid on to the unit and turn clockwise to close make sure the steam vent is in the closed position with the circle facing ...

Страница 12: ... and press start add meat and toss in cooking pot once you are happy with the colour add stock and other ingredients if required close lid and steam valve 2 Select meat function Amend cooking time as required once Digital Pressure Cooker Smoker has pressurised cooking function will commence 3 When complete you will hear 3 beeps keep warm cycle will start if not required press cancel Turn steam val...

Страница 13: ...rature the hot smoke cycle will start 5 Once the cooking time has finished you will hear 3 beeps release any built up steam by turning the steam release valve to the open position once all steam is released carefully open the lid Using oven gloves carefully remove the cooking rack and serve Cold Smoking 1 Firstly place the smoking pot in to the main unit making sure to align these correctly follow...

Страница 14: ...nctions and a 24 hour keep warm function perfect for those with a busy lifestyle that need their kitchen to fit around them We have created these fab recipes for you to get started so don t be afraid and dive on in and experiment Tips Season the meat with a dry rub like sugar or herbs This process removes odours dust and solvents while preparing the smoker to cook food Before cooking with an elect...

Страница 15: ...n short grain rice 280ml cups of water tsp salt How you do it 1 Combine the rice water and salt in to the pressure cooker pot 2 Lock on the lid and close the steam vent 3 Follow the functionality for rice Pg 10 4 Once complete fluff rice with a fork and serve Cooking Time 12 mins SERVES 6 SEE RICE SECTION PAGE 10 ...

Страница 16: ...ou do it 1 Pour the chicken broth into the main cooking pot of the pressure cooker 2 Season the chicken with salt and pepper and place into the pot as well 3 Take both bag s of the frozen vegetable mix and toss it into the pot Follow the function for chicken on pg 10 Extending your cooking time to 30 minutes Press Start 4 Prepare rice mashed potatoes spaghetti or other pasta to serve with the chic...

Страница 17: ...g chopped tomatoes 1 litre low salt beef stock 220g frozen green peas or green beans 220g ounces frozen corn How you do it 1 Firstly seal and brown the meat in 2 tbsp of vegetable oil seasoned with tsp of salt and pepper 2 Add this to the pressure cooker and then add the vegetables 3 Now add the stock and top up to 4 5 line with water 4 Follow the soup function described on pg 10 and increase the ...

Страница 18: ...salmon fillet with canola oil on both sides 4 Place salmon skin side down side by side on the steamer rack Do not stack salmon on top of each other and place vegetables around the salmon Close and lock in the lid And close the steam vent start the steam process by following the steam function increase or decrease the cooking time for your own preferred taste 5 Once the steam function is complete t...

Страница 19: ...than half full Start your porridge function For steel cut oats increase the cooking time by several minutes and add more water 2 When the pressure cooker timer goes off use tongs to force pressure release When the unit unlocks the lid remove it holding the back edge up at an angle so any hot water there drops back into the pot 3 Turn the pressure cooker off and remove the inner pot from the unit O...

Страница 20: ...he cooking pot place chops in to pot and brown on both sides 2 Add onion and toss round for 2 minutes add carrots and potatoes and stock 3 Place lid on top and close also close the steam vent once pressure cooker has reached temperature cooking will commence 4 Once complete you will hear 3 beeps keep warm function will start if not required press cancel 5 Release steam pressure by turning steam va...

Страница 21: ...ual ribs 2 Add any flavouring to the ribs as required 3 Follow directions for hot smoking from the functionality page 12 4 We recommend cooking time to be adjusted to 60 minutes and the amount of wood chips between 4 and 6 this may vary to own personal taste 5 Once your cooking cycle is complete remove your spare ribs and serve SEE HOT SMOKE SECTION PAGE 12 Cooking Time 60 mins ...

Страница 22: ...each refrigerated temperature 2 Remove cheese and cut into required sizes 3 Follow directions for cold smoking on page 13 4 We recommend smoking time to be 10 minutes and the amount of wood chips between 4 and 6 this may vary to your own personal taste 5 Once complete remove cheese from smoke pot and allow to dry 6 Place cheese in to a sealed bag and refrigerate Cooking Time 10mins SEE COLDSMOKE S...

Страница 23: ...isen with the pressure switch below the cook pot ensure that the pressure switch is engaged Air escapes from the rim of the lid There may be food residue on the sealing ring or the sealing ring may be worn out Remove the lid and check the sealing ring it may need cleaning or replacing Error code E1 shows If this code shows it means that there is a broken circuit Please return the product Error cod...

Страница 24: ... cool down before cleaning Do not immerse the base unit of the appliance in water and make sure no water enters the appliance Clean the base unit by wiping it with a damp cloth A little detergent can be added if the appliance is heavily soiled Do not use scouring pads steel wool or any form of strong solvents or abrasive cleaning agents to clean the appliance as they may damage the outside surface...

Страница 25: ...ked On no account must either the brown or the blue wire be connected to the EARTH terminal Always ensure that the cord grip is fastened correctly The plug must be fitted with a fuse of the same rating already fitted and conforming to BS 1362 and be ASTA approved If in doubt consult a qualified electrician who will be pleased to do this for you Non Rewireable Mains Plug If your appliance is suppli...

Страница 26: ...tandard one year guarantee is only extended to the maximum available for each particular product upon registration of the product within 28 days of purchase If you do not register the product with us within the 28 day period your product is guaranteed for 1 year only To validate your extended warranty please visit www towerhousewares co uk and register with us online Alternatively call our custome...

Страница 27: ...Safety and Instruction Manual 27 Helpline 44 0 333 220 6066 10 YOUR RECEIPT Affix your store receipt to this page for safe keeping ...

Страница 28: ...rantee register your appliance online by visiting www towerhousewares co uk Should you have a problem with your appliance or need any spare parts please call our Service Department on 44 0 333 220 6066 great british design innovation and excellence since 1912 1015 V3 Your warranty becomes void should you decide to use non Tower spare parts Spare parts can be purchased from www towerhousewares co u...

Отзывы: