background image

Virtuo Floor Stand Guide

Installing the Virtuo Floor Stand
Installing and Connecting the Floor Stand Acoustics

24

Installing and Connecting the Floor Stand Acoustics

Installing the Floor Stand acoustics consists of the following:

 - Removing the rear panel

 - Mounting and wiring the satellite speakers

 - Re-attaching the rear panel

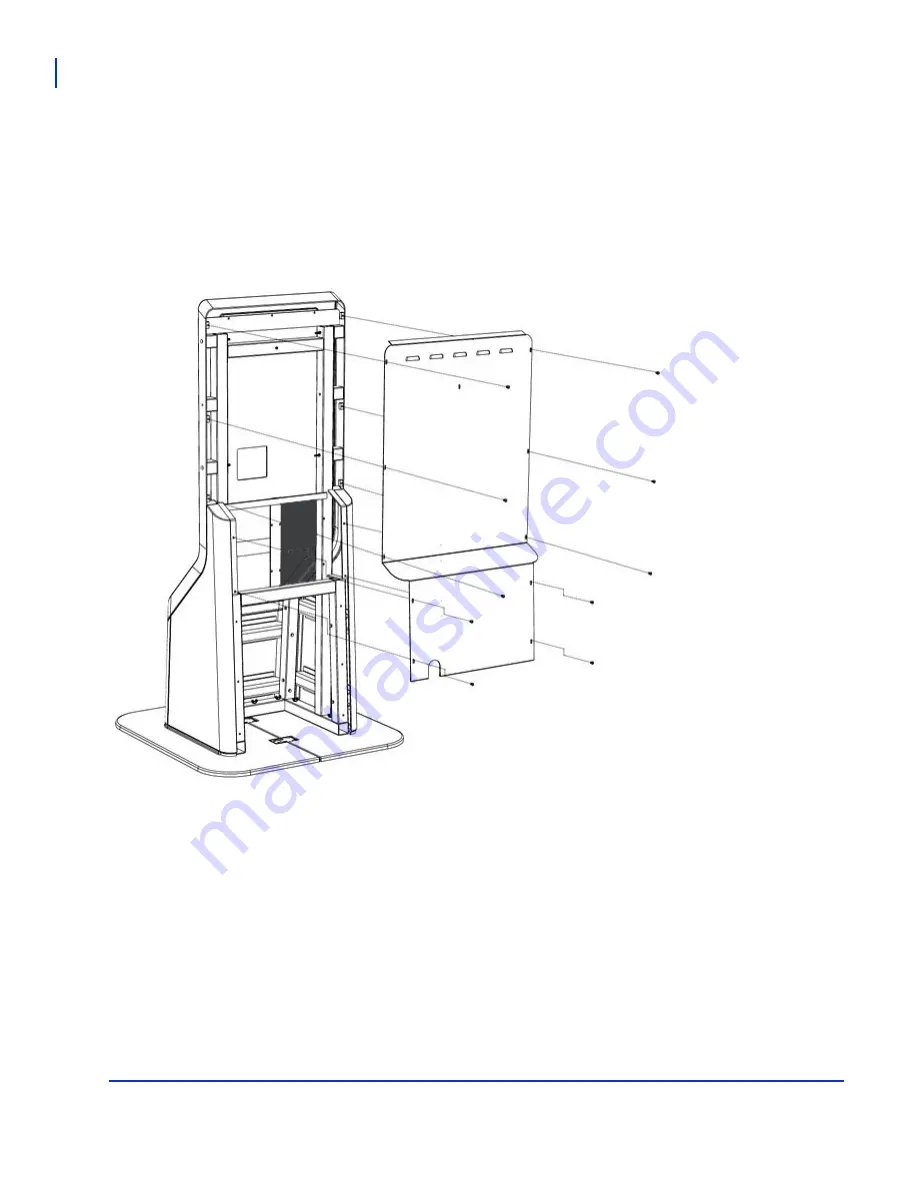
Removing the Floor Stand Rear Panel

Remove the rear panel
from the Floor Stand.

Содержание Virtuo Floor Stand

Страница 1: ...Floor Stand Guide...

Страница 2: ...cation may be reproduced stored in any retrieval system or transmitted in any form or by any means electronic mechanical recording or otherwise without prior written consent of TouchTunes Interactive...

Страница 3: ...Inserting the and fastening the subwoofer 19 Attaching the wheels to the main frame 20 Assembling the baseplate 20 Rolling the Floor Stand into the Baseplate 21 Levelling the Floor Stand 23 Installing...

Страница 4: ...4...

Страница 5: ...me This section introduces the Virtuo Floor Stand provides important safety information and describes how to get customer support Introducing the Virtuo Floor Stand About this guide Disclaimer and imp...

Страница 6: ...nical support and field service personnel It provides important information about the installation setup and operation of your new Virtuo Congratulations on your purchase of a Virtuo Floor Stand As we...

Страница 7: ...mponents to maintaining the Virtuo Floor Stand s stability and both must remain attached to the Virtuo Floor Stand at all times when in operation WARNING The handles and wheels on the Virtuo Floor Sta...

Страница 8: ...ension cords Protect the power cord from being walked on or pinched particularly at plugs convenience receptacles and the point where they exit from the apparatus CAUTION See product enclosure for saf...

Страница 9: ...ve fallen into the apparatus the apparatus has been exposed to rain or moisture does not operate normally or has been dropped The Floor Stand is supplied with a preinstalled DA 415 amplifier in the ba...

Страница 10: ...s 24 7 Service Hotline at 847 353 1954 To help us assist you more effectively with problem reports the following information can be required when contacting TouchTunes Support Virtuo ID The serial num...

Страница 11: ...ocation List of Floor Stand components Preparing tools for installation Removing the Floor Stand from the Pallet Attaching the wheels to the main frame Assembling the baseplate Installing and Connecti...

Страница 12: ...it afterwards IMPORTANT TouchTunes recommends that you unpack the Floor Stand as closely as possible to its intended installation location CAUTION The Virtuo is heavy and represents a serious safety h...

Страница 13: ...ht and dimensions of the Virtuo Floor Stand Before you install the Floor Stand check that you have received all of the hardware components and that the hardware components and items in the parts kit a...

Страница 14: ...to the Floor Stand 200099 040 8 washers flat no 10 zinc plated to be used with 200099 040 4 are attached to the Floor Stand 200134 001 2 brackets for baseplates length 2 3 8 x width 3 23 32 x thickne...

Страница 15: ...You may require these tools to install the Floor Stand Ensure that you have all the tools at hand before beginning the installation spirit level to ensure the Floor Stand and the Virtuo are level Phi...

Страница 16: ...allet Detach and remove temporarily the subwoofer from the floor stand Detach and remove the Floor Stand from the pallet Re insert and fasten the subwoofer to the base of the Floor Stand Bolt the whee...

Страница 17: ...e There are 6 bolts securing it to the Floor Stand You will be permanently reinserting it and re attaching it momentarily WARNING Do not operate the Virtuo Floor Stand without the integrated subwoofer...

Страница 18: ...oving the Floor Stand from the Pallet Remove the 4 bolts securing the Floor Stand to the pallet using the open ended 3 8 wrench Carefully remove the Floor Stand and set it on a level surface WARNING T...

Страница 19: ...or Stand Removing the Floor Stand from the Pallet Virtuo Floor Stand Guide 19 Re Inserting the and fastening the subwoofer With the Floor Stand resting on a level surface re insert the subwoofer and b...

Страница 20: ...pallet if you have not done so already and use the use 8 bolts and washers provided to attach the two wheels to the base of the Floor Stand The baseplate consist of a right and left piece that combin...

Страница 21: ...VER roll the Floor Stand with a Virtuo mounted With the wheels firmly attached grab the handles on the rear panel of the Floor Stand and recline it just enough so you can roll it forward into the base...

Страница 22: ...oor Stand to the Baseplate There are 4 set screws included with the kit for securing the baseplate to the Floor Stand Using an supplied 3 16 inch Allen Key also called a Hex key insert the two set scr...

Страница 23: ...Set screws determine if it is level and well balanced If you need to level the Floor Stand insert the provided levellers into the rear of the baseplate Insert the provided levellers in both the left...

Страница 24: ...Acoustics 24 Installing and Connecting the Floor Stand Acoustics Installing the Floor Stand acoustics consists of the following Removing the rear panel Mounting and wiring the satellite speakers Re at...

Страница 25: ...and Connecting the Floor Stand Acoustics Virtuo Floor Stand Guide 25 Attaching the Array Speakers Bolt the array speakers onto the Floor Stand frame Pass the array speaker wires and subwoofer wires th...

Страница 26: ...Virtuo Floor Stand Guide Installing the Virtuo Floor Stand Installing and Connecting the Floor Stand Acoustics 26 Attach the speaker wires to the array speakers...

Страница 27: ...ll bracket from the wall 4 On the Floor Stand identify where the holes are for attaching the wall bracket and attach the wall bracket to the Floor Stand CAUTION The Virtuo is heavy and can cause injur...

Страница 28: ...oor Stand Mounting the Virtuo to the Floor Stand 28 5 Identify the flange hooks on the back of the Virtuo The flange hooks fit into receptacles on the front of the wall bracket securing the Virtuo to...

Страница 29: ...htly higher than the top of the bracket 7 Pass the power wire from the Virtuo through the Floor Stand 8 Align the flange hooks on Virtuo with the receptacles on the front of the bracket on the Floor S...

Страница 30: ...he crossover bracket under the I O board screws and fasten the lower left corner with the M4 screw included in the kit 4 Tighten the I O board screws 5 Install the replacement warning label under the...

Страница 31: ...used to power the Virtuo Floor Stand s integrated subwoofer or array speakers It can be used only to power externally connected devices on Virtuo s Zone 2 and Zone 3 Subwoofer This integrated subwoofe...

Страница 32: ...the Virtuo 32 Connecting the audio cables to the Virtuo Pass the speaker wires into the Virtuo and connect the wires inside the Virtuo according to this diagram and then connect the integrated subwoo...

Страница 33: ...s Virtuo Floor Stand Guide 33 Connecting the subwoofer and array speaker wires 1 Connect the subwoofer speaker wire to Zone 2 output of the power amplifier according to this diagram 2 Connect the arra...

Страница 34: ...w to connect the DA 415 to the AC strip inside the Virtuo The Floor Stand is supplied with a preinstalled DA 415 amplifier in the base The amplifier in the Virtuo must be used only to power the Floor...

Страница 35: ...r Stand Wiring the DA 415 amplifier Virtuo Floor Stand Guide 35 This diagram shows the connections between the I O board and Input A Zone 2 and Input B Zone 3 of the DA 415 amplifier It also shows the...

Страница 36: ...iring configurations 2 Bose 141 JB speakers 1 Virtuo Array This series configuration provides a total of 8 ohm impedance load to the amplifier 4 Bose 141 JB speakers 1 Virtuo Array This parallel confi...

Страница 37: ...iguration provides a total of 12 ohm impedance load to the amplifier 2 MX 1V Satellites 1 Virtuo Array This parallel configuration provides a total of 8 ohm impedance load to the amplifier Securing th...

Страница 38: ...Virtuo Floor Stand Guide Installing the Virtuo Floor Stand Reattaching the back panel 38 Reattaching the back panel Reattach the upper back panel to the Floor Stand...

Страница 39: ...Installing the Virtuo Floor Stand Powering up the Virtuo Virtuo Floor Stand Guide 39 Powering up the Virtuo You can now plug in and power up the Virtuo...

Страница 40: ...Virtuo Floor Stand Guide Installing the Virtuo Floor Stand Powering up the Virtuo 40...

Страница 41: ...uchTunes Interactive Networks Inc 400 Sainte Croix Avenue Suite 200 E Montreal Quebec Canada H4N 3L4 TouchTunes Interactive Networks Inc 3455 Salt Creek Lane Suite 100 Arlington Heights IL 60005 USA T...

Страница 42: ......

Отзывы: