background image

12

Installing the Ovation Jukebox

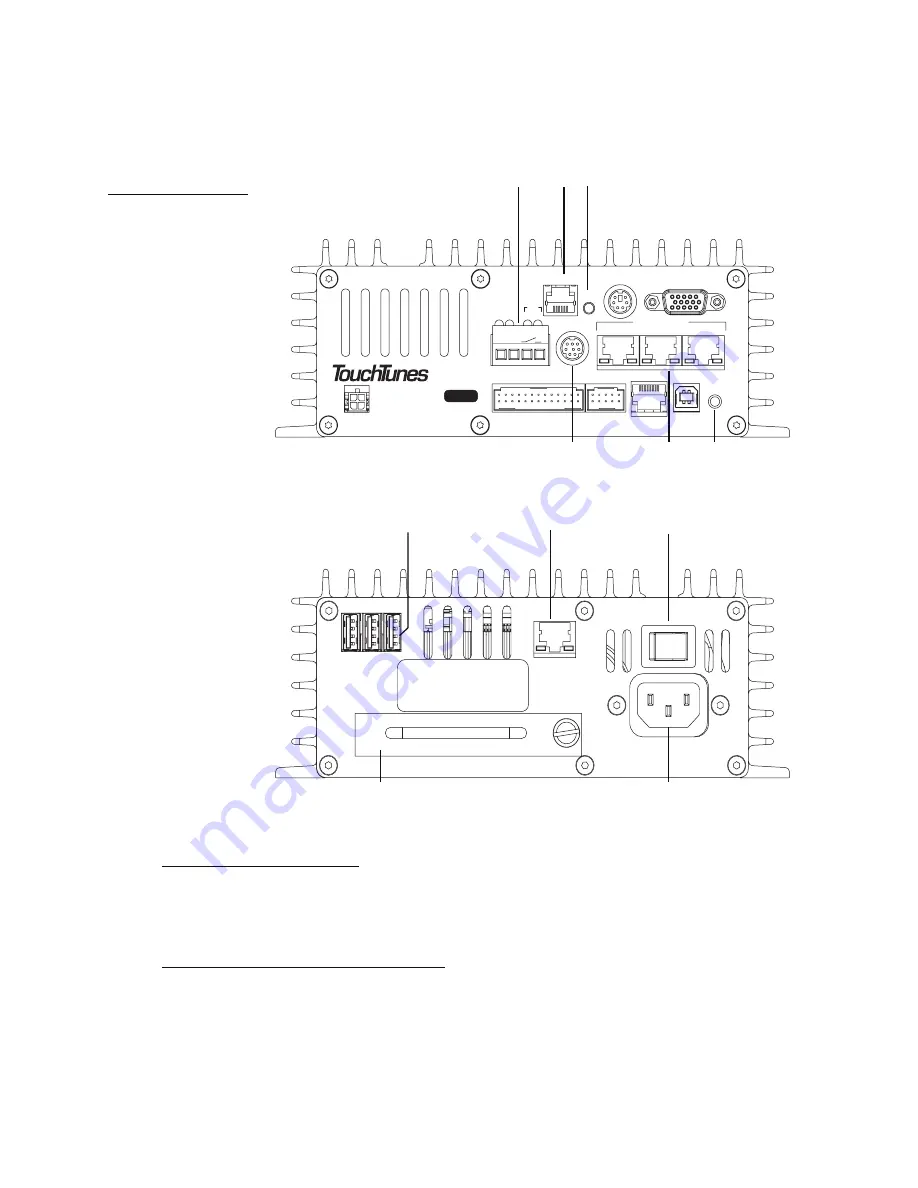
To conserve space, the MJS has connections on both its top and bottom panels. Refer to the 
following diagrams to identify all components and connections on the MJS for your jukebox.  

Power off the Ovation

1. If necessary, ground yourself by touching an exposed piece of metal in the jukebox case.

2. Turn the MJS system power switch to OFF. 

Install the hard drive in the MJS

Install the hard drive for the Ovation in its MJS.

1. Locate the hard drive for the jukebox.

The hard drive for a TouchTunes jukebox is contained in an enclosure. 

Figure 6

Layout of MJS

a) Microphone connector  b) Phone line connector  c) Reset button  d) Auxiliary audio input connector
e) Audio Out ports  f) Manager button

g) USB ports  h) Network/Broadband port  i) MJS System power switch  j) Hard drive 
k) MJS power receptacle 

VIDEO

KBD

TELCO

AUDIO OUT

1

3

LINE IN

RST

USB

DMX

MNG

COM1

MIC

1 2

P

W

R

D

I

A

G

HD

TO CTL

P/N: 300114-

2

SW

(-) (+)

Top Panel

a

b

c

d

e

f

NETWORK

2

USB

1

3

ON

OFF

Serial No.

ACT

LNK

100 - 120VAC

50/60Hz 2.0A MAX.

NO USER-SERVICEABL E PARTS INSIDE

Bottom Panel

g

h

i

j

k

Содержание Gem3 Ovation

Страница 1: ......

Страница 2: ...if their mounting system should fail Therefore installation should only be performed by an experienced installer or licensed contractor that is familiar with standard rigging mounting and hanging prac...

Страница 3: ...the obsolete outlet Protect thepower cord frombeing walked onor pinched particularly at the plugs convenience receptacles and the point where they exit from the apparatus Only use attachments accessor...

Страница 4: ...ency energy and if not installed and used in accordance with the instruction manual may cause harmful interference to radio communications Operation of this equipment in a residential area is likely t...

Страница 5: ...the Ovation 8 Open the Ovation 9 Replacing the Lock for the Ovation 11 Installing the Hard Drive 11 Power off the Ovation 12 Install the hard drive in the MJS 12 Connecting the Ovation to the Telepho...

Страница 6: ...toc 4 Activating the Jukebox 23 Overview 23 Activation Procedure 24 Error Scenarios 35 5 Disclaimer 37...

Страница 7: ...entation This guide is designed to get you started quickly with installing and activating a jukebox in a location For more detailed documentation refer to the following documents The TouchTunes Jukebo...

Страница 8: ...e Contacts page on the TouchTunes Dashboard see the TouchTunes Dashboard User Guide You can also use this page to contact other departments at TouchTunes such as the Music Sales and Finance department...

Страница 9: ...hows the dimensions and weight of the Ovation jukebox Before you install the jukebox you must ensure that you have received all jukebox hardware components and that both hardware components and the it...

Страница 10: ...which are summarized below Dial upConnection Ajukebox usingadial up connectionuses thenormal telephonenetwork to connectto theInternetand to theTouchTunes server Dial upconnections donotrequireany sp...

Страница 11: ...ing for the location to the jukebox The demarcation point may also be called the telephone network interface or service entry point By running new cable from this point to the jukebox you can avoid po...

Страница 12: ...crimp tool and RJ 45 connectors to connect the laptop and or jukebox to the router If you are setting up a dial up connection for the Ovation you may also require the following tools USB modem Phone l...

Страница 13: ...acket for the jukebox 1 On the wall where the Ovation is to be installed measure 65 inches 5 5 from the floor and mark this measurement This measurement identifies where the top of the bracket will be...

Страница 14: ...h it to the wall Hang the Ovation Once the wall bracket is securely attached hang the Ovation on the wall To hang the Ovation on its wall bracket 1 Move the Ovation so it is close to the wall bracket...

Страница 15: ...n open up its case Open the Ovation Once the Ovation is installed open the jukebox to access its internal components Secure the Ovation to the wall bracket using internal screws To open the jukebox 1...

Страница 16: ...jukebox and then slowly swing open the Ovation case 3 Using the diagram below identify the location of the holes for the wall bracket screws used to secure the jukebox to the wall bracket Figure 3 Ope...

Страница 17: ...wn in the following diagram Ensure any replacement locks have the same dimensions before performing the following procedure Installing the Hard Drive Before installing the hard drive you should famili...

Страница 18: ...tion in its MJS 1 Locate the hard drive for the jukebox The hard drive for a TouchTunes jukebox is contained in an enclosure Figure 6 Layout of MJS a Microphone connector b Phone line connector c Rese...

Страница 19: ...Align the hard drive enclosure with the slot labelled REMOVEABLE HARD DISK on the bottom panel of the MJS The hard drive enclosure cannot be inserted in its slot until it is properly aligned 3 Insert...

Страница 20: ...or telecommunications to internal jukebox components A wire strain relief bracket provides slack for cables inside the jukebox and also covers the opening to the cable channel to keep dust out In the...

Страница 21: ...twork You connect an Ethernet network cable from the router to the Ovation MJS to connect the jukebox to the broadband network 1 Locate the RJ 45 Ethernet cable for the broadband connection The cable...

Страница 22: ...Connect the Ovation to the telephone network below Connect the Ovation to the telephone network You use the following procedures to attach the USB modem to the Ovation and then connect the modem to th...

Страница 23: ...tor at other end of the USB cable to its associated port on the USB modem The modem is now installed Next connect a phone line to the USB modem so the Ovation can access the telephone network To conne...

Страница 24: ...n external speaker system An external Bose AM 141P Acoustimass amplifier and speaker system Refer to the supplied documentation for each system to connect these amplifier speaker systems to the Ovatio...

Страница 25: ...zed 2 Connect the male plug of the power cord to a properly grounded and polarized three prong power outlet Tighten the wire strength relief bracket All cables are now connected to the Ovation You tig...

Страница 26: ...vation 4 Tighten the screws for the wire strain relief bracket to hold the bracket in position Turn on power to the MJS You turn on power to the MJS in the Ovation so you can activate the jukebox and...

Страница 27: ...mechanism 2 Secure the Ovation by using the key to lock its case Activate the Ovation screen When you power up a jukebox for the first time it automatically goes into night mode the MJS and other inte...

Страница 28: ...reen lights and audio system for the jukebox are activated You can now use the touchscreen to activate the jukebox and configure its settings using the system software 2 Follow the procedure in Activa...

Страница 29: ...ion You no longer have to manually enter a jukebox password when you first start the jukebox as this process has been automated However when necessary you can now use the Manual Override feature to re...

Страница 30: ...ing the Power On button on the control board The Jukebox Software initialization screen appears indicating that the jukebox is starting the installation process Jukebox Software Initialization Screen...

Страница 31: ...t appears on the upper left of the screen 2 Touch the center of the target that appears on the lower right of the screen 3 Touch the center of the target that appears on the lower left of the screen C...

Страница 32: ...hich software has been previously installed In both these cases the jukebox detects a hardware change and can retrieve the settings from the hard drive This option is not available if you have install...

Страница 33: ...r Calling Window and Connection Type The Calling window controls allow you to specify the nightly time range during which the jukebox will communicate with the TouchTunes server Use the corresponding...

Страница 34: ...r area of the screen allowing you to specify connection parameters To choose a dynamic DHCP broadband connection 1 Select DHCP to obtain an IP address automatically from the ISP or the location s rout...

Страница 35: ...nd then re enter the correct information Use the Clear key to erase the entire contents of the IP address field Use the Cancel key to cancel the operation and return to the Calling Window and Connecti...

Страница 36: ...on 3 Turn the Tone Dialing option off if the location uses pulse dialing 4 If you need to dial an outgoing prefix before the phone number touch the Config button for Dialing prefix then use the numeri...

Страница 37: ...t and then re enter the correct information Use the Clear key to erase the entire contents of the main phone number field Use the Cancel key to cancel the operation and return to the Calling Window an...

Страница 38: ...finished entering the main phone number press Apply 11 Touch the Config button associated with the Main password field to specify the password associated with the main username and phone number 12 Us...

Страница 39: ...ion screen that appears Communication Screen a Network status LED indicators b Activity messages The Communication screen indicates the progress of the jukebox as it attempts to communicate with the T...

Страница 40: ...ss to receive any new settings you may have made to it via the TouchTunes Dashboard For installation and activation the jukebox needs the Logged In Music Access and Data Access LED indicators to be gr...

Страница 41: ...Corruption in the iButton or Hard Drive A corruption in the iButton or hard drive could result in the jukebox being unable to play songs on the hard drive In this case the jukebox must download some...

Страница 42: ...36 Activating the Jukebox...

Страница 43: ...no part of this publication may be reproduced stored in any retrieval system or transmitted in any form or by any means electronic mechanical recording or otherwise without prior written consent of T...

Отзывы:

Похожие инструкции для Gem3 Ovation