Touchboards CHIEF FCI Скачать руководство пользователя страница 9

Installation Instructions

FCI / PACI

9

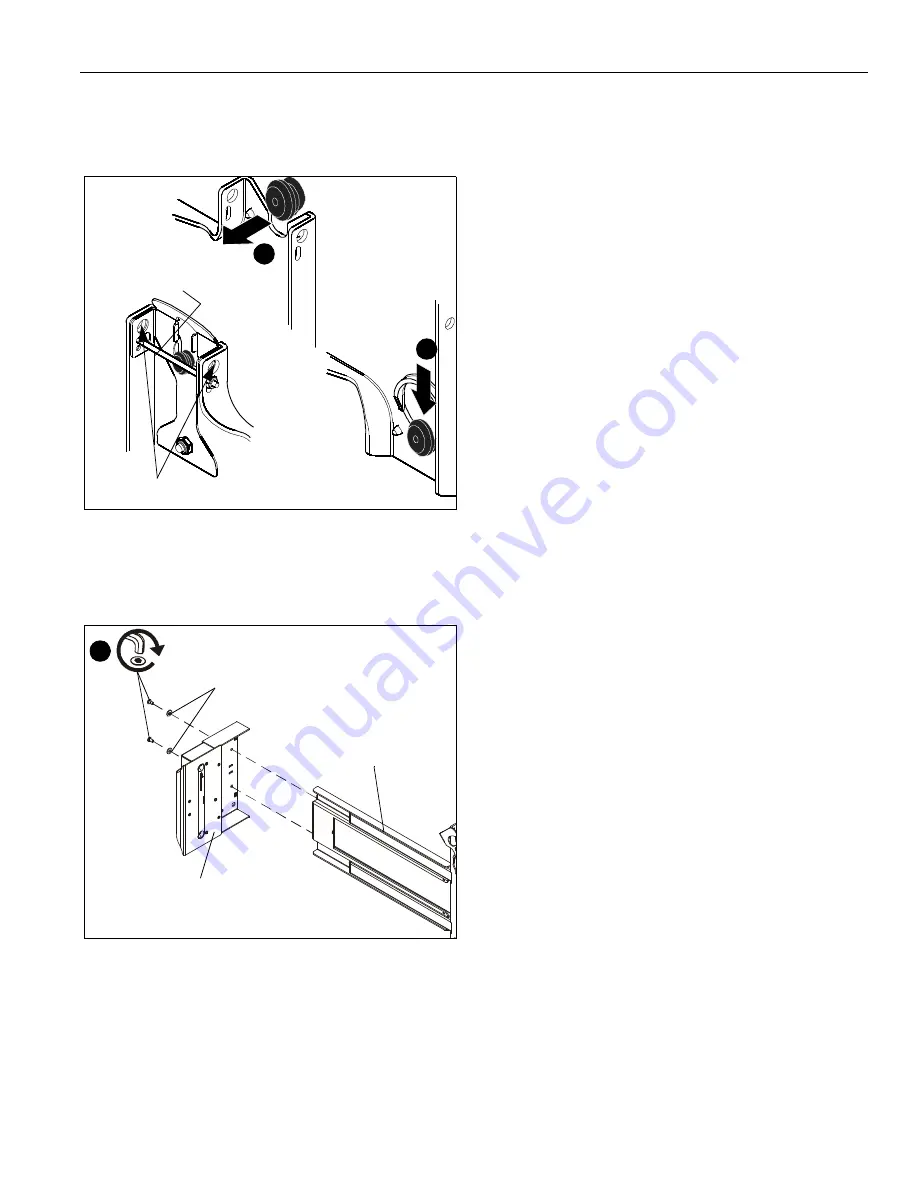
Holes are provided in the faceplate for use with a padlock or
similar locking device, if desired. In addition, the pin and nut may
be removed from the upper holes and moved to the lower holes
for use as a more permanent locking device. (See Figure 8)

Figure 8

7.

Fasten sensor assembly (F) to ClickConnect assembly (E)
using two 10-24 x 3/8" button head cap screws (A) and two
#10 flat washers (B). (See Figure 9)

Figure 9

8.

Re-attach flat panel TV following instructions contained with
mount.

9.

Proceed to

Connecting FCI/PACI

 section.

CONNECTING FCI/PACI

NOTE:

Follow instructions in the Quick Start Guide (KE).

IMPORTANT ! :

After adding battery (KD) to the stylus

(KB), tighten the cap

only

 to the point of being fingertip-

tight. Overtightening cap may cause the stylus to stop
transmitting signals.

1.

Connect flat panel TV to computer.

2.

Connect USB cord (KG) from cartridge in sensor assembly
(F) to computer USB port.

3.

Insert interactive software CD (KC) into computer, and
follow start-up and operating instructions.

Minimum System Requirements for FCI/PACI

Windows® System

Compatible PC with Pentium™ II 400 MHz+
processor and 256 MB RAM

Windows 2000, XP, Server 2003, Vista, or 7

30 MB available hard drive space

Available USB port

Macintosh® System

Power PC®/Intel™ 1.42 GHz+ processor and 1G
RAM

Mac OS X 10.5 through 10.6

25 MB available hard drive space

Available USB port

Connection Requirement

The FCI/PACI includes a USB cable.

Screen Recording Requirements

(Currently available only on Windows platform.)

Pentium™ IV processor

1.4GHz, with 512MB RAM

Placement Tips

NOTE:

See

DIMENSIONS

 drawing for TV/sensor assembly

placement information.

The corners of the TV should be positioned within the
fan area extending from the sensor assembly. This fan
area should not exceed 140°.

Do not put sticky notes, hanging paper, cables, outlets,
or other items inside the capture area.

5

6

To use as a more
permanent lock, remove
pin and nuts and move
to lower holes.

A padlock or bolt may
be placed through latch holes

(F)

7

(A) x 2

(B) x 2

(E)

Содержание CHIEF FCI

Страница 1: ... U C T I O N S FCI PACI Interactive Flat Panel Upgrade Kits Spanish Product Description German Product Description Portuguese Product Description Italian Product Description Dutch Product Description French Product Description FCI PACI ...

Страница 2: ... follow the instructions CAUTION A CAUTION alerts you to the possibility of damage or destruction of equipment if you do not follow the corresponding instructions WARNING Failure to read thoroughly understand and follow all instructions can result in serious personal injury damage to equipment or voiding of factory warranty It is the installer s responsibility to make sure all components are prope...

Страница 3: ...Installation Instructions FCI PACI 3 DIMENSIONS FCI 140 COVERAGE ANGLE FOR BEST RESULTS SLIDE THE SENSOR OUT UNTIL THE CORNERS OF THE TV ARE WITHIN THE COVERAGE AREA 0 50 12 7 RECOMMENDED SPACING ...

Страница 4: ...FCI PACI Installation Instructions 4 DIMENSIONS continued 14 00 355 7 140 SENSOR COVERAGE SLIDE SENSOR SO THAT CORNERS OF TV ARE INSIDE COVERAGE AREA LIKE SHOWN ABOVE 0 50 12 7 RECOMMENDED SPACING PACI ...

Страница 5: ...Chave de bocas Chiave a punte aperte Steeksleutel Clé à fourche By Hand A mano Von Hand Com a mão A mano Met de hand À la main Hex Head Wrench Llave de cabeza hexagonal Sechskantschlüssel Chave de cabeça sextavada Chiave esagonale Zeskantsleutel Clé à tête hexagonale Pencil Mark Marcar con lápiz Stiftmarkierung Marcar com lápis Segno a matita Potloodmerkteken Marquage au crayon Drill Hole Perforar...

Страница 6: ... 1 Quick start guide KF 1 Stylus wrist strap kit KG 1 Interactive USB cable D 1 FCI 3 5 extension E 2 Interactive bar assembly J 1 3 16 ClickConnect Interactive Hardware Kit PACI Only A 2 10 24 x 3 8 B 2 10 C 1 1 8 FCI Only F 1 Sensor assembly G 2 5 16 x 5 8 H 1 1 8 D 1 PACI 3 5 extension F 1 Sensor assembly E 1 ClickConnect interactive assembly K 1 Chief Interactive Kit Both FCI PACI models PACI ...

Страница 7: ...with the mount FCI PACI INSTALLATION IMPORTANT Determine depth thickness of flat panel TV If the TV is MORE than 3 in depth 76 2mm proceed to Step 1 If the TV is LESS than 3 in depth proceed to either Complete FCI Installation or Complete PACI Installation section as appropriate 1 Remove and save two button head cap screws and two washers from back of sensor assembly F See Figure 1 Figure 1 2 Remo...

Страница 8: ...per extension See Figure 6 4 Tighten four button head cap screws on back of ClickConnect assembly E See Figure 6 Figure 6 5 Align ClickConnect assembly E with the mount aligning four mounting buttons on assembly with four mounting holes in mount See Figure 7 Figure 7 6 Lower ClickConnect assembly E into place listening for audible click to ensure recessed area of mounting buttons are properly seat...

Страница 9: ...omputer USB port 3 Insert interactive software CD KC into computer and follow start up and operating instructions Minimum System Requirements for FCI PACI Windows System Compatible PC with Pentium II 400 MHz processor and 256 MB RAM Windows 2000 XP Server 2003 Vista or 7 30 MB available hard drive space Available USB port Macintosh System Power PC Intel 1 42 GHz processor and 1G RAM Mac OS X 10 5 ...

Страница 10: ...I in both lateral and depth directions so that sensor assembly is as far as possible from the flat panel TV 2 Recalibrate the eBeam software a Right click on the eBeam icon on the system tray See Figure 12 b Select Calibrate Interactive Area and follow calibration instructions See Figure 12 Figure 12 Table 1 1 Recommended Sensor Locations Measurement Description Operational Range Recommended Depth...

Страница 11: ...rid test will show distorted annotation lines See Figure 15 A passed grid test will show no broken or distorted annotation lines See Figure 15 Figure 15 5 If the grid test has failed gradually move the sensor assembly in 1 2 increments in both the depth and lateral extension ranges until the grid test is passed 6 If the interactive area is not responding precisely after the grid tests proceed to C...

Страница 12: ...d the 3 numbers that appear in Hardware Diagnostics See Figure 16 6 Compare hardware diagnostics results to table below Example The hardware diagnostics numbers are 151 72 52 and indicate the sensor is near an ultrasonic device that causes interference See Figure 16 7 If interferences are detected separate FCI PACI from ultrasonic or IR interferences and try the set up again 8 If questions remain ...

Страница 13: ...Installation Instructions FCI PACI 13 ...

Отзывы: