background image

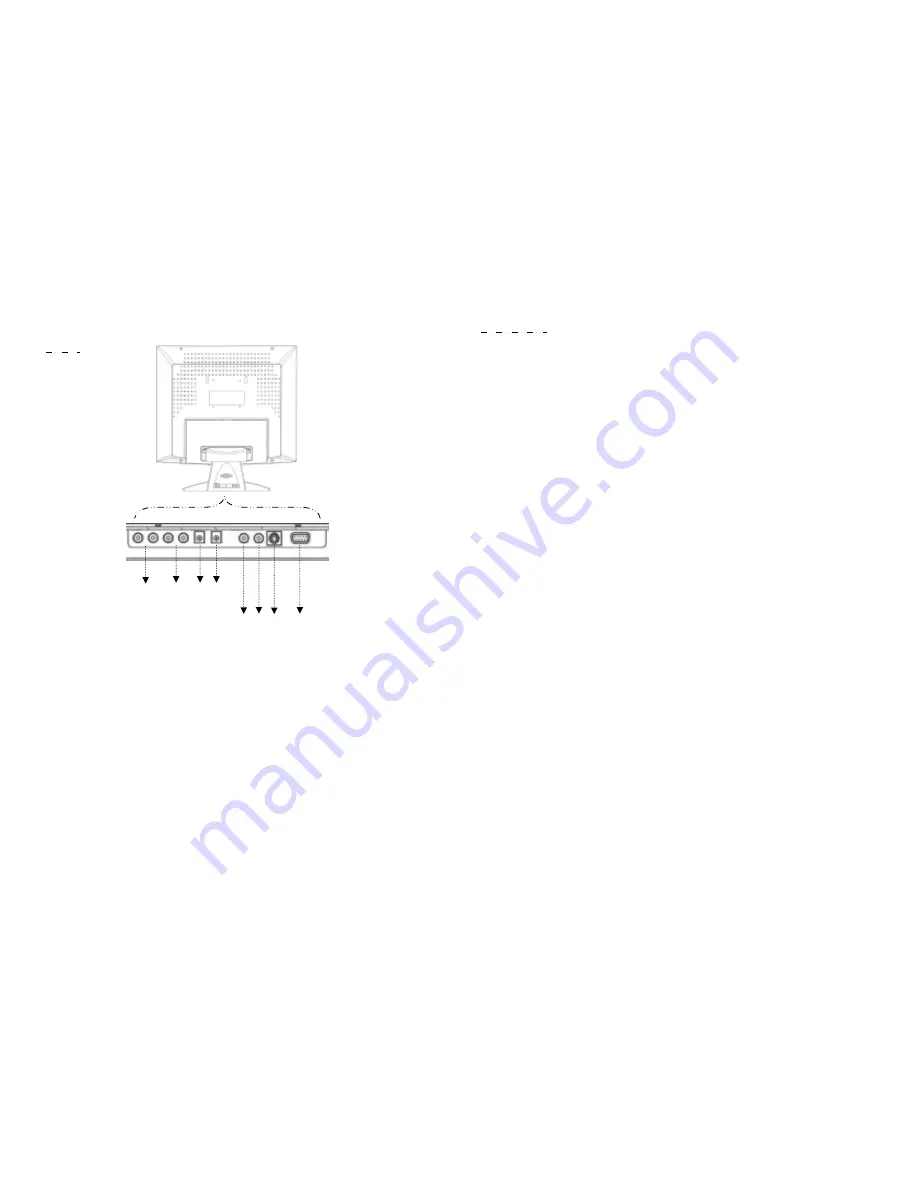
Inputs Diagram 

Inputs

μ

1

ν μ

2

ν μ

3

νμ

4

ν


μ

5

νμ

6

νμ

7

νμ

8

ν

μ

1

ν

AUDIO1

Κ

This can be connected to the 1st audio-out connector of any sound resource. 

μ

2

ν

AUDIO2

Κ

This can be connected to the 2nd audio-out connector of any sound resource. 

μ

3

ν

LINE IN

Κ

This can be connected to the 3rd audio-out connector of any sound resource. 

μ

4

ν

DC IN

Κ

This is for connecting the power cable. 

μ

5

ν

VIDEO1

Κ

This can be connected to the 1st video-out connector of any video resource. 

μ

6

ν

VIDEO2

Κ

This can be connected to the 2nd video-out connector of any video resource. 

μ

7

ν

S-VIDEO

Κ

This can be connected to the 3rd video-out connector of any video resource. 

μ

8

ν

PC IN

Κ

This can be connected with the D-Sub 15 pin signal connector. 

Page.10

Precautions

z

Read all of these instructions and save them for later use. 

z

Follow all warnings and instructions on the product. 

Product 

z

Do not cover block the vent holes in the case. 

z

Do not insert sharp objects or spill liquid into the LCD monitor through cabinet slots. They 

may cause accidents, fire, electric shock or failure. 

z

Disconnect the power plug from the AC outlet if you will not use it for an indefinite period. 

z

Do not attempt to service this product yourself, by opening or removing covers may expose 

you to dangerous voltage points or other risks. 

z

Do not touch the screen directly with your fingers. You may damage the screen, and oil from 

your skin in difficult to remove. 

z

Do not apply pressure to screen. The LCD is a very delicate product. 

Power

z

Use the type of power indicated on the marked label. 

Plugs

z

Do not remove any of the prongs of the monitor’s three-pronged power plug. 

z

Disconnect the power plug from the AC outlet under following conditions

Κ

z

If you will not use it for an indefinite period time. 

z

When the power cord or plug is damaged or frayed. 

z

If the product does not operate properly, adjust only those controls that are mentioned in the 

operating instructions. Improper adjustment of other controls may result in damage and will 

often require extensive work by a qualified technician to restore the product to normal 

operation.

z

If the product has been dropped or the cabinet has been damaged. 

z

If the product exhibits a distinct change in performance, indicating a need for service. 

z

Power and extension cords 

z

Do not allow anything to rest on the power cord. 

Page.11 

Содержание LCD-1513TS

Страница 1: ...TFT LCD COLOR MONITOR User s manual ModelΚLCD 1513VB 15 1ϛ ModelΚLCD 1513TS 15 1ϛ Ϥ 1319 Dexter Avenue N 020 Seattle WA 98109 TELΚ206 623 6000 FAXΚ206 623 6609 R ...

Страница 2: ...or damage caused by improper use of this product Warranty void if customer break the seal of the enclosures Multilingual User s ManualΚ 1 Introduction Product Description Package Contents Product Features Cleaning 2 Control Function OSD Button OSD Control 3 Inputs Diagram Inputs Setting Up 4 Display Angle 5 Product Specification 6 Display Modes 7 Service Information 8 Appendices Page 2 Page 2 Page...

Страница 3: ...y compatibility audio system A V input and users friendly OSD On Screen Display controls Package Contents Included with your LCD monitor are following itemsΚ z 15 TFT LCD monitor z 15 pin D sub signal cable z AC power cable z User s manual z Sound Card Cable z Adaptor AC Cord Product Features z High contrast color TFT LCD display support resolution up to XGA 1024 x 768 z Compatible with IBM VGA VE...

Страница 4: ... Power LED indicates different status when this unit operates in different modes Page 4 4 OSD Menu SelectΚPressing this button pops up the OSD menus on the screen and used to select the OSD control options on the screen 5 IncreaseΚThis button is used to adjust the increasing value of selected OSD control option 6 DecreaseΚThis button is used to adjust the decreasing value of selected OSD control o...

Страница 5: ... buttons Horizontal PositionΚPressing Ѐ moves the display image to right Pressing Ё moves the display image to left Vertical PositionΚPressing Ѐ moves the display image upward Pressing Ё moves the display image downward Page 6 Tools MenuΚ Input AV1 1st Video out connector of any image resource Input AV2Κ2nd Video out connector of any image resource Input S VideoΚS Video out connector of any image ...

Страница 6: ...it the OSD function selection menu OSD Horizontal PositionΚPressing Ѐ moves the OSD menu to right Pressing Ё moves the OSD menu to left OSD Vertical PositionΚPressing Ѐ moves the OSD menu upward Pressing Ё moves the OSD menu downward OSD Time OutΚSet the OSD time Moiré AdjustΚSet panel moiré degrees and noise Page 9 ...

Страница 7: ... from the AC outlet if you will not use it for an indefinite period z Do not attempt to service this product yourself by opening or removing covers may expose you to dangerous voltage points or other risks z Do not touch the screen directly with your fingers You may damage the screen and oil from your skin in difficult to remove z Do not apply pressure to screen The LCD is a very delicate product ...

Страница 8: ... supply cord which came with your monitor is to be connected to the PC instead of the wall outlet this equipment is to be used with UL TÜV approved computers with receptacle rated 100 240V AC 50 60Hz 1 0A minimum Environment z Place the monitor on a flat and leveled surface z Place the monitor in a will ventilated place z Keep the monitor away from the following Do not place unit in extreme hot co...

Страница 9: ... Auto Adjust Clock Phase H Position V Position Input Pc AV1 AV2 S Video AV Power Adapter AC Input 100 240V 1 5A 50 60Hz DC Output 12V 5 0A Operating Conditions Temperature 0к 35к Humidity 20 95 Storage Conditions Temperature 20к 60к Humidity 5 95 Certification FCC DOC CE B VCC I UL TUV GS Weight Net WeightΚ4 66Kgs Gross WeightΚ6 66Kgs Page 14 Display Modes Mode Resolution H Freq kHz V Freq Hz 1 64...

Страница 10: ...e following If the problem persists please contact your local dealer or our service center Note For best viewing image effect please set resolution at 1024x768 Problem No signal Ensure all cables and power connections are correctly and securely connected Check the power LED light is in green color Make sure the computer is on Press the OSD Auto Setup for best view result Problem Image is out of fo...

Отзывы: