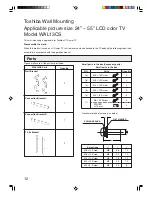
background image

8

L

L

Assembling and Installation

(The operation must be done by qualified installers)

Before the operation, make sure all components and parts listed in the addendum are included.
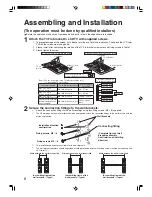
1

Attach the TV Fix bracket to LCD TV with supplied screws.

2

Secure the connection fittings to the wall brackets.

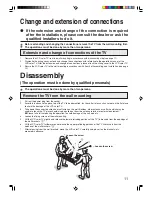
      1. To prevent damage of the screen, put a blanket or alike on a flat place in advance. Then place the LCD color

TV with the screen side facing down.

      2. Please install after confirming the relation of the TV Fix bracket screw holes and fixing screws in Table 1.
      3. Please tighten the screw.

*

Attach the connection fittings to the wall mountings using four fixing screws (M5 

×

 8) supplied.

\

The UP markings on the wall brackets should be kept upside. Attach the connection fittings to the wall brackets with the

marks kept upside.

\

Two installation positions are available for the wall brackets.

*

The wall brackets positions should be decided according to the positions of the fixing screws located on the back of the
LCD color TV.

(Assembling figure of the
wall brackets —Type1)

Width between the wall brackets=100

Width between the wall brackets=200

(Assembling figure of the
wall brackets —Type2)

Wall brackets

Connecting fitting

(Complete figure of wall
brackets assembly
Confirmation of installing
direction)

Installation direction
confirmation

Fixing screws  M5

8

Fixing screws  M5

8

Width between the wall brackets=400

(Assembling figure of the
wall brackets —Type3)

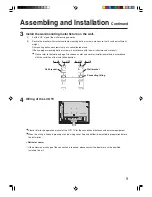
 corresponding TV screen sizes

unit screw supplied

corresponding TV 

screen size

M4 

×

 12 = 4 pcs

(double washer supplied)

M4 – M4 deep hole

26 ~ 27 inch

M6 

×

 14 = 4 pcs

(double washer supplied)

M6 –


M6 deep hole

32 ~ 42 inch

M8 

×

 14 = 4 pcs

(double washer supplied)

M8 –


M8 deep hole

(40)46 ~ 55 inch

Spacer (ø15.8 L=13 mm)
(double-sided adhesive
 paper supplied)

M4 –


M4 for deep hole use

24PC1, 24PS1
Only


(24”~55” LCD TV) M4, M6, M8 Screw


(24PC1, 24PS1) M4 

×

 25 screw

Peel off the protection of 
double-sided adhesive paper

screw hole pattern for 

TV fix Bracket assembling

Fix screws

Branket or alike

Bracket

Fix screws

Branket or alike

Spacer

M8 Screw Hole
M6 Screw Hole

M4 Screw Hole

M6 Screw Hole

M4 Screw Hole

M8 Screw Hole

M6 Screw Hole

24PC/PS1

TV fix Bracket screw hole

TV fix

TV fix Bracket

Table 1: The use of fix screw on the TV fix Bracket and the list of

L

L

R

R

L

Содержание WAL13CS

Страница 1: ...Model Operation Manual For LCD Color TV Toshiba Wall Mounting VX1A00189900 WAL13CS ...

Страница 2: ... be done by two persons at least Please make sure no screw or part disassembled is missed Please consult thoroughly with the user before the application and start the operation upon the agreement of the user Once the application is finished please check and make sure it has been installed safely and correctly and then hand this operation manual of wall mounting to the user 1 About the wall structu...

Страница 3: ...ion prohibited is described within or near the symbol by diagram or words indicates a required action Do The action required is described within or near the symbol by diagram or words Symbol Meaning of the Symbol Exemptions Toshiba is not liable for any damage caused by natural disaster such as fire earthquake by the act of the third person accidents owner s intentional acts negligence misuse or u...

Страница 4: ...it may fall overturn or be damaged resulting in injury The family with children in particular should pay full attention to it Do not hang or place anything on wall mounting or TV Otherwise the object placed or the TV may fall and cause death or injury Do not attempt to repair disassemble or modify the wall mounting on your own Otherwise the wall mounting may fall and cause injury Please contact th...

Страница 5: ...the TV The neglect of these instructions may break the electric wire and may cause fire shock fall down TV damage even lead to injury Do not fix the wall mounting to a wall out of the vertical Otherwise the TV may fall cause death injury damage of TV or floor And ventilation of the TV may turn worse cause inner heating resulting in fire Do not install at places where may be splashed such as outdoo...

Страница 6: ...tion and then hand this operation manual to the user Improper installation may cause fall of the TV leading to death injury TV or floor damage etc Do not block the LCD color TV ventilation holes on the top of the screen If these holes are blocked heat will gather inside the TV causing a fire Leave a space of about 10cm around the equipment body Do not install at the places with poor ventilation Do...

Страница 7: ... Please follow the steps below to remove the base of the LCD color TV 1 Pull out all connections 2 Remove 4 fixing screws 3 Please raise LCD TV screen vertically to remove stand Please store the fixing screws in step 2 and stand in step 3 carefully 4 Please put a soft blanket or alike on a flat place in order to prevent the damage of the LCD TV screen Then place TV with screen side facing down Sta...

Страница 8: ...ackets Type1 Width between the wall brackets 100 Width between the wall brackets 200 Assembling figure of the wall brackets Type2 Wall brackets Connecting fitting Complete figure of wall brackets assembly Confirmation of installing direction Installation direction confirmation Fixing screws M5 x 8 Fixing screws M5 x 8 Width between the wall brackets 400 Assembling figure of the wall brackets Type3...

Страница 9: ...on is required please contact the dealer or ask the qualified installers to do it L 8 8 Wall bracket Connecting fitting 1 Put the UP sign of the wall mounting upwards 2 Secure the bracket with market available mounting bolts or screws make sure that it can bear sufficient weight Fix mounting bolts and screws firmly at a consolidated place Choose proper mounting bolts or screws in accordance with t...

Страница 10: ...s of the wall brackets 3 Secure the LCD color TV on the wall brackets assembly Fix the LCD color TV and the wall brackets assembly from both sides by using two screws M5 12 supplied Wall brackets Protruding portions of the TV fix brackets LCD color TV TV fix brackets 1 Hang the upper protruding portions of the TV fix brackets on the notches 2 Lift the LCD color TV slightly and insert the lower pro...

Страница 11: ...e and release the upper protruding portions of the TV fix brackets from the notches of the wall brackets 7 After releasing from the wall brackets move the LCD color TV carefully and place it on the blankets etc prepared in advance Loosen the screw Change and extension of connections If the extension and change of the connection is required after the installation please consult the dealer or ask th...

Страница 12: ... Parts Please make sure all the parts are included Quantity Parts Small parts in the box Nominal method of screws is as below SPRING WASHER FLAT WASHER t L Small parts in the box Accessory parts NO L Screw type t Quantity WAL13CS Parts Wall Bracket Connection Bracket L 2 1 Connection Bracket R 1 TV fix Bracket 2 e M5 8 Screw 6 M5 12 Screw 2 d c M4 12 Screw 4 M6 14 Screw 4 b M8 14 Screw 4 a M8 14 S...

Страница 13: ...ation of the wall condition balance and strength etc Specification MODEL WAL13CS Dimension W 160mm H 345mm D 58mm Pitch 100 Type W 260mm H 345mm D 58mm Pitch 200 Type W 460mm H 345mm D 58mm Pitch 400 Type Mass 1 3kg Design and specification are subject to change without notice TV fix bracket pitch 100 type TV fix bracket pitch 200 type TV fix bracket pitch 400 type Lcd TV L L R L L L ...

Отзывы: