38
DSS
®
Satellite Receiver Set-up (continued)
VCR display
6
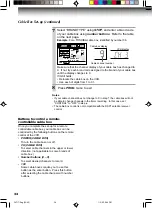
Select “CONTROL” using
PLAY/x2 or STOP, and set to “O
n
”
or “OFF” using
FF or REW.
O
N
: if your DSS
®
satellite receiver is
remote-controllable.
• Satellite channels will be selected by
CH (CABLE BOX) on the remote
control.
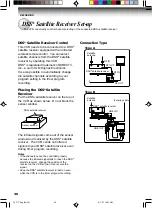
The VCR can change the satellite
channel to the desired one when timer
recording starts.
→
Go to step 7.
OFF: if your DSS
®
satellite receiver is
NON remote-controllable.
• Satellite channels will be selected by
the own channel selector of the DSS
®
satellite receiver.
The VCR channel should be set to the
output channel of the DSS
®
satellite
receiver.
→
Go to step 8.
7
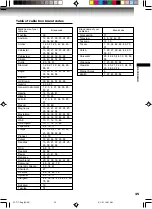
Select “BRAND TYPE” using
STOP, and enter a brand code
of your DSS
®
satellite receiver using
number buttons. Refer
to the table on the next page.
Example: For a TOSHIBA DSS
®
satellite receiver, identified by
number 99.
Make sure that the background of the above display has changed to
the satellite program on channel 200. If not, relocate the DSS
®
satellite receiver on the VCR so that it can receive the infrared signal.
8
Press
PROG. twice to exit.
Notes
• If your satellite channel does not change to 200 in step
7
, the DSS
®
satetllite
receiver will not be able to change channels in the timer recording. In this
case, set “CONTROL” to “OFF” in step
6
.
• The VCR Plus+ C system recording is not available on satellite channels.
• The DSS
®
satellite receiver control is not compatible with the cable box
control.
3
®
USE no C. Box DSS
OUTPUT CH 3 CH
CO
n
TROL Off on
BRA
n
D TYPE no. 36
USE no C. Box DSS
OUTPUT CH 3 CH
CO
n
TROL Off on
USE no C. Box DSS
OUTPUT CH 3 CH
CO
n
TROL Off on
BRA
n
D TYPE no. 99
TO SET BRAND TYPE
PUSH 0~9 KEYS
W-717/Eng (24-40)
9/1/01, 10:41 AM
38

