background image

27

RECORDING

If a power failure occurs during the
timer program recording

• When a power failure has occurred, “- -:- -”

appears in the VCR display.  Since the
programmed contents have been cleared,
reset the clock and timer programming.

• When power has failed for a short time, the

colon of the current time display blinks. The
programmed contents are not affected. Reset
the clock.

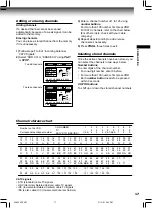
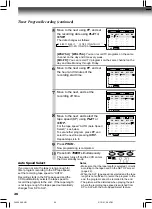
Overlaps of the programs

If two timer programs overlap, the recording start
time of program 1 has priority over the recording
off time of program 2.

Program 1
(Start time)

Program 2
(Start time)

Overlapped portion
(not recorded)

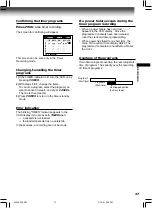
Confirming the timer programs

Press 

PROG


while timer recording.

The screen for confirming will appear.

This screen can be sure only in the Timer
Recording mode.

Changing/cancelling the timer
programs

1) If the TIMER indicator is lit, turn the VCR on by

pressing 

POWER.

2) With steps 

2

 to 

9

, change the items.

To cancel a program, select the program you
want to cancel in step 

4

, and press 

CANCEL.

The line is then cleared.

3) Press 

POWER to return to the timer standby

mode.

Error indication

The blinking “TIMER” indicator appears in the
VCR display if you press both 

TIMER when:

–– a cassette is not loaded.
–– the loaded cassette has no safety tab.

In these cases, a recording can not be made.

n

 D  :    PROG

CH   DATE    O

n

     OFF    SPD

- -    -/--      -:- -     -:- -         -
- -    -/--      -:- -     -:- -         -
- -    -/--      -:- -     -:- -         -

- -    -/--      -:- -     -:- -         -
- -    -/--      -:- -     -:- -         -

2 5    8/30      9:30     10:00     SP  

P

M

P

M

W-604 04 ENG

2/12/01, 2:26 PM

27

Содержание W-604

Страница 1: ...Video Cassette Recorder W 604 OWNER S MANUAL CHANNEL PLAY STOP FF EJECT POWER REW W 604 01 ENG 2 12 01 2 20 PM 1 ...

Страница 2: ...lightning flash with arrowhead symbol within an equilateral triangle is intended to alert the user to the presence of uninsulated dangerous voltage within the product s en closure that may be of sufficient magnitude to constitute a risk of electric shock to per sons The exclamation point within an equilateral triangle is intended to alert the user to the presenceofimportantoperatingandmainte nance...

Страница 3: ...y after moving it from a cold location to a warm location When the VCR is exposed to such a change in temperature moisture may condense on the cylinder inside one of its most crucial internal parts To prevent the VCR from possible damage do not use the unit for at least 2 hours when there is an extreme or sudden change in temperature Compatibility This video cassette recorder VCR is compatible wit...

Страница 4: ...he product and to protect it from overheating and these openings must not be blocked or covered The openings should never be blocked by placing the product on a bed sofa rug or other similar surface This product should not be placed in a built in installation such as a bookcase or rack unless proper ventilation is provided or the manufacturer s instructions have been adhered to 5 Heat The product ...

Страница 5: ... CONDUCTORS NEC SECTION 810 21 GROUND CLAMPS POWER SERVICE GROUNDING ELECTRODE SYSTEM NEC ART 250 PART H NEC NATIONAL ELECTRICAL CODE S2898A 10 Outdoor Antenna Grounding If an outside antenna or cable system is connected to the product be sure the antenna or cable system is grounded so as to provide some protection against voltage surges and built up static charges Article 810 of the National Elec...

Страница 6: ...hock Never spill liquid of any kind on the product 15 Accessories Do not place this product on an unstable cart stand tripod bracket or table The product may fall causing serious injury to a child or adult and serious damage to the product Use only with a cart stand tripod bracket or table recommended by the manufacturer or sold with the product Any mounting of the product should follow the manufa...

Страница 7: ...deo Cassette Use 18 PLAYBACK Explains variable functions concerning playback Playback 19 Basic Playback Double Speed Playback Variable Speed Playback 20 Picture Search Still Picture Frame Advance Slow motion Picture Useful Functions in Tape Operation 22 Counter Function Tape Remaining Time Memory Stop Feature RECORDING Explains recording functions Recording a TV Program 24 Basic Recording Watching...

Страница 8: ...AY FF Cassette compartment REW EJECT POWER LINE IN 2 VIDEO jack LINE IN 2 AUDIO L MONO R jacks REC 7 8 0 100 9 6 5 2 3 4 1 STOP PLAY FF REW SLOW PAUSE STILL CANCEL A SELECT EJECT PROG ENTER TIMER TV VOL CH TRK REC SP SLP DISPLAY TV VCR COUNT RESET REMAIN COUNTER I SELECT POWER VCR TV TV Number buttons I SELECT DISPLAY REMAIN COUNTER SP SLP REC 19 21 14 18 REW SLOW VCR POWER CH TRK TV VOL TV VCR CO...

Страница 9: ...sette indicator Timer recording indicator STEREO indicator Hi Fi indicator SAP indicator Hi Fi L R indicators L Left channel R Right channel off Normal track VCR Display Hi Fi STEREO S L P SAP VCR REC L R TIMER INTRODUCTION P L R CH selector 3 4 LINE OUT AUDIO jacks L R LINE OUT VIDEO jack RF IN FROM ANT terminal LINE IN 1 AUDIO jacks L R RF OUT TO TV terminal LINE IN 1 VIDEO jack CH OUT TO TV IN ...

Страница 10: ... If the remote control does not operate correctly replace all batteries with new ones If the remote control is not to be used for a long period of time remove the batteries to avoid possible damage from battery corrosion Caring for the remote control Do not expose the remote sensor of the VCR to a strong light source such as direct sunlight or illumination especially high frequency lighting when u...

Страница 11: ...litter not supplied 1 2 Connections Before you use this VCR it is necessary to connect it to your TV Several ways of connecting are available depending on your use of TV or cable box Select one which is applicable to your equipment PREPARATION L R CH OUT TO TV IN FROM ANT LINE OUT LINE IN 1 VIDEO AUDIO 3 4 RF LINE OUT VIDEO VIDEO IN AUDIO IN LINE OUT AUDIO Cable Connection Choose one of the below ...

Страница 12: ...H OUT TO TV IN FROM ANT LINE OUT LINE IN 1 VIDEO AUDIO 3 4 RF Cable box L R CH OUT TO TV IN FROM ANT LINE OUT LINE IN 1 VIDEO AUDIO 3 4 RF A B A B A B This set up will enable you to record an unscrambled channel watch an unscrambled channel while recording it record an unscrambled channel while watching another scrambled or unscrambled You will need to set TV channel to the output channel of the c...

Страница 13: ...VCR automatically sets the clock using the data broadcast by the local TV stations While AUTO is blinking channel memory is also set automatically 3 When Auto set up has been completed the VCR is on standby mode Notes It may takes several minutes during the Auto set up Press CANCEL on the remote control to cancel the auto set up 7 8 0 100 9 6 5 2 3 4 1 STOP PLAY FF REW CANCEL W 604 02 ENG 2 12 01 ...

Страница 14: ...VCR 4 Press PROG to return to the normal TV screen 3 Select the language using PLAY CURSOR or STOP CURSOR and press PROG The screen turns to the MENU screen EnD PROG ENTER MEnU EnD PROG ENTER 7 8 0 100 9 6 5 2 3 4 1 STOP PLAY FF REW POWER VCR FF PLAY STOP ENTER PROG REW Optional settings on the SET UP screen Other optional settings can be made Press ENTER while SET UP is selected on the MENU scree...

Страница 15: ...ock using the first Coordinated Universal Time information it finds If the time is not correct select another time zone or use the MANU option 3 Set CLOCK DATA CH If you don t know the clock data channel select AUTO The VCR will scan automatically to tune the channel carrying the clock data If AUTO CLOCK SET is unsuccessful set the time and date through the MANU clock set menu selection 10 Press P...

Страница 16: ...nd press ENTER 4 Set TV CATV to TV or CATV using FF or REW TV To store channels received via the antenna CATV To store channels received via the incoming cable 5 Select AUTO SCAN using PLAY or STOP and press FF to set to ON The VCR starts scanning and the channels are stored in the VCR in ascending order When the scanning is finished the screen automatically returns 6 Press PROG three times to exi...

Страница 17: ...check with your cable company 4 Repeat steps 2 and 3 to add or erase channels as necessary 5 Press PROG three times to exit Selecting stored channels Once the active channels have been stored you can select the channels in two ways below Number buttons To enter digits of the channel number For one digit number enter 0 before For more than 100 number first press 100 Each number button needs to be p...

Страница 18: ...in injury or damage Take special care with children to avoid accidents Precautions when using video cassettes Video cassettes have a safety tab to prevent accidental erasure If the tab has already been removed recording cannot be performed To prevent accidental erasure Remove this safety tab with a screwdriver To record again Cover the tab hole with adhesive tape Avoid exposing cassettes to direct...

Страница 19: ...nt hold down one of CH TRK to adjust the tracking manually Notes During the adjusting the playback picture and sound may be distorted The digital auto tracking is activated only in the playback mode The noise on the screen may not be completely eliminated depending on the tape used especially when the tape was recorded on another VCR S S L P VCR REC L TIMER S S L P VCR REC L TIMER PLAYBACK Playbac...

Страница 20: ... To resume normal playback Press PLAY Still Picture A picture freezes so that you can watch closer 1 Press PAUSE STILL during playback The picture freezes To resume normal playback Press PAUSE STILL again Notes The still mode is automatically cancelled after about 5 minutes and returns to normal playback The still picture may shake if a picture of a fast moving object or scene is frozen This is no...

Страница 21: ...d alternates between 1 7th and 1 15th To resume normal playback Press PLAY Notes The slow motion picture mode is automatically cancelled after about 5 minutes and returns to normal playback The slow motion picture may flicker up and down This is not a defect in the unit Adjusting the Tracking Manually If the slow motion picture is noisy hold down one of CH TRK until the best picture is obtained No...

Страница 22: ...r on the TV screen Each time you press REMAIN COUNTER the VCR display changes in sequence as follows The indication above will also appear on the TV screen by pressing DISPLAY They are switchable with REMAIN COUNTER To reset the linear time counter to 0 00 00 The counter is automatically reset to 0 00 00 when a cassette is ejected If you want to reset at another point such as the beginning of a ne...

Страница 23: ...tedly You may also discover other useful application for this feature Notes If you are rewinding the tape and the VCR stops at 0H00M00S M press REW again to continue rewinding If you press the FF fast forward button and the time counter never reaches 0H00M00S M between that point and the end of the tape the VCR will continue to fastforward to the end of the tape Memory Stop Feature Zero Return 7 8...

Страница 24: ... picture and sound quality than using the SP tape speed 5 Press REC on the VCR or simultaneously press both REC on the remote control Recording starts 6 Press STOP to stop recording Recording off time setting By setting the recording off time the recording stops and the VCR is turned off automatically While recording press simultaneously both REC on the remote repeatedly to set the desired off tim...

Страница 25: ... If your cable box is not remote controllable choose the desired channel 1 to 125 on the cable box To make corrections Press REW to move back to the item or FF to forward Continued Timer Program Recording The programmable timer allows you to record up to 6 different programs over one month Preparation Select the video channel 3 or 4 or video input mode on the TV Make sure that the clock is set cor...

Страница 26: ...r program recording in the SP tape speed set the recording tape speed to AUTO Recording starts in the SP tape speed and the VCR automatically selects the tape speed to record the program to the end If the tape length is not long enough the tape speed automatically changes from SP to SLP Notes Make sure that the tape length is selected correctly according to the tape used on the SET UP screen page ...

Страница 27: ...ot recorded Confirming the timer programs Press PROG while timer recording The screen for confirming will appear This screen can be sure only in the Timer Recording mode Changing cancelling the timer programs 1 If the TIMER indicator is lit turn the VCR on by pressing POWER 2 With steps 2 to 9 change the items To cancel a program select the program you want to cancel in step 4 and press CANCEL The...

Страница 28: ...riately Hi Fi sound track Contents of recorded sound On Screen Display Press DISPLAY Setting of SAP SET on the SET UP screen Type of receiving broadcast Normal sound track Mono L R SAP STEREO ON or OFF not lit not lit MONO MONO MONO ON or OFF not lit lit MONO MIXED ON lit not lit MONO MONO SAP OFF lit not lit MONO MONO MONO ON lit lit MONO MONO SAP OFF lit lit MONO MIXED STEREO STEREO Regular mona...

Страница 29: ... s ENTER key Important Some TVs may not respond to all the operations above or may not be operated at all with this remote control In this case operate your TV with its own remote control Notes For some brands several control codes brand codes are allocated Try each of them until the buttons work on your TV If you replace the remote control s batteries set the brand code again Multi Brand Remote C...

Страница 30: ...1 Nikko 11 Optimus 09 Optonica 08 Panasonic 07 10 15 Penney 01 02 07 11 12 Philco 10 Philips 10 Princeclub 12 Prism 07 Proscan 02 Proton 11 Table of Brand Codes Pulser 14 Quasar 07 15 Radio Shack 13 RCA 02 Realistic 09 11 13 Runco NEC 14 Samsung 11 12 Sanyo 09 Scotch 11 Scott 11 Sears 01 02 09 10 11 Sharp 08 13 Sony 03 Soundesign 11 Supreme 03 Sylvania 10 Tandy 08 Technics 07 15 Techwood 07 Teknik...

Страница 31: ...d cassette has no safety tab Use a cassette with a safety tab or cover the hole with adhesive tape page 18 The playback picture is poor Tracking is not set appropriately Adjust the tracking manually page 19 The video heads are dirty Clean the video heads with a commercially available cleaning tape The desired sound is not heard such as SAP stereo or regular sound Setting of sounds is not correct S...

Страница 32: ...tacle may be in the way of the operation Remove the obstacle The operating mode of the remote control is not set correctly Press VCR or TV depending on the equipment you want to operate pages 14 29 The cassette is ejected immediately after it is loaded The cassette was inserted with the label side not paralleling the compartment Reload it carefully page 18 The cassette does not go into the cassett...

Страница 33: ...SP SLP Playback VHS format SP LP SLP Cassette Video cassette with mark Tape speed SLP 11 1 mm s SP 33 4 mm s Video recording playback time SLP 480 minutes SP 160 minutes When T 160 video cassette is used Fast forward rewind time Within approx 60 s When T 120 video cassette is used Video input 1 V p p 75 Ω unbalanced negative sync pin jack Video output 1 V p p 75 Ω unbalanced negative sync pin jack...

Страница 34: ...ed this product This is one way to enable TACP THI to provide you with better customer service and improved products Failure to return the card will not affect your rights under this warranty Your Responsibility The above warranties are subject to the following conditions 1 You must retain your bill of sale or provide other proof of purchase 2 You must notify an Authorized TACP THI Service Station...

Страница 35: ...r dealer or company is authorized to change modify or extend the terms of these warranties in any manner whatsoever The time within action must be commenced to enforce any obligation of TACP THI arising under the warranty or under any statute or law of the United States or any state thereof is hereby limited to ninety 90 days from the date you discover or should have discovered the defect This lim...

Отзывы: