background image

35

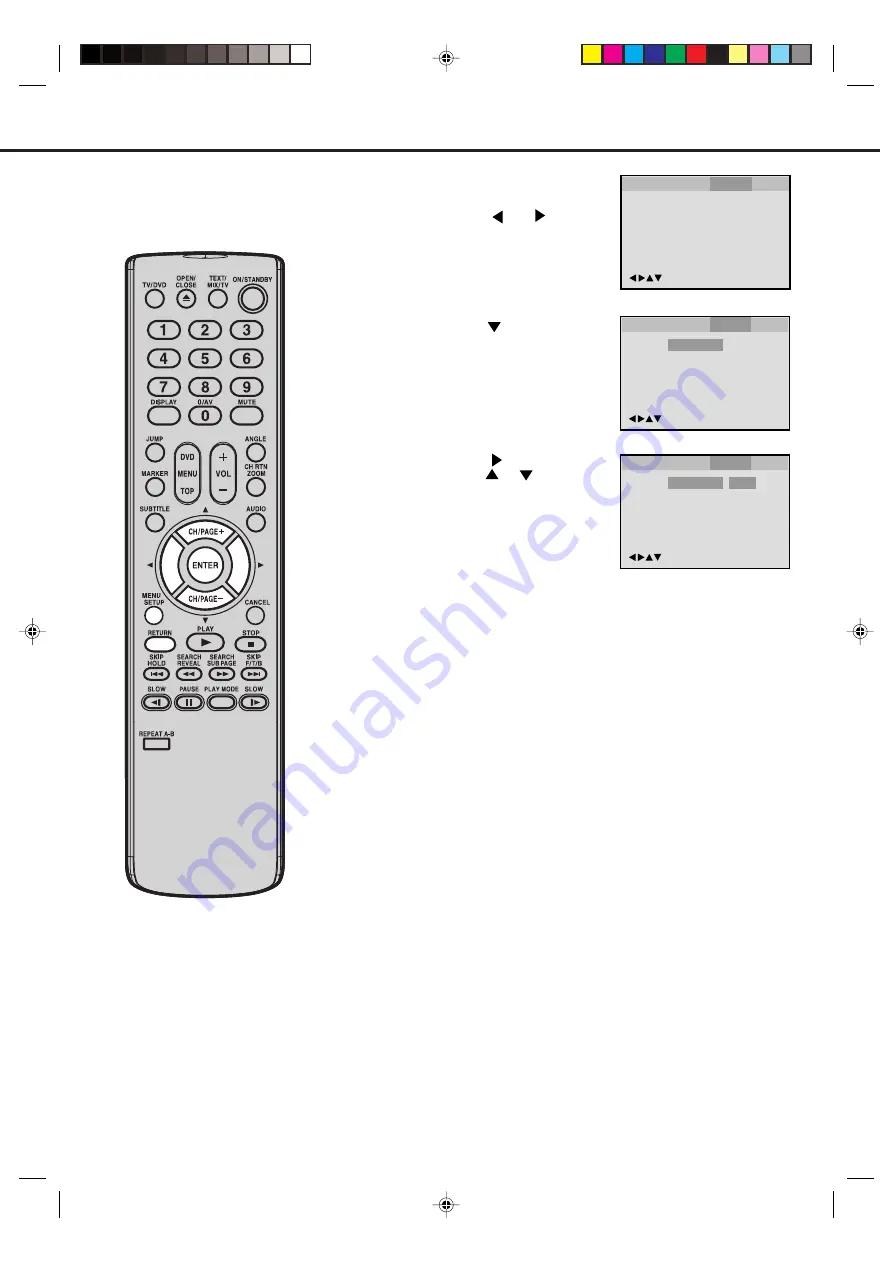
DYNAMIC RANGE CONTROL

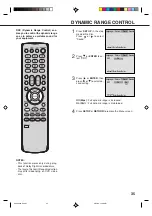
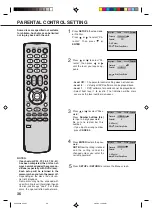
1

Press 

SETUP 

in the stop

mode or No Disc.
Press 

  or 

  to select

“Sound”.

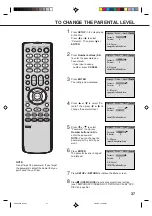
2

Press 

 or 

ENTER

 to se-

lect “DRC”.

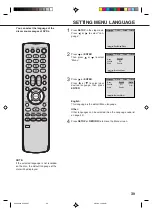
3

Press 

  or 

ENTER

, then

press 

 or 

 to select de-

sired setting.

Off (Max)

: Full dynamic range is increased.

On (Std)

: Full dynamic range is maintained.

4

Press 

SETUP 

or 

RETURN

 to remove the Menu screen.

DRC (Dynamic Range Control) ena-
bles you to control the dynamic range
so as to achieve a suitable sound for
your equipment.

NOTES:

• This function works only during play-

back of Dolby Digital recorded discs.

• The level of Dynamic Range Reduction

may differ depending on DVD video
disc.

/Enter/Setup/Return

DRC

On

Language

Picture

Parental

Sound

/Enter/Setup/Return

Language

Picture

Parental

Sound

/Enter/Setup/Return

Language

Picture

Parental

Sound

DRC

On

Off

On

 5Q40401A P32-37

3/25/05, 10:46 AM

35

Содержание VTD1552

Страница 1: ...Combination 15 Flat TV and DVD Video Player TELETEXT Region ALL discs only MODEL VTD1552 USER GUIDE DIGITAL VIDEO 5Q40401A Cov In 3 25 05 10 43 AM 1 ...

Страница 2: ...ION EXPOSURE IF DIRECTED BE SURE TO OPERATE THE PLAYER CORRECTLYAS INSTRUCTED THE FOLLOWING CAUTION LABEL IS LOCATED ON THE REAR PANEL OF THE UNIT WHEN THIS UNIT IS PLUGGED INTO THE WALL OUTLET DO NOT PLACE YOUR EYES CLOSE TO THE OPENING OF THE DISC TRAY AND OTHER OPENINGS TO LOOK INTO THE INSIDE OF THIS UNIT USE OF CONTROLS OR ADJUSTMENTS OR PERFORMANCE OF PROCEDURES OTHER THAN THOSE SPECIFIED HE...

Страница 3: ...shorten the life of the equipment DON T allow electrical equipment to be exposed to dripping or splashing or objects filled with liquids such as vases to be placed on the equipment DON T place hot objects or naked flame sources such as lighted candles or nightlights on or close to equipment High temperatures can melt plastic and lead to fires DON T use makeshift stands DON T listen to headphones a...

Страница 4: ... Dolby Digital AC 3 and DTS Playback of DVD Video CD SVCD Audio CD and MP3 WMA JPEG CD PAL NTSC DVDs playback A B Repeat playback DISC 20 PREPARATION 21 STATUS DISPLAY OF DISC 21 PLAYBACK PROCEDURE 22 SPECIAL PLAYBACK 23 MP3 WMA JPEG PLAYBACK 24 SETTING THE JPEG INTERVAL 26 SETTING THE SELECT FILES 27 ZOOMING 28 CHANGING ANGLES 28 LOCATING DESIRED SCENE 28 REPEAT PLAYBACK 29 PROGRAM PLAYBACK RANDO...

Страница 5: ...STOP button OPEN CLOSE button VIDEO AUDIO IN L R jacks AV2 FWD SKIP button REV Reverse SKIP button PLAY button Phones socket Main Power Switch STANDBY Indicator Disc tray VOLUME buttons Remote sensor CHANNEL buttons Mains Lead to AC outlet Indoor Aerial Holder 5Q40401A P01 07 3 25 05 10 43 AM 3 ...

Страница 6: ...k 28 SUBTITLE Set Subtitle of a DVD disc 32 AUDIO Change sound track language of DVD 32 33 CH PAGE Select channel of the TV 13 14 Utilize the teletext 19 B A Cursor buttons ENTER Enter information in the menu Select option in the menu MENU SETUP Display menu of setup 10 12 15 16 26 27 34 37 39 41 CANCEL Cancel input data in the setting mode 14 15 28 30 31 36 37 RETURN Remove DVD set up menu 26 27 ...

Страница 7: ... yearly basis or when remote operation becomes erratic Do not mix old and new batteries Weak batteries can leak and severely damage the remote control transmitter Always remove batteries as soon as they become weak Dispose of batteries in a designated disposal area Do not throw batteries into a fire BATTERY CAUTIONS NOTES When direct sunlight an incandescent lamp fluorescent lamp or any other stro...

Страница 8: ...it locks into place Insert the aerial adaptor supplied to the aerial socket Adjust the angle of the loop aerial to receive the best possible picture INDOOR AERIAL A The type of aerial required depends on the position of your home it s distance from the transmitter and local interference If you do not have an aerial and you are uncertain of what to buy you should seek the advice of a local aerial c...

Страница 9: ...of each component Check the Owner s Manual provided with each component for the location of video and audio inputs and outputs Coaxial digital cable not supplied AV Amplifier with built in digital surround decoder as listed above Centre Speaker Front Speaker Left Front Speaker Right Subwoofer Surround Speaker Left Surround Speaker Right Coaxial Digital Audio Output To Coaxial Digital Audio Input T...

Страница 10: ...ed to consult each component s Owner s Manual for additional information 1 To connect the unit to a VCR Press 0 AV to select AV1 to use the TV as a monitor Press TV DVD to select TV mode and then press 0 AV repeatedly to select AV1 or AV2 AV1 Scart socket AV2 Front AV input TV program CONNECTION TO OTHER EQUIPMENT 4 To connect the unit to another TV set ie a widescreen set see P 34 Connect the uni...

Страница 11: ...RST TIME THE AUTOMATIC TUNING PROCESS WILL BE AVAILABLE 1 Press the Main POWER switch on the unit Then press ON STANDBY on the remote control 2 Press ENTER Your unit will now automatically tune in all available channels When the programme on the screen stops changing and the sound comes on the tuning process is complete NOTE If you use the supplied loop aerial weak channels may not be stored autom...

Страница 12: ...hat you can do this Press or to select the AUTOmode thenpressENTER 3 Allavailablechannelsinyourarea are automatically scanned and stored in the memory of the unit When the programme on the screen stops changing and the sound comes on the tuning process is complete 4 Press MENU twice The unit will return to normal TV screen The automatic tuning will not necessarily store the chan nels in the correc...

Страница 13: ...ess or to select the CHANNEL SETUP mode then press ENTER AV COLOUR PAL PICTURE MENU PRESS ENTER MENU CHANNEL SETUP MANUAL TUNING How to tune a station to channel 10 position CHANNEL SETUP PRESS ENTER MENU AUTO CH ALLOCATION MANUAL Repeat steps 3 through 4 until all the required channels have been stored When all desired channels have been set in your required position press MENU three times to ret...

Страница 14: ...TION AUTO Press or to select the channel position No broadcast ing which you want to change Then press ENTER 3 Press or to select the channel allocation No that you want to change to 4 Press ENTER The numbers of thestationsarechanged Repeat steps 3 4 to change the order of other channels Then press MENU three times to return to normal TV screen 5 PRESS ENTER MENU CH ALLOCATION CH 1 CH 2 PRESS ENTE...

Страница 15: ...l Selection buttons on the remote control 1 9 CH Press your required number only 10 80 CH Pressthetwodigitsinaccordancetothechannel numbers required VOLUME 32 0 CH Press CH or on the remote control 3 The VOLUME can be adjusted by pressing the VOL or on the remote control NOTE On screen display will disappear after 4 seconds Automatic Power Shut Off Ifastationbeingviewedstopsbroadcasting for about ...

Страница 16: ...NEL RETURN DISPLAY When you press this button once the channel number will appear Press this button again then the display will disappear MUTE When MUTE is pressed the TV sound will be turned off completely To disable this function press the button again or VOL or After all channels available in your area have been set in memory you can skip unwanted channels as follows SKIP FUNCTION 1 PressCH or ...

Страница 17: ...RAST COLOUR NOTE Each time is pressed the on screen display will change as shown below To adjust the BRIGHTNESS press or then press TINT Press MENU twice to return to normal TV screen SHARPNESS 3 BRIGHTNESS 0 PRESS B A C D MENU NOTES Thepicturesettingscanonlybeadjusted when they are displayed on screen Pressing CANCEL will return all adjustments to their factory preadjusted levels This function is...

Страница 18: ...ipment to the unit the picture may become black and white This can be corrected by selecting AV Extension Colour as follows PICTURE MENU PRESS ENTER MENU CHANNEL SETUP AV COLOUR PAL 2 Press ENTER to select one of the colour options PAL or NTSC4 43 Usually select the PAL option 3 Press MENU to remove the menu from the screen 5Q40401A P08 17 3 25 05 10 44 AM 16 ...

Страница 19: ...the other isreflectedfromtallbuildings hillsorsimilarobstruction Changingthedirectionand orposition of the aerial may improve reception SNOW If your TV is located on the fringe area of a TV station where the signal is weak your picture may be affected by the appearance of small dots SNOW It may be necessary to install a stronger aerial to improve the picture RADIO FREQUENCY INTERFERENCE This kind ...

Страница 20: ...ush TEXT MIX TV The first push on TEXT MIX TV switches the Teletext on The second push on TEXT MIX TV displays the TV program and the Teletext together MIX The third push on TEXT MIX TV switches the Teletext off and returns the screen back to the TV program TV GUIDE P100 TELETEXT 100 JAN 1 12 00 00 SPORT NEWS WEATHER Selected page number Time Teletext service name Date Displayed page number scroll...

Страница 21: ...s upper left corner will display To call sub page 2 enter 0 0 0 2 Your input will be displayed in the upper left corner 0002 It may take some time until sub page 2 is broadcast The sub page can only be displayed when the broadcaster transmits it To leave sub page mode push SUB PAGE again Within the sub page mode no other pages other than the sub pages of the selected page can be called To call oth...

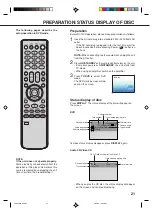
Страница 22: ...ral items These are assigned to tracks On handling Disc Do not touch the playback side of the disc Do not attach paper or tape to discs Removing Disc from Case Be sure to hold the edge of disc Do not touch the surface of the disc Pick up the disc gently from the case Do not scratch the disc Do not get dirt on the surface of the disc Do not stick a label or adhesive tape on the disc Do not drop or ...

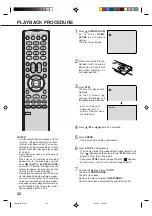
Страница 23: ...llows Insert the AC cord plug into a standard 230V 240V 50Hz AC outlet If the AC cord plug is plugged in for the first time wait for about 5 seconds before pressing Power button on the front NOTE When connecting to other equipment unplug the unit from the AC outlet Press ON STANDBY on the remote control to turn on the unit Every time you press ON STANDBY the unit starts from TV mode When using an ...

Страница 24: ...d point 7 To stop the playback press STOP Then press OPEN CLOSE The disc tray opens Remove the disc and press ON STANDBY The disc tray closes automatically and unit turns off NOTES If a non compatible disc is loaded Incor rect Disc Region Code Error or Paren tal Error will appear on the TV screen ac cording to the type of loaded disc If these appear check your disc again see pages 20 and 36 Some d...

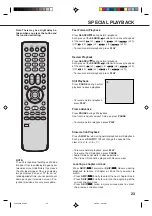
Страница 25: ...ormalplaybackorstillplayback Each press of SLOW will change the speed of the slow x1 2 x1 4 x1 6 x1 7 Slow motion Playback To resume normal playback press PLAY Locating a chapter or track NOTE The unit is capable of holding a still video image or On screen display image on your television screen indefinitely If you leave the still video image or On screen display image displayed on your TV for an ...

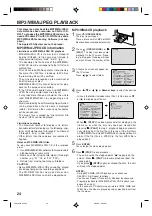
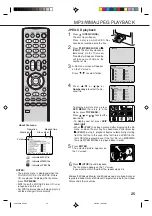
Страница 26: ...nditions The CD R RW that has no music data or non MP3 WMA JPEG files can not be played back Press OPEN CLOSE The disc tray will open Place a disc on which MP3 or WMA files have been recorded onto the tray Press OPEN CLOSE or 1 1 1 1 1 PLAY The disc tray closes auto matically On the TV screen Read ing will appear Reading will take as much time as the number of file A file menu screen will appear o...

Страница 27: ...ding MP3 WMA JPEG PLAYBACK Press ENTER The selected picture appears on the TV screen Press 3 3 3 3 3 STOP to end playback The file menu appears on the TV screen If you want to watch the other file repeat steps 4 5 To display a picture menu press DVD MENU To return to a file menu press TOP MENU Press or to select the desired file To display next list press SKIP When 1 1 1 1 1 PLAY has been pressed ...

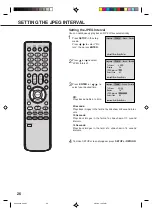
Страница 28: ... show at 5 second inter vals 10 Seconds Plays back images in the form of a slide show at 10 second intervals 15 Seconds Plays back images in the form of a slide show in 15 second intervals To make SETUP screen disappear press SETUP or RETURN Enter Setup Return Language Picture Parental Sound Tv Screen Display On JPEG Interval Select Files 4 3 Enter Setup Return Off All Language Picture Parental So...

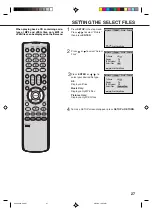
Страница 29: ...ile type All Displays all files Music Only Displays only MP3 files Pictures Only Displays only JPEG files To make SETUP screen disappear press SETUP or RETURN Enter Setup Return Language Picture Parental Sound Tv Screen Display On JPEG Interval Select Files Enter Setup Return Off All 4 3 Language Picture Parental Sound Tv Screen Display On Enter Setup Return JPEG Interval Select Files Off Pictures...

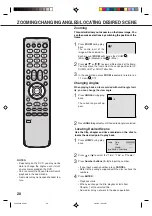
Страница 30: ...ay move the frame from the centre position to UP DOWN LEFT or RIGHT direction 2 Press or to select the Time Title or Chapter Jump Time Title Chapter Enter 0 9 Cancel Jump When playing back a disc recorded with multi angle facil ity you can change the view angle 1 Press ANGLE during play back The current angle will ap pear 2 Press ANGLE repeatedly until the desired angle is selected Changing Angles...

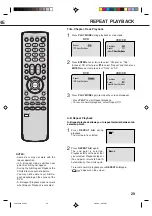
Страница 31: ...ial between two selected points 1 Press REPEAT A B during playback The start point is selected 2 Press REPEAT A B again The end point is selected Playback starts at the point that you selected Playback stops at the end point returns to Point A automatically then starts again A B Repeat Playback VCD CD 2 Press ENTER once or twice to select Chapter or Title In case of CD at first press to select Rep...

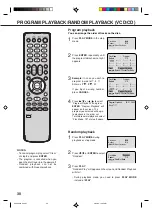
Страница 32: ...de Off Repeat Off Enter Play Mode Program Playback 02 31 08 29 Track 7 11 1 Press PLAY MODE during playback or stop mode Random playback Play Mode Off Repeat Off Enter Play Mode 2 Press or ENTER to select Random 3 Press PLAY Random Play will appear on the screen and Random Playback will start During playback mode you need to press PLAY MODE instead of PLAY NOTES To cancel program play select Clear...

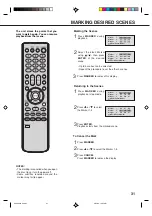
Страница 33: ...s ENTER Playback starts from the marked scene 1 Press MARKER 2 Press or to select the Marker 1 3 3 Press CANCEL Press MARKER to remove the display To Cancel the Mark NOTES The marking is cancelled when you open the disc tray or turn the power off Some subtitles recorded around the marker may fail to appear 3 Press MARKER to remove this display Marker 2 Marker 1 Marker 3 Enter Cancel Marker Marker ...

Страница 34: ...the disc tray The initial default language or available lan guage will be heard if the disc is played back again Changing subtitle language is cancelled when you open the disc tray Some functions may not work on some DVDs You may not be able to turn subti tles on or off or change subtitles While playing the DVD the subtitle may change when you open or close the disc tray you change the title In so...

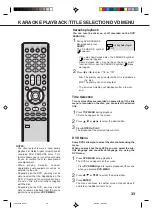
Страница 35: ...y Digital multi channel recorded DVD KARAOKE discs This feature allows you to turn off vocal audio tracks or restore them for background accompaniment When playing Karaoke connect appropriate audio equipment such as an amplifier to the unit Depending on the DVD you may not be able to select the title Depending on the DVD a title menu may simply be called a menu or title in the instructions supplie...

Страница 36: ... picture setting for example if you select 4 3 Panscan the disc may not offer this option In this case the picture would dis play in whichever format the disc is ca pable of playing back Setting the aspect ratio of TV screen You can select the aspect ratio of the picture 1 Press SETUP in the stop mode or No Disc Press or to select Picture 2 Press or ENTER then press or to select Display 3 Press or...

Страница 37: ...e Menu screen DRC Dynamic Range Control ena bles you to control the dynamic range so as to achieve a suitable sound for your equipment NOTES This function works only during play back of Dolby Digital recorded discs The level of Dynamic Range Reduction may differ depending on DVD video disc Enter Setup Return DRC On Language Picture Parental Sound Enter Setup Return Language Picture Parental Sound ...

Страница 38: ...he parental control setting does not function Level 8 Virtually all DVD software can be played back Level 1 DVD software for adults cannot be played back Select from level 1 to level 8 The limitation will be more severe as the level number decreases Press or to select Pass word Press Number buttons 0 9 to input a 4 digit password Be sure to remember this number If you input a wrong number press CA...

Страница 39: ...rental level is changed and locked Press SETUP or RETURN to remove the Menu screen Password Parental 5 Enter Setup Return 1234 0 9 Cancel Language Picture Parental Sound Password Parental 3 Enter Setup Return Language Picture Parental Sound 0 9 Cancel Password Parental 3 Enter Setup Return 0 9 Cancel Language Picture Parental Sound Password Parental 3 Enter Setup Return 0 9 Cancel 1234 Language Pi...

Страница 40: ...ding screen will change depending on which disc is played If you select YES withENTER key Yourdiscexceedstheparentalcontrollevel1 e g screen will then appear 3 Enter the password with Number buttons 0 9 Then press ENTER 4 Playback will commence if the entered password was correct 5 NOTE This temporary cancellation of rating level will be kept until the disc is ejected When the disc is ejected the ...

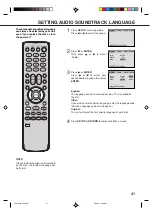
Страница 41: ...ist on page 42 English This language is the default Menu language Press or ENTER Then press or to select Menu 4 You can select the language of the disc menu messages of DVDs Press SETUP in the stop mode Press or to select Lan guage Enter Setup Return Language Picture Parental Sound Menu Subtitle Audio Enter Setup Return English Off English Language Picture Parental Sound NOTE If the selected langu...

Страница 42: ...stop mode Press or to select Lan guage 2 3 Press SETUP or RETURN to remove the Menu screen 4 NOTE If the selected language is not recorded on the disc the first priority language is selected The same subtitle language can always be selected even if you replace the disc or turn the power off Press or ENTER Then press or to select Subtitle The unit will automatically select the same language in the ...

Страница 43: ...meaudiosoundtracklanguage can always be selected by your unit even if you replace the disc or turn the power off English The language you have selected will play if it is recorded on the disc Other If you want to select another language enter the language code See the Language code list on page 42 Original The unit will select the first priority language of each disc Press or ENTER Then press or t...

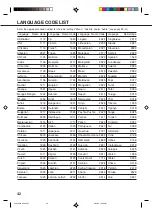
Страница 44: ...n 2425 Thai 3018 Bihari 1218 Hungarian 1831 Oriya 2528 Tibetan 1225 Breton 1228 Icelandic 1929 Panjabi 2611 Tigrinya 3019 Bulgarian 1217 Indonesian 1924 Pashto Pushto 2629 Tonga 3025 Burmese 2335 Interlingua 1911 Persian 1611 Turkish 3028 Byelorussian 1215 Irish 1711 Polish 2622 Turkmen 3021 Cambodian 2123 Italian 1930 Portuguese 2630 Twi 3033 Catalan 1311 Japanese 2011 Quechua 2731 Ukrainian 3121...

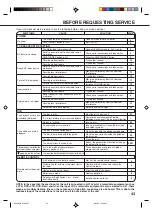
Страница 45: ...ce of interference Try another channel Move the aerial away from the source of interference Increase VOLUME control Check aerial connections or broken wires Try another channel Check aerial connections or broken wires Try another channel Move the aerial away from the source of interference Adjust the colour settings 15 17 13 6 13 6 13 17 13 17 6 13 13 20 Eject the disc and clean it The disc is dir...

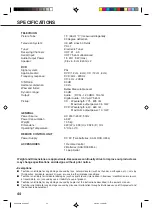
Страница 46: ... mW AC 230V 240V 50Hz 65 W 13 5 kg 440 W x 393 H x 392 5 D mm 5 C to 40 C DC 3V Two batteries AAA R03 UM 4 1 Remote Control 2 Batteries AAA R03 UM 4 1 Loop Aerial Weight and Dimensions are approximate Because we continually strive to improve our products we may change specifications and designs without prior notice SPECIFICATIONS Exemptions Toshiba is not liable for any damage caused by fires natu...

Страница 47: ...5Q40401A P38 LAST 3 25 05 10 46 AM 45 ...

Страница 48: ...J5Q40401A SH 05 04 K 5Q40401A P38 LAST 3 25 05 10 46 AM 46 ...

Страница 49: ...help prevent potential negative consequences for the environment and human health which could otherwise be caused by inappropriate waste handling of this product For more detailed information about recycling of this product please contact your local city office your household waste disposal service or the shop where you purchased the product J5Q40401B SH 05 07 K 5Q40401B P38 LAST 5 23 05 17 17 46 ...

Отзывы: