TOSHIBA SERVER RACK ENCLOSURE
OWNERS MANUAL
Doc. No.: 99881-001
June 2018
Страница 1: ...TOSHIBA SERVER RACK ENCLOSURE OWNERS MANUAL Doc No 99881 001 June 2018 ...
Страница 2: ...This Page Intentionally Left Blank ...
Страница 3: ...ssible contingency concerning installation operation or maintenance Should further information be required or if problems arise which are not covered sufficiently contact your Toshiba sales office The contents of this instruction manual shall not become a part of or modify any prior or existing agreement commitment or relationship The sales contract contains the entire obligation of Toshiba Intern...
Страница 4: ...__________________________________________________ Serial Number _______________________________________________________________________ Application __________________________________________________________________________ Shipment Date ______________________________________________________________________ Installation Date _____________________________________________________________________ Ins...
Страница 5: ...metric and or the English equivalent Toshiba International Corporation reserves the right without prior notice to update information make product changes or to discontinue any product or service identified in this publication TOSHIBA is a registered trademark of the Toshiba Corporation All other product or trade references appearing in this manual are registered trademarks of their respective owne...
Страница 6: ...o 5 p m CST Monday through Friday Toll Free 877 867 8773 Option 1 Order Processing Customer Service Option 2 Application and Sales Support Option 3 Field Service Repair and Maintenance Service You may also contact Toshiba by writing to Toshiba International Corporation Power Electronics Division 13131 West Little York Road Houston Texas 77041 Attn Power Electronic s Division For further informatio...
Страница 7: ...sal 5 8 Rack Enclosure Installation 6 8 1 Unpacking 6 8 2 Moving the Enclosure 7 8 3 Leveling 7 8 4 Ground Connection 8 9 Enclosure Configuration 9 9 1 Installing or Removing Front and Rear Doors 9 9 1 1 Removing Door 9 9 1 2 Installing Door 9 9 1 3 Reversing Front Door 9 9 2 Removing Side Panels 10 9 3 Removing Installing Top Panel 10 9 4 Joining Baying Enclosures 11 10 Adjusting Mounting Rails 1...
Страница 8: ...in death or serious injury to personnel The word WARNING in capital letters preceded by the safety alert symbol indicates that a potentially hazardous situation exists that if not avoided could result in death or serious injury to personnel The word CAUTION in capital letters preceded by the safety alert symbol indicates that a potentially hazardous situation exists which if not avoided may result...
Страница 9: ...oor wall structure is able to withstand the weight of the enclosure while fully loaded Always ensure adequate amount of personnel are present when loading unloading or moving the enclosure to reduce risk of personal injury or product damage Place heavier equipment towards the bottom of the enclosure to avoid unstable conditions Evenly distribute all mounted loads and equipment to ensure stability ...
Страница 10: ... signal instruments combustion control instruments life support equipment all types of safety devices etc Unintended Usage of Toshiba products listed in this document shall be made at the customer s own risk 4 Disclaimer IN NO EVENT WILL TOSHIBA CORPORATION BE RESPONSIBLE OR LIABLE FOR EITHER INDIRECT OR CONSEQUENTIAL DAMAGE OR INJURY THAT MAY COME FROM THE MISUSE OF THIS EQUIPMENT ANY MODIFICATIO...
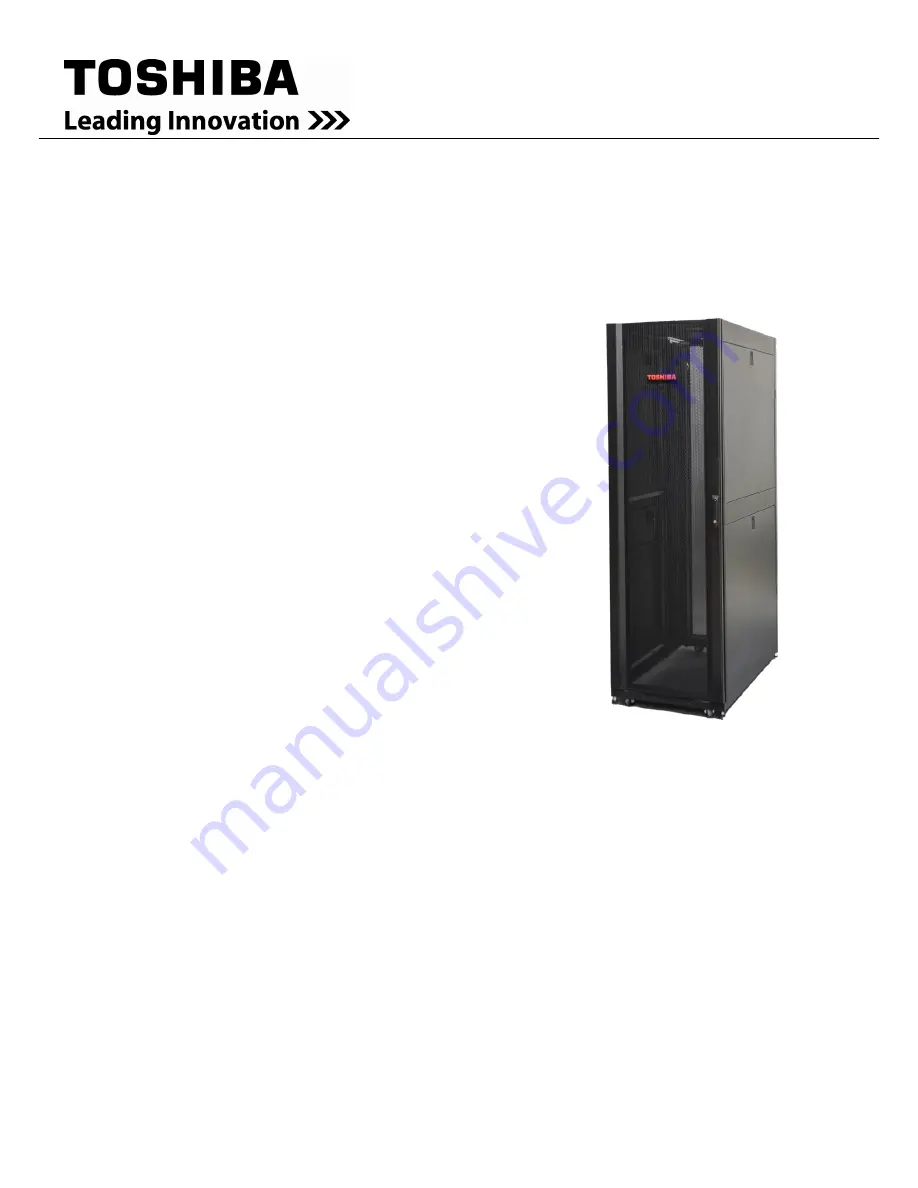
Страница 11: ...e The front and rear doors are perforated for high ventilation The enclosure also comes with leveling feet and heavy duty casters Features Description Weight Capacity 3307 lbs static load 2645 lbs rolling load Doors can be switched front and back left and right Rear double doors can open over 130o for easy mounting and maintenance Perforated doors with high ventilation Vertical mounting rails with...
Страница 12: ...ng agent The warranty does not apply to damage incurred during shipping 7 2 Storage When the enclosure is not in use store the enclosure in its original packaging if possible The enclosure should be stored in an indoor controlled environment It should be stored away from direct sunlight moisture dust extreme temperatures flammable liquid and conductive contaminants 7 3 Disposal Never dispose of el...
Страница 13: ...s 40 qty M6 plastic cup washers 40 qty Tools Needed not included T 25 Torx Screwdriver adjusting mounting rail T 15 Torx Screwdriver adjusting PDU Cable Channel T 30 Torx Screwdriver for door hinges when reversing door 13 mm socket or wrench removal of shipping bracket 13 mm open end wrench adjusting leveling feet 8 1 Unpacking WARNING Use at least two people when unpacking and removing the enclos...
Страница 14: ...hat the enclosure is being moved must be leveled smooth and stable The enclosure can support 2645 lb dynamic rolling load rating 1 Move the enclosure using the casters only for short distances Do not attempt to move the enclosure using casters for over long distances 2 Slowly push the enclosure from the front or rear Do not attempt to move the enclosure from the sides or pull the enclosure towards...
Страница 15: ...e enclosure Figure 8 3 Grounding Wire 3 Each enclosure should be grounded directly to the building ground using the designated grounding location of the enclosure WARNING Attach each enclosure to earth ground separately Do not use the enclosure without an earth ground connection Figure 8 4 Rear Threaded Grounding Point Rear Frame on Bottom ...
Страница 16: ...ned to the enclosure frame hinges 3 The doors self align on hinge pins when properly installed 4 Re connect the ground wire 9 1 3 Reversing Front Door WARNING Do not attempt to reverse the front door without assistance NOTE The front door can be reversed so that the door opens in the other direction This procedure assumes that initially when facing the enclosure the hinges are on the left and the ...
Страница 17: ... door handle by removing the cam screw cam washer and cam Rotate the cam washer 90 degrees and the latch 180 degrees Install the handle on the door 8 Remove and reinstall the Toshiba nameplate 9 2 Removing Side Panels 1 Unlock the panel with the key provided 2 Tilt the top of the panel away from the enclosure 3 Lift the panel away from the brace that supports it Figure 9 3 Side Panel 9 3 Removing ...
Страница 18: ...joining the enclosures Refer to Removing Door on section 7 1 3 Each enclosure includes 4 baying brackets 2 in front 2 in rear Bay the enclosures using one M5 x 12 countersunk screw per bracket Use Phillips head end tool insert the screw into the designated hole and tighten Figure 9 5 Baying Bracket 10Adjusting Mounting Rails WARNING Do NOT adjust rails without assistance Ensure all equipment are r...
Страница 19: ...ed Install the heaviest equipment first and toward the bottom of the enclosure Do NOT install from the top of the enclosure If using sliding rails be careful when extending the rails Do NOT extend more than one set of sliding equipment rails at a time Avoid extending sliding rails near the top of the enclosure Failure to follow these instructions can result in death serious injury or equipment dam...
Страница 20: ...insert the cage nut into the square hole by hooking one ear of the cage nut assembly Press it against the side of the square hole 2 Compress the cage nut at the sides slightly to allow the other ear of the cage nut to fit through the square hole When the cage nut is installed properly both ears will stick out through the square hole and be visible on the outside of the vertical mounting rail 3 Aft...
Страница 21: ...5 1027 6 43 3 1100 TR1X428120 42U 76 9 1955 78 7 1999 5 31 5 800 44 4 1127 6 47 2 1200 TR1X486110 48U 87 4 2221 7 89 2 2266 2 23 6 600 40 5 1027 6 43 3 1100 TR1X486120 48U 87 4 2221 7 89 2 2266 2 23 6 600 44 4 1127 6 47 2 1200 TR1X488110 48U 87 4 2221 7 89 2 2266 2 31 5 800 40 5 1027 6 43 3 1100 TR1X488120 48U 87 4 2221 7 89 2 2266 2 31 5 800 44 4 1127 6 47 2 1200 42U Models are UL 2416 certified ...
Страница 22: ...or contact numbers or visit www toshibaups com Note the model number and serial number and the date of purchase The model and serial numbers are located on the rear of the enclosure If the enclosure is under warranty the repair or replacement is free If it is determined that the enclosure is under warranty and needs to be repaired or replaced please submit a Return Authorization RA Form from www t...
Страница 23: ...ersonnel est présente lors du chargement du déchargement ou du déplacement du boîtier afin de réduire les risques de blessures ou de dommages au produit Placer l équipement le plus lourd vers le bas de l enceinte pour éviter les conditions instables Répartissez uniformément toutes les charges et tous les équipements montés pour assurer la stabilité dans le système d enceinte Les roulettes du l arm...
Страница 24: ...OWER ELECTRONICS DIVISION 13131 West Little York Rd Houston TX 77041 Tel 713 466 0277 Fax 713 466 8773 US 877 867 8773 Canada 800 872 2192 Mexico 01 800 527 1204 www toshiba com tic industrial uninterruptible power systems Printed in China ...