background image

17

16

Preparations

(18)

(16)

(12)(11)

(9)

(10)

(13)

(20)

(2)

(19)

(17)

(15)

(14)

(8)

(1)

(3)(4)(5)(6)

(7)

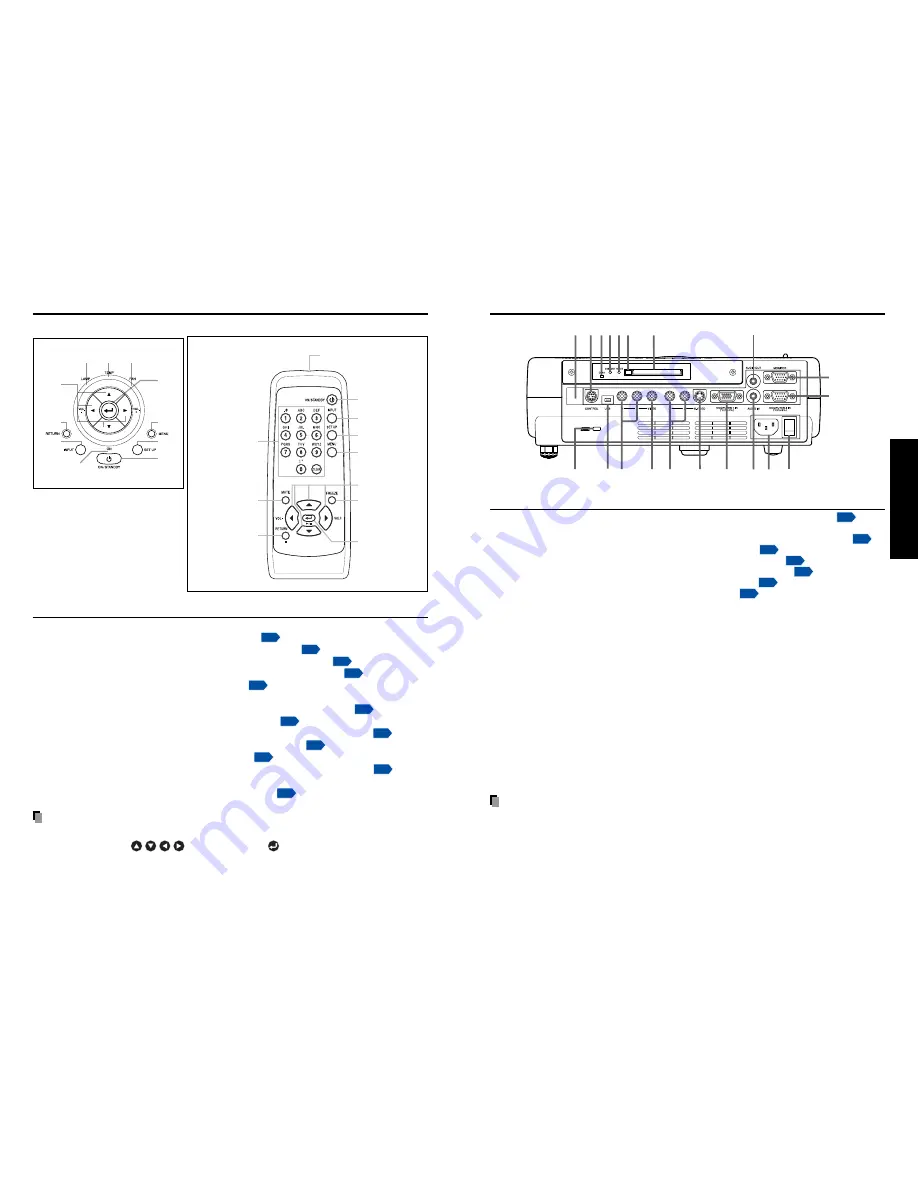
Name

: Main Function

(1) Infrared remote sensor

: Senses commands from the remote control. 

p.18

(2) CONTROL terminal

: When operating the projector via a computer, connect

this to the controlling computer’s RS-232C port. 

p.71

(3) CARD indicator

: Displays PC card’s status. 

p.21

(4) UNMOUNT button

: Press before removing PC card. 

p.21

(5) RESET switch (inside depression) : Press if CARD indicator turns red. 

p.21

(6) Eject button

: Press to remove PC card. 

p.21

(7) PC card slot

: Insert PC cards here. 

p.21

(8) AUDIO OUT terminal

: Outputs audio signals.

(9) MONITOR terminal

: Connect to a computer display, etc.

(10) COMPUTER 2 terminal

: Input RGB signal from a computer or other source, or a

component video signal (Y/P

B

/P

R

) from video equipment.

(11) Main power switch

: AC power line ON (standby)/OFF.

(12) AC IN socket

: Connect the supplied power cord here.

(13) AUDIO IN terminal

: Input audio signals from a computer or video equipment

with a component video signal output terminal.

(14) COMPUTER 1 terminal

: Input RGB signal from a computer or other source, or a

component video signal (Y/P

B

/P

R

) from video equipment.

(15) S-VIDEO terminal

: Input S video signals from video equipment.

(16) AUDIO (L/R) terminal

: Input audio signals from video equipment.

(17) VIDEO terminal

: Input video signals from video equipment.

(18) AUDIO (L/R) terminal

: Input audio signals from video equipment.

(19) USB terminal

: Provided for servicing purposes only. Do not use for

any connection.

(20) Antitheft lock hole

: Attach a safety cable or any other antitheft device.

Note

• Although this owner’s manual abbreviates component video signals as Y/P

B

/P

R

, the

product also supports signals from video equipment marked “Y/C

B

/C

R

.”

Parts on the rear panel

Names of each part on the control panel and remote control

Control panel

Remote Control

(2)

(3)

(4)

(9)

(10)

(11)

(1)

(5)

(8)

(7)

(6)

Name

: Main Function

(1) ENTER button

: Accepts the selected mode.

(2) MENU button

: Displays menus. 

p.29

(3) SET UP button

: Sets up image and mode. 

p.26

(4) ON/STANDBY button

: Turns the power on/off (standby). 

p.22

(5) ON indicator

: Displays whether power is on or off. 

p.22

(6) INPUT button

: Selects input. 

p.24

(7) RETURN button

: Goes back one screen.

(8) Selection button

: Menu selections and adjustments,etc.


p.30

(9) LAMP indicator

: Displays lamp mode. 

p.23

(10) TEMP indicator

: Lights when internal temperature too high. 

p.65

(11) FAN indicator

: Displays cooling fan mode. 

p.65

(12) FREEZE button

: Pauses image. 

p.28

(13) MUTE button

: Cuts off the picture and sound temporarily. 

p.28

(14) Numeric keypad

: Use to set up the wireless LAN. Numbers and charac-

ters can be entered. 

p.37

Note

• For the remainder of this manual, buttons are referred to as follows:

Selection buttons 


; ENTER button 


Remote control 
transmitter

(4)

(3)

(8)

(6)

(1)

(2)

(12)

(14)

(13)

(7)

Содержание TLP-TW90

Страница 1: ...Others Maintenance Operations Preparations Before Using OWNER S MANUAL DATA PROJECTOR TDP TW90 XGA With PC Card Slot ...

Страница 2: ...of electric shock to persons The exclamation point within an equilateral triangle is intended to alert the user to the presence of important operating and maintenance servicing instructions in the literature accompanying the appliance WARNING TO REDUCE THE RISK OF FIRE OR ELECTRIC SHOCK DO NOT EXPOSE THIS APPLIANCE TO RAIN OR MOISTURE DANGEROUS HIGH VOLTAGES ARE PRESENT INSIDE THE ENCLOSURE DO NOT...

Страница 3: ...on this product or do not place this product on the other equipment Top and bottom plates of this product develops heat and may give some undesirable damage to other unit 14 Attachments Do not use attachments not recommended by the product manufacturer as they may cause hazards 5 Heat The product should be situated away from heat sources such as radiators heat registers stoves or other products in...

Страница 4: ...ot place this product on an unstable cart stand tripod bracket or table The product may fall causing serious injury to a child or adult and serious damage to the product A product and cart combination should be moved with care Quick stops excessive force and uneven surfaces may cause the product and cart combination to overturn S3125A 16 Damage Requiring Service Unplug this product from the wall o...

Страница 5: ...perature Place and Manner of Installation Do not place in hot locations such as near heating equipment Doing so could cause malfunction and shorten the life of the projector Avoid locations with oil or cigarette smoke Doing so will dirty the optical parts shortening their lives and darkening the screen Do not use the product vertically in any upright position or slantwise in an angle of 20 degrees...

Страница 6: ...k and lead to burn or injury If battery leaking fluid contacts skin wash the fluid off immediately with clean water and consult a doctor If the fluid is spilt on an instrument avoid contact and wipe it off using tissue paper Dispose of the used tissue paper as flammable garbage after moistening with water OTHER CAUTIONS AND INFORMATIONS EXEMPTION CLAUSES Toshiba Corporation bears no responsibility...

Страница 7: ...Computer settings 41 Projecting images stored in a memory PC card 42 Memory PC cards 42 JPEG files 43 Setting slideshow options 43 Automatic demonstration 45 Playing a slide show from a thumbnail list 46 Checking the projector status 48 Status display 48 Installing the applications 49 Using the Wireless Utility 50 Displaying a computer s screen via the projector 50 Displaying a JPEG image saved on...

Страница 8: ...ctions of the wireless LAN PC card Installing Acrobat Reader Windows Run the CD ROM select the Reader English folder and run ar500enu exe Follow the on screen instructions Macintosh Run the CD ROM select the Reader English folder and run Reader Installer Follow the on screen instructions to install the software Viewing the manual Run the CD ROM and double click on Start pdf Acrobat Reader launches...

Страница 9: ...17 VIDEO terminal Input video signals from video equipment 18 AUDIO L R terminal Input audio signals from video equipment 19 USB terminal Provided for servicing purposes only Do not use for any connection 20 Antitheft lock hole Attach a safety cable or any other antitheft device Note Although this owner s manual abbreviates component video signals as Y PB PR the product also supports signals from ...

Страница 10: ...the remote control Operating the projector from the front Approx 15 Approx 5m Operating the projector from the rear Approx 15 Approx 5m Loading dry cell batteries into the remote control q Remove the battery cover w Insert the dry cell batteries Be sure to align the plus and minus ends of the batteries properly Two batteries R6 SIZE AA are used e Replace the battery cover 2 1 Dry cell batteries Be...

Страница 11: ...ted correctly the CARD indicator comes on in green How to use the PC card slot The wireless LAN PC card enables you to connect the projector wirelessly with a personal computer that supports IEEE802 11b based wireless LAN p 34 Please note that commu nication between all the computers based on IEEE802 11b and this projector is not guaranteed You can also use a commercially available memory card to ...

Страница 12: ...ng lamp During internal cooling After cooling complete A B C Orange Orange Green Green Off Orange Flashing Green Off Off A During cooling the LAMP indicator flashes In this state the power cannot be turned back on B After the LAMP indicator goes off the cooling fan continues to operate for a short while in order to expel excess internal heat If you are in a hurry there is no problem with unpluggin...

Страница 13: ...urkish Japanese Chinese simplified Chinese traditional Korean 5 Projector placement angle adjustments The placement angle and the height of the projected image can be adjusted by the foot adjuster q Lift up the front of the projector to the desired angle then press the foot adjuster release button The foot adjuster extends Release the button to lock the position w To adjust the horizontal angle us...

Страница 14: ...djustment and the content of images some information may be lost or the picture quality may suffer Keystone adjustment is available for the keystone distortion in a slant angle of 15 degrees Using handy features Control panel Remote Control Before correction After correction Manual adjustments and settings The menu items of the Set up menu vary depending on the input type as shown in the table bel...

Страница 15: ...gs using the operation buttons p 16 on the control panel main unit side and remote control How to use the menus The menu shown below is for operation instructions purposes and might differ from the actual display Using the menus Note Menu adjustments and settings are saved when the power is turned off via the ON STANDBY button If the power cable is disconnected before this or the power goes out th...

Страница 16: ... No Yes No US NTSC US mode Japan NTSC JAPAN mode 1 Tint and NTSC mode can be displayed and adjusted only when the video signal is set to NTSC and NTSC4 43 NTSC mode is set to JAPAN when the language is set to Japanese It is set to US for other languages Using the menu Continued The display setting menu Use this menu to set screen display related items Full Display with 1024 768 dot resolution Thru...

Страница 17: ...tc Note The displayed information will not be refreshed if the status changes To refresh the information dismiss the display then display it again The default setting menu This menu shows placement status and other settings Sets projection mode in accordance with Placement Style Set the timer to wait for the power to be turned off after signal input stops Press Switch with and Off not turned off 1...

Страница 18: ...eason confirm the specifications of your computer for the distance that the radio wave can reach The coverage of this projector may vary depending on the computer and the surrounding environment When tested with a PC manufactured by Toshiba with built in wireless LAN system the coverage is approximately 60 m with an unobstructed path between the projector and computer placed indoors This figure is...

Страница 19: ...the menu These marks signify that options can be selected by using The figure shows a typical example As the display may differ depending on the item use the following pages as a reference Item Setting Value Option Display the Wireless Card menu Displayed only in Wireless Card input mode 4 Back Press the RETURN button How to enter characters Use the numeric keypad on the remote control to enter ch...

Страница 20: ... security may be compromised due to access by a third party using the Wireless Utility within the projector s possible communication area Before using the projector therefore be sure to set SSID to a character string different from the default Note 2 When you use the Ad hoc communication mode if there is a similar SSID network group for example DPJ DPJ1 DPJ2 etc in the possible communi cation area...

Страница 21: ...ng menu when Browser authentication is set to On Specify a string of arbitrary characters 1 to 8 characters Enter the setting mode Move from digit to digit to Enter the string Accept Select whether to automatically send error information to a specified e mail address if an error occurs for example when the lamp has blown On Off Set the IP address of the SMTP server Enter the setting mode Move from...

Страница 22: ...ted file extensions are jpg JPG jpeg and JPEG 2 The maximum number including both folders and files is 512 3 Some JPEG files are not supported by this projector The limitations in 3 above can be alleviated by converting the JPEG file with the supplied JPEG Conversion Tool p 55 software application Setting slideshow options Slideshow is the function to display the JPEG image files stored in a memor...

Страница 23: ...s from both sides over the current slide Blind Display the next slide as if it opened like a window blind over the current slide Play icon The slideshow icon can be displayed Standard The projector handles the slideshow icon as follows depending on the On Off setting of Icon on the projector s menu Icon On The projector displays the icon upon the start of playing a slide show and turns it off afte...

Страница 24: ...ile names have the same number of characters they are ordered numerically if numbers are used in the file name and alphabetically otherwise It is possible to give presentations without using a computer by converting presentations created with Microsoft PowerPoint into JPEG files using the JPEG Conversion Tool and storing them on a memory PC card p 57 Note however that functions such as animation e...

Страница 25: ... provide the GPL covered source code of the software in accordance with the terms of GPL2 Contact AXE if you need it An OS of axLinux is a registered trademark of AXE Inc If you will use the wireless LAN PC card function install the application on the supplied CD ROM onto your computer System Requirements Supported OS Windows 2000 Windows XP CPU Pentium III 750 MHz or higher recommended RAM 256 MB...

Страница 26: ... window only The desktop and a list of running applications are displayed Select the desired application from this list If the desired application is not on the list launch it Note that if too many applications are running it will consume the computer s resources which could slow communication speed 5 Select the projector to be transmitted The IDs of projectors accessible for communication will be...

Страница 27: ... case as well the selected file is added to the file pull down list Transmission File field s 5 Select the projector to be transmitted The IDs of projectors accessible for communication will be listed If projector name has been set up already it is shown instead of the MAC address Select the checkbox of the projector to be transmitted to from this list Then icon is displayed on the projector s scr...

Страница 28: ...can be displayed by sending them using the wireless LAN PC card p 52 or saving them on a memory PC card p 42 Launching the JPEG Conversion Tool The window shown in the figure to the right appears on the computer screen Drag the Image Quality Settings slider to the left or right to set the image quality of the file after conversion Lower values create smaller files but lower the image quality It is...

Страница 29: ...PEG Conversion Tool window click on the Conversion button b A confirmation dialog box opens Click Yes The computer begins to convert the file When it finishes a message appears informing you that a JPEG file has been created 1 2 4 9 a 1 2 4 9 a 3 b 3 a 6 8 a 6 8 a 5 5 7 a 7 b 7 b 8 b 8 b 9 b 9 b Making a presentation with converted JPEG files 1 Copy the folder created by the JPEG Conversion Tool o...

Страница 30: ...o make various settings on the wireless card menu When Browser authentication has been set to On access to the setup page requires the input of the password Status Display Displays some states of the projector Features Introduces the functions available in wireless card input mode Projector name Enter a character string and press the Set button and it will be set as the projector name Top Returns ...

Страница 31: ... text input fields Status Display Displays some states of the projector Projector Displays the contents of status display in the menu Wireless Card Displays the contents of status display in the Wireless Card menu Maintenance Describes an error if it occurs for example when the lamp has blown Features Introduces the functions available in Wireless Card input mode Slide Show Wireless Utility ...

Страница 32: ...ay vary greatly by lamp Some may explode shortly after first use Free replacement is available if the lamp explodes within the warranty period Contact the dealer from whom you purchased the product in such a case Explosion is likely to happen if the lamp is used after the replacement period has elapsed When the lamp explodes the broken pieces of glass may get inside the product or be released outs...

Страница 33: ... wait for a short while then turn the power back on If the above action will not clear the problem unplug the power cord and contact your dealer After approx one minute of abnormal display the projector returns to the standby state waiting for internal cool down PRECAUTION Make sure to unplug the power cord if something goes wrong Trouble indications Others Used Lamps This projector s lamps contai...

Страница 34: ...or Is the lamp cover loose p 63 Is the ambient temperature high p 65 Is the air intake or air exhaust blocked p 65 Is the projector turned on p 24 Is the mute function on p 28 Is the brightness setting minimized p 30 Are the connections set up correctly p 20 Are all the connected devices functioning properly Is the projector turned on p 24 Is the mute function on p 28 Is the volume setting minimiz...

Страница 35: ...ge without notice for improvements etc Connection terminal List of supported signals RGB signals This projector supports the following RGB signals Note however that depending on the computer model the screen may show flicker or streaking Please adjust the projector if this happens Press the SET UP button and adjust automatically or manually p 26 p 27 Resolution 720 400 640 480 800 600 832 624 1024...

Страница 36: ...10 GND 11 GND 12 N C 13 Horizontal sync signal 14 Vertical sync signal 15 N C Specifications Continued Do not connect anything CONTROL terminal Pin assignment 7 6 8 5 4 3 2 1 Signal Name RXD CTS DSR GND RTS N C TXD GND Pin No 1 2 3 4 5 6 7 8 Description Receiving data Consent to send Data set ready Signal ground Request to send No connection Sending data Signal ground Mini DIN 8 pin connector Inte...

Страница 37: ......

Отзывы: