‒
2
‒
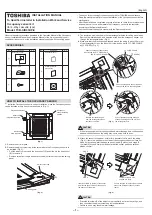
HOW TO WIRING THE OCCUPANCY SENSOR
1.
Remove the mounting screw A on the electric control box cover and loosen the
screw B. Slide the cover inward to remove the hook (the electric control box
cover remains hooked on the hinge).
Screw B
Screw A
Hook
Electric control
box cover
Hinge
2.
Connect the wiring from the Occupancy sensor to the connector 9P (CN214:
white) on the PC board of the indoor unit.
Use the cord clamp inside the electrical parts box to process the excess wiring,
and then attach the electric control box cover and air inlet grille.
Clamping claw
Plug into CN214
Cord
Clamp
NOTE
• If you do not connect the connector, the Occupancy sensor will not operate,
so be sure to connect it securely.
• Do not bundle these control signal wires with the power wire to avoid malfunction
CODE NO. (DN) SETTING
Wired remote controller (RBC-AMS5
名
E*)
Perform the advanced settings for the air conditioner. Carry out the setting operation
while the indoor unit is stopped. (Turn off the air conditioning unit before starting the
setting operation.)
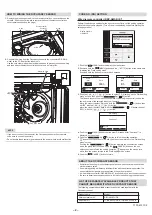
6.Setting timer operation mode
Field setting menu(2/2)
Return
Set
7.DN setting
8.Reset power consumption data
Display example
of AMS55E*
1.
Push the [
MENU] button to display the menu screen.
2.
Push and hold the [
MENU] button and the [
] button at the same time
to display the “Field setting menu”.
Push and hold the buttons for more than 4 seconds.
DN setting
Code
(DN)
Data
Return
B5
0000
Fix
<
>
DN setting
Code
(DN)
Data
Return
B5
0001
Fix
<
>
3.
Push the [
] / [
] button to select “7. DN setting” on the “Field setting
menu” screen, then push the “
Set” [
F2] button.
The fan and louver of the indoor unit operate. When the group control is used, the
fan and louver of the selected indoor unit operate.
Move the cursor to select “DN code” with the “
<” [ F1] button, then
set “B5” with the [
] / [
] button.
Move the cursor to select “data” with the “
>” [
F2] button, then set
“0001” with the [
] / [
] button.
Return
Continue?
No
Yes
DN setting
4.
Push the [
MENU] button to set the other DN codes. After “Continue?” is
displayed on the screen.
5.
Push the “
No” [ F2] button to
fi
nish the setting operation.
“ ” appears on the screen for a while, then the screen returns to the “Field setting
menu” screen.
Pushing the “
No” [ F2] button displays the unit selection screen
when the group control is used. Push the [
CANCEL] button on the unit
selection screen to
fi
nish the setting operation. “ ” appears on the screen for a
while, then the screen returns to the “Field setting menu” screen.
6.
Push the [
CANCEL] button to return.
ABOUT THE OCCUPANCY SENSOR
• Sometimes the sensor may not detect people even when they are present if their
movements are small.
• If something having a difference in temperature with the surroundings moves, the
sensor may detect people as present even if they are not present.
• A wired remote controller (RBC-AMS5
名
E*) is required to use an occupancy sensor.
• Be sure to install an occupancy sensor in all indoor units if using group operation.
LIST OF SEPARATELY AVAILABLE PRODUCTS THAT
CANNOT BE USED WITH THE OCCUPANCY SENSOR
The following separately available products cannot be used together with the
Occupancy sensor.
Product name
Wireless receiver kit
Air puri
fi
er kit
Model
RBC-AXU33UP-E
TCB-EAPC1UHP-E, TCB-EAPC1UCP-E
1130615102


