Страница 1: ... BA IIII IIIIIII III IIIII IIII IIIIIII Carrier AIR CONDITIONER SPLIT TYPE Install i ual Model name TC P22C L Installation Manual Air Conditioner Split type Manuel D installation Climatiseur Type split 2 12 ...
Страница 2: ...UL TCB KP22CUL sold separately If using a piping kit procured locally it may cause a water leak or so on This Air Conditioner is a new type which adopts a new refrigerant HFC R410A instead of the conventional refrigerant R22 in order to prevent destruction of the ozone layer CONTENTS Accessory parts and Parts to be procured locally 3 1 2 3 4 5 PRECAUTIONS FOR SAFETY 4 PREPARATION FOR INSTALLATION ...
Страница 3: ...manual 4 _ 2 Parts to be procured locally Usage For mounting Drain Pump Kit For connecting vinyl chloride pipe of Dain Pump kit For thermal insulation of drain hose Be sure to hand to users For fixing drain hose For thermal insulation of drain hose connecting section For sealing upper piping hole of indoor unit For fixing Drain Pump Kit For fixing fixture of Drain Pump Kit For fixing wires 17 Spec...
Страница 4: ... connecting cable is connected in a wrong way electric parts may be damaged When moving the air conditioner for the installation into another place be very careful not to enter any gaseous matter other than the specified refrigerant into the refrigeration cycle If air or any other gas is mixed in the refrigerant the gas pressure in the refrigeration cycle becomes abnormally high and it resultingly...
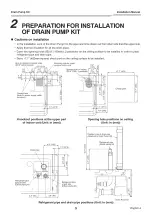
Страница 5: ... installed Hole for remote controller wires O1 6 40 knockout _ 8 5 216 _ 1 5 2 4 3 3 __ 110 7_6 Cond Hole for power supply cable knockout Knockout hole for upper piping of indoor unit 532_ Opening hole on ceiling 1 1 27 5 z _5 o _o c4 41 1 27 5 _ 7 9 200 17 7 450 Check port S LO b_ Knockout positions at the upper part of indoor unit Unit in ram Opening hole positions on ceiling Unit in ram 4 3 109...
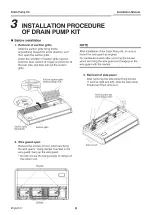
Страница 6: ... guard as original Do maintenance work after removing the screws which are fixing the wire guard and hanging up the wire guard with the clamps Pull out suction grille while pushing hook 3 Removal of side panel After removing the side panel fixing screws 1 each at right and left slide the side panel forward and then remove it Removing the side panel fixing screws Suction grille Suction grille fixin...
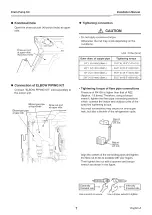
Страница 7: ...t port at liquid side at upper side Elbow type pipe at gas side Tightening torque of flare pipe connections Pressure of R410A is higher than that of R22 Approx 1 6 times Therefore using a torque wrench tighten the flare pipe connecting sections which connect the indoor and outdoor units of the specified tightening torque Incorrect connections may cause not only a gas leak but also a trouble of the...
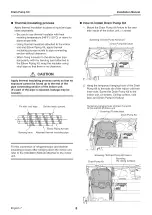
Страница 8: ...nit if a part of the pipe is exposed leakage may be caused How to install Drain Pump Kit 1 Mount the Drain Pump Kit fixture to the rear side inside of the indoor unit 1 screw I Screwing of Drain Pump Kit fixture _ _Pump Kit fixture eX _Jl _ _ Hang the temporary hanging hook of the Drain Pump Kit to the side slit of the indoor unit from inner side Screw the Drain Pump Kit to the indoor unit 3 screw...
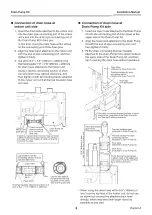
Страница 9: ...on the other side at the upper side Connection of drain hose at Drain Pump Kit side 1 Insert the drain hose attached to the Drain Pump Kit into the connecting port of drain pipes at the upper side of the Drain Pump Kit 2 Align the hose band attached to the Drain Pump Kit with the end of pipe connecting port and then tighten it firmly 3 Fit the drain connecting thermal insulator attached to the Dra...
Страница 10: ... 9 100ram order to prevent waving __5 y__ VP25 VP30 or more Set the collective piping as shown in the right figure Be sure not to apply force to the connecting part of the drain pipe 4 1t to 6 7 1 5m 2m q 1_ Support _i racket Heat 1 100 or more ll insulator downward I IArched NO GOOD VP25 II Trap _ _ExExtended ___ i ventilating pipe Downward slope 1 100 or more The hard vinyl chloride pipe cannot ...
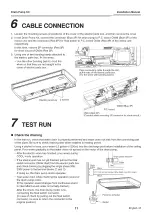
Страница 11: ...ot leak from the connecting part of the pipes Be sure to check draining also when installed in heating period Using a pitcher or hose pour water 0 3 galoon 1200cc into the discharge port before installation of the ceiling panel Pour water gradually so that water does not spread on the motor of the drain pump After the electric work has finished pour water during COOL mode operation If the electric...
Страница 12: ...CB KP22CUL vendue s6par6ment En utilisant une tuyauterie procur6e sur place vous risquez de provoquer des fuites d eau etc Ce climatiseur est d un type in6dit qui utilise le nouveau r6frig6rant HFC R410A au lieu du r6frig6rant traditionnel R22 afin d eviter la destruction de la couche d ozone Pi_ces accessoires et pi_ces non fournies 13 1 2 3 4 5 6 7 MESURES DE SECURITE 14 PREPARATION POUR L INSTA...
Страница 13: ...x utilisateurs Collier de fixation du tuyau _ d evacuation flexible 2 Pour fixer le tuyau d evacuation flexible Isolant thermique pour la section 2 _ _ Pour I isolation thermique de la section de raccordement du de raccordement de I evacuation _ tuyau d evacuation flexible Isotant thermique du panneau 1 _ Pour scetler I orifice de la tuyauterie sup ieure de I unite au ptafond _ int ieure Vis 4 _ F...
Страница 14: ...trocution Branchez correctement le c_ble de raccordernent Si le c ble de raccordement est mal branch les composants _lectriques peuvent s endommager Lorsque vous d_placez le clirnatiseur pour I installer ailleurs faites tr_s attention ace qu aucun corps gazeux autre que le r_frig_rant sp_cifi_ n entre darts le circuit de r_frig_ration Si I air ou tout autre gaz se m_lange au r_frig_rant la pressio...
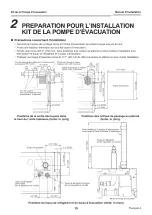
Страница 15: ...de passage des c bles de la tel6commande Orifice de passage du tuyau I unite interieure _ o _ 6 1 passage de O1 6 40 8 5 216 J superieur de 5 2 15 2 _ z_9 _ z52 4 3 3q t ov o Orifice de passage au plafond _ _CI Trou de la gaine J JlII trou de passage du c ble I II II d alimentation defoncer J i lil 17 7 450 Trappe d inspection t Positions de la sortie des tuyaux darts le haut de I unit6 int6rieure...
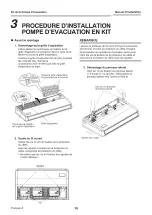
Страница 16: ...st termin6 montez la protection du c ble d origine Accomplissez les op6rations d entretien apr6s avoir retir6 les vis de fixation de la protection du c ble et accroch_ la protection du c ble avec les agrafes 3 D6montage du panneau lat6ral Otez les vis de fixation du panneau lateral 1 droite et 1 gauche faites glisser le panneau lateral vers I avant et 6tez le Otez les vis de fixation du panneau la...
Страница 17: ...fice de sortie dans le haut Couple de serrage des raecords des tuyaux _vas_s La pression du R410A est sup6rieure celle du R22 d environ 1 6 fois Par cons6quent I aide d une cl6 dynamom6trique serrez bien les sections de raccordement des tuyaux 6vas6s reliant les unit6s int6rieures et ext6rieures jusqu au couple de serrage sp6cifi6 Les raccordements incorrects provoqueront non seulement une fuite d...
Страница 18: ...d evacuation ATTENTION Appliquez soigneusement I isolant thermique en recouvrant entierement route la tuyauterie jusqu la section de raccordement du tuyau de I unite interieure routepattie de tuyau non isolee risque de provoquer des fuites Fixez avec du Placez I encoche ruban adh_sif vers le haut 2 Suspendez le crochet de suspension provisoire Kit de la Pompe d 6vacuation par I int ieur du c6t6 de...
Страница 19: ...ation Tuyau flexible fixe a Kit de la Pompe d evacuation Isolant thermique de la section de raccordement de I evacuation fixe A Kit de la Pompe d evacuation Orifice de raccordement du tuyau d evacuation o o Tuyau d evacuation souplefourni ContrSlez si le Bac d evacuation Bac de Kit de la Pompe r6cuperation de I extremit6 du bac d evacuation I unite interieure de recup6ration Alignez les colliers d...
Страница 20: ...1 5 m 2 m pour 6viter qu il n ondule _ _ Posez les tuyaux collectifs de la v_z_ fagon illustr6e sur la figure de droite Assurez vous de n exercer auoune force sur la section de raccordement du tuyau d 6vacuation Le tuyau en chlorure de vinyle dur ne peut pas re raccord_ directement sur I orifice de raccordement du tuyau d 6vacuation de I unit_ int ieure Pour effectuer le raccordement sur I orifice...
Страница 21: ...ds des tuyaux ne fuient pas Assurez vous de v6rifier 1 6vacuation 6galement Iors de I installation pendant la p6riode de chauffage A I aide d une cruche ou d un tuyau flexible versez de I eau 0 3 gallon 1200 cc dans I orifice de refoulement avant d installer le panneau pour plafond Versez I eau graduellement de sorte qu elle ne se r6pande pas sur le moteur de la pompe d 6vacuation L installation 6...
Страница 22: ...MEMO ...
Страница 23: ...MEMO ...
Страница 24: ...EH99866301 ...